Managing optimization schedules
- 15 Apr 2026
- 11 Minutes to read
- Print
- DarkLight
- Download PDF
Managing optimization schedules
- Updated on 15 Apr 2026
- 11 Minutes to read
- Print
- DarkLight
- Download PDF
Article summary
Did you find this summary helpful?
Thank you for your feedback!
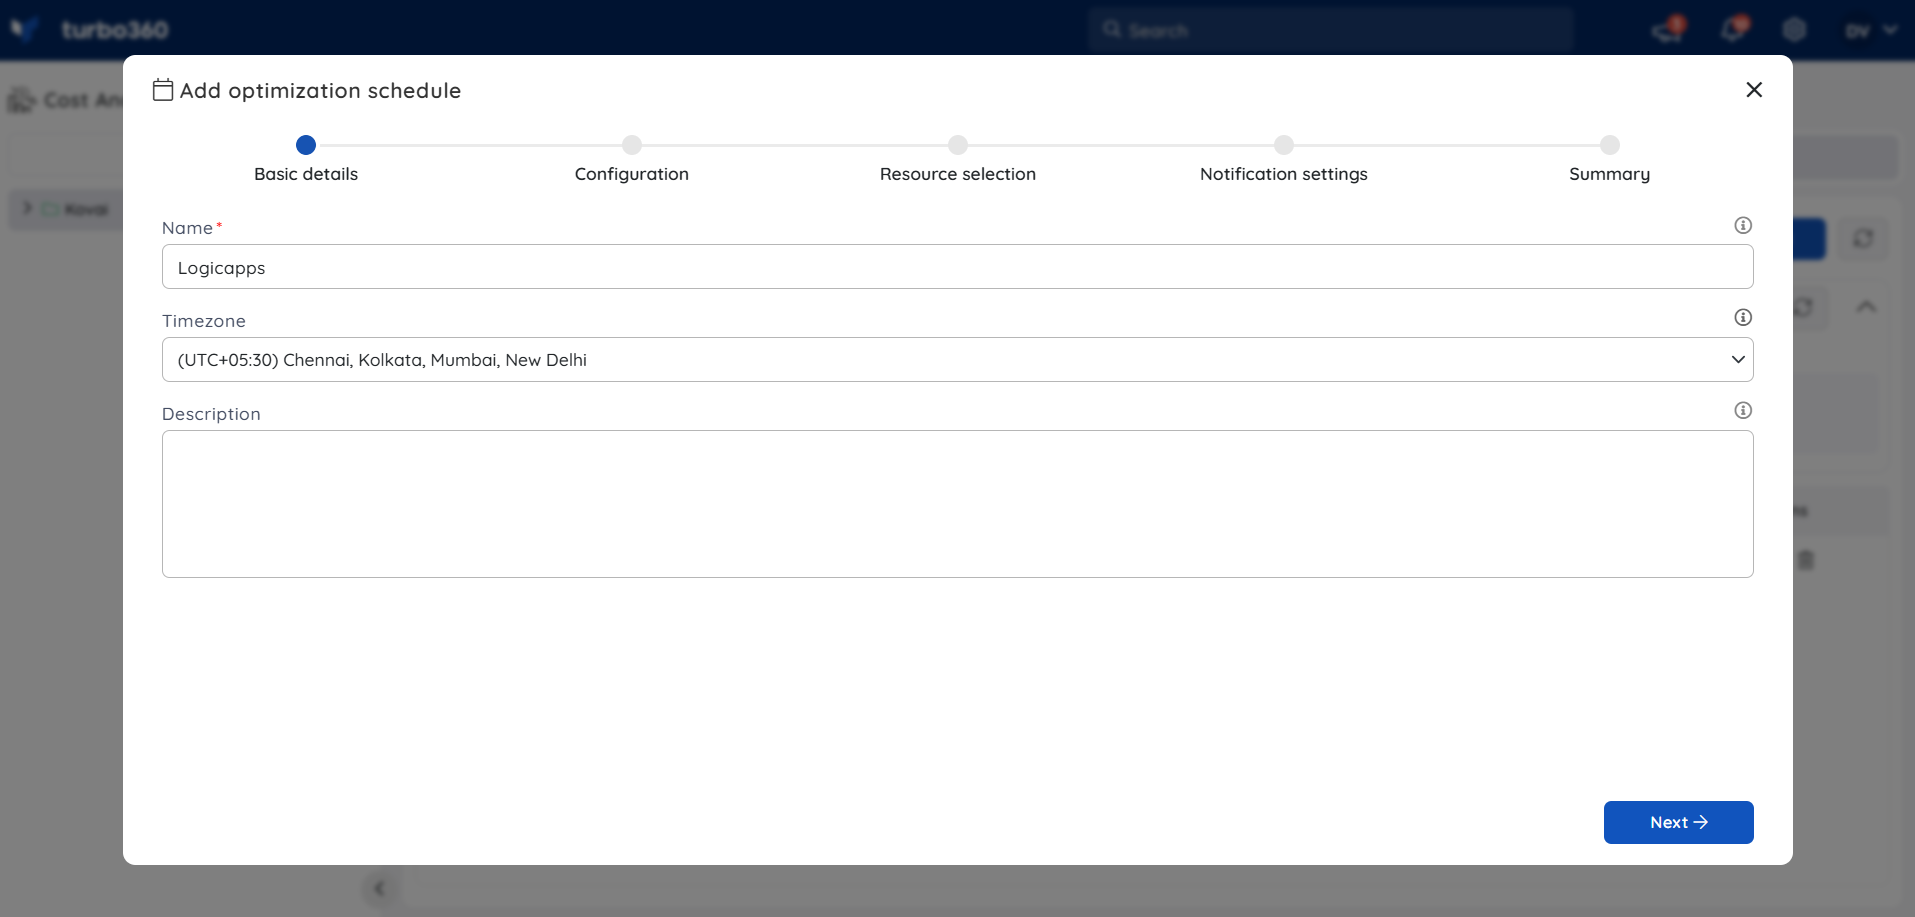
Create a Schedule
- Go to Optimization -> Schedules section in a Cost group.
- Click Add / Create optimization schedule.
- Enter a name for the schedule.
- Set a timezone based on which scheduling is to be performed.
- Click Next.
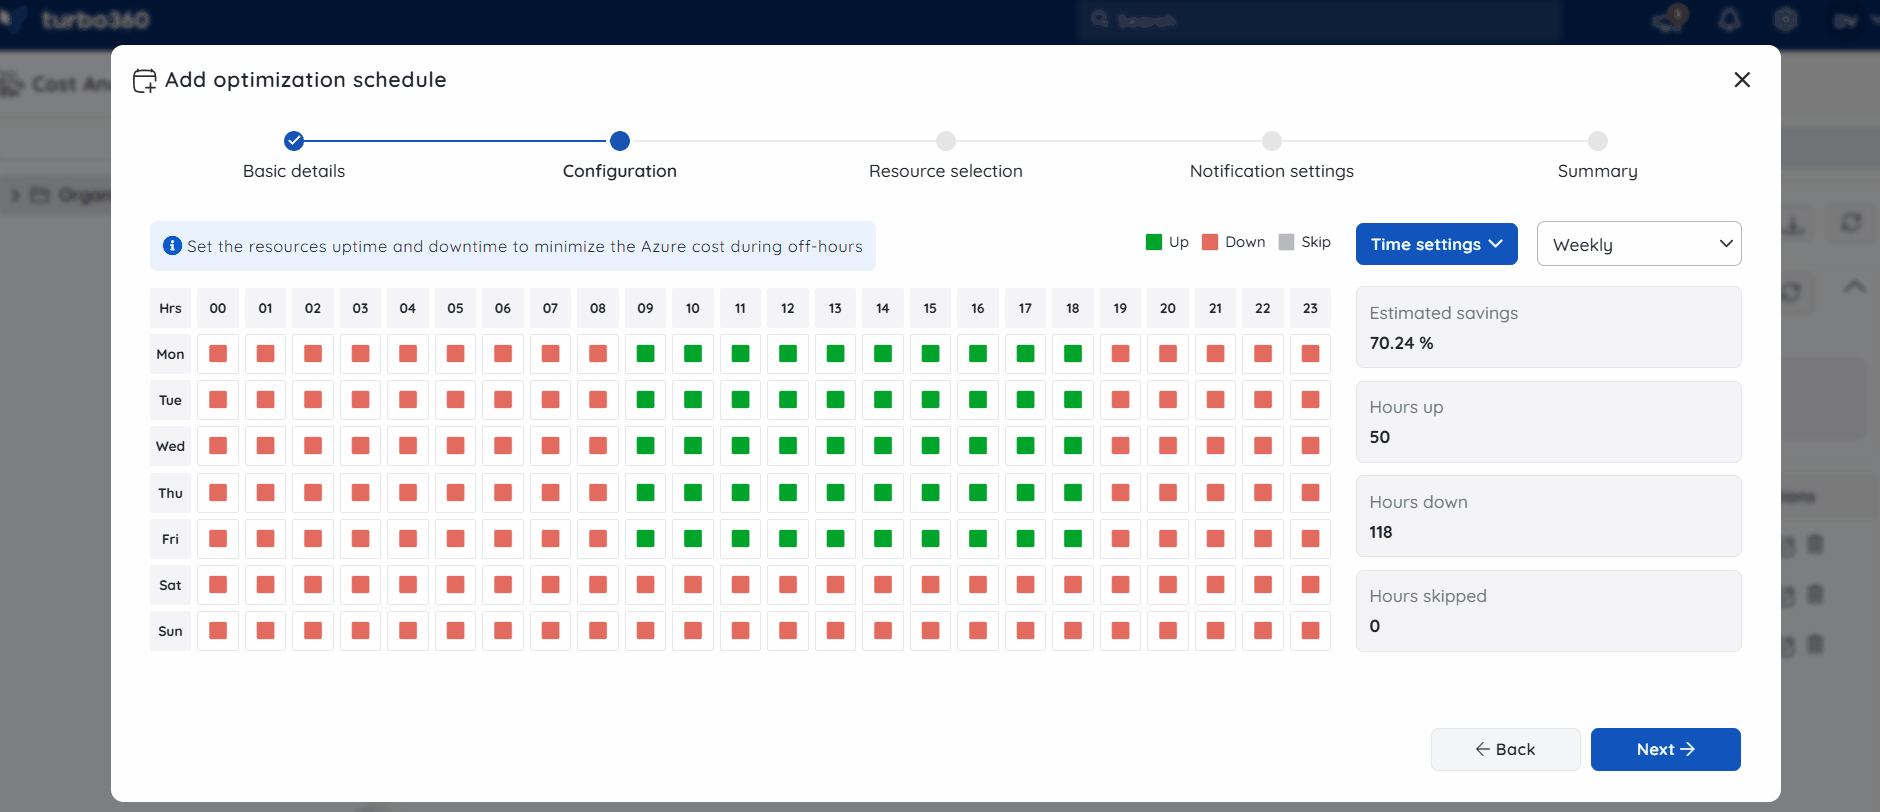
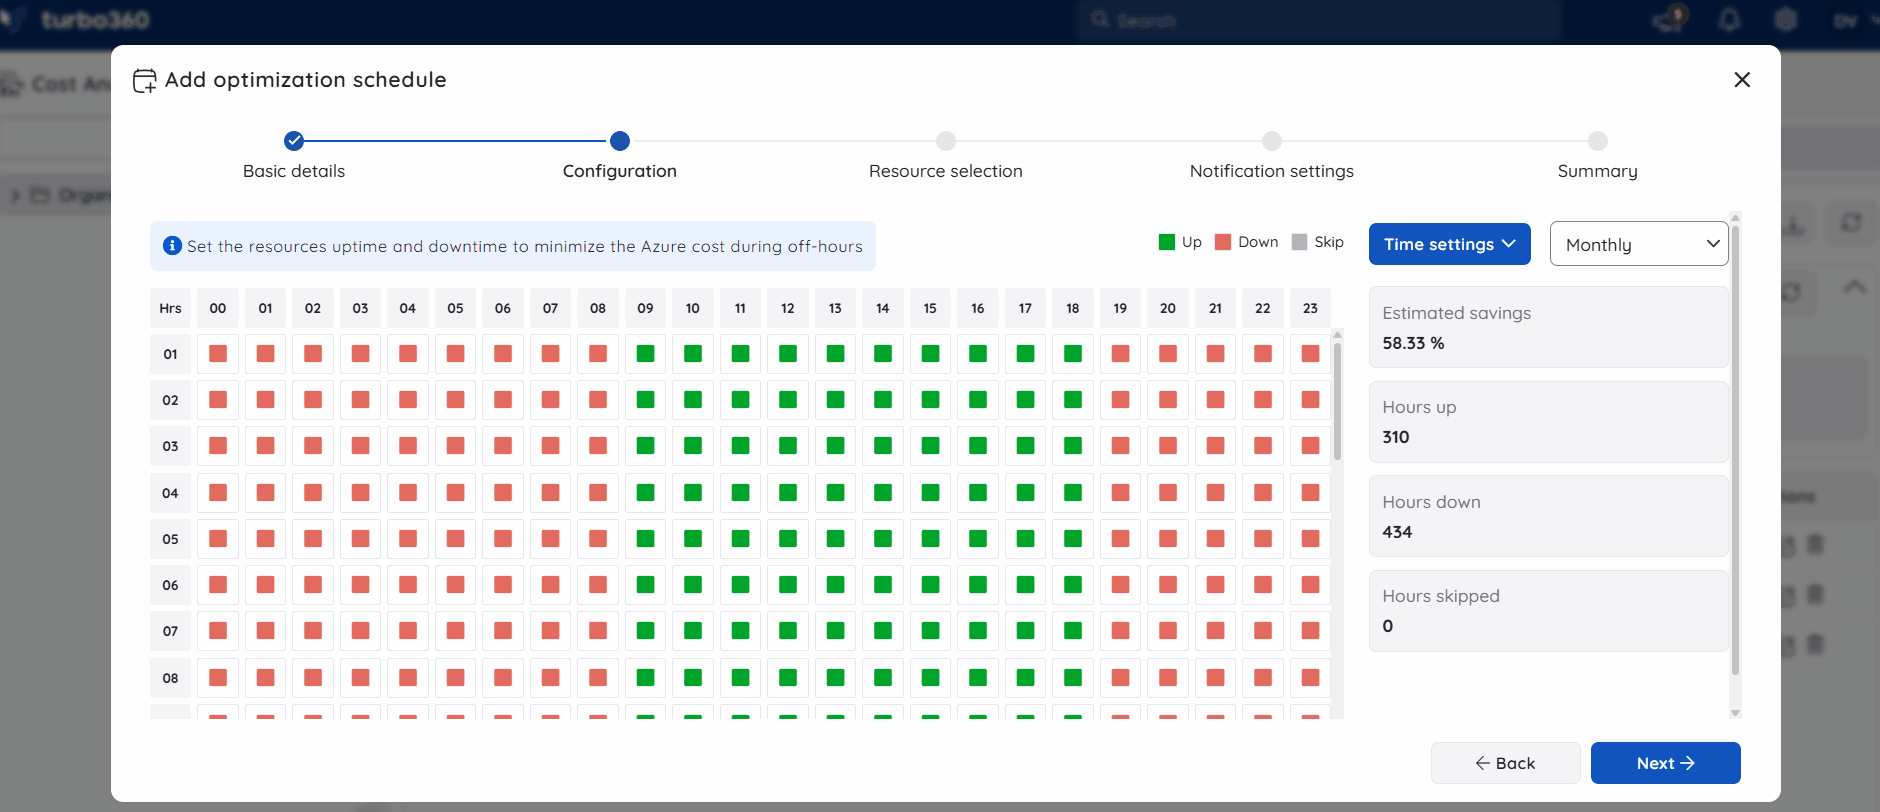
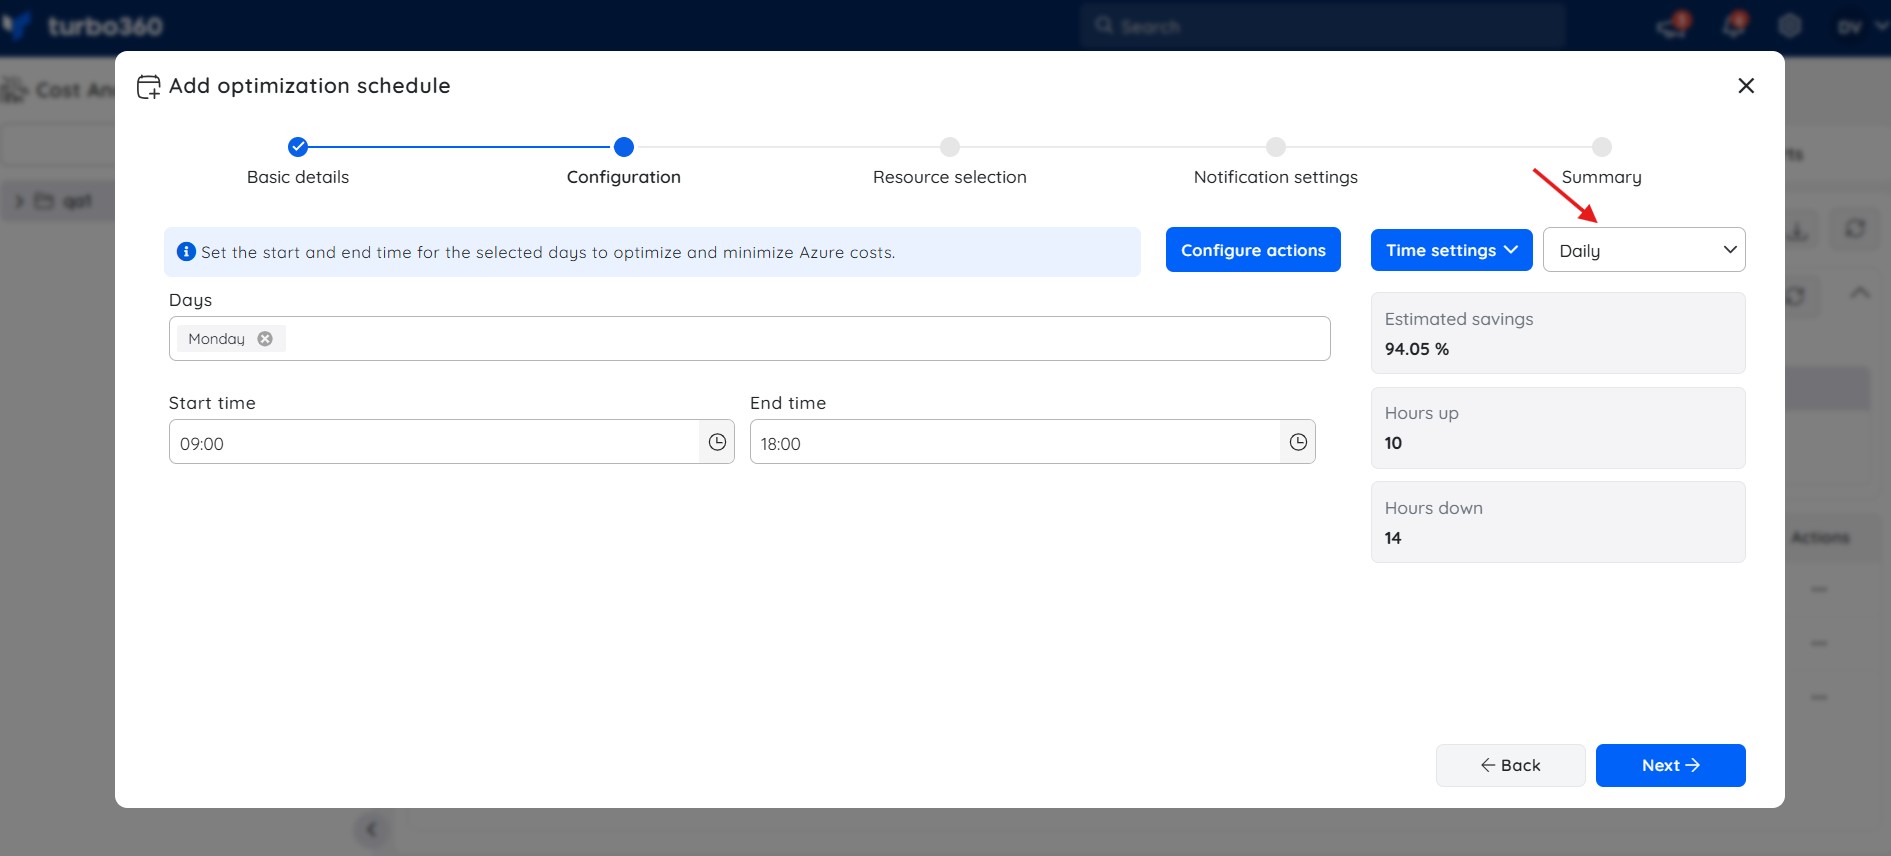
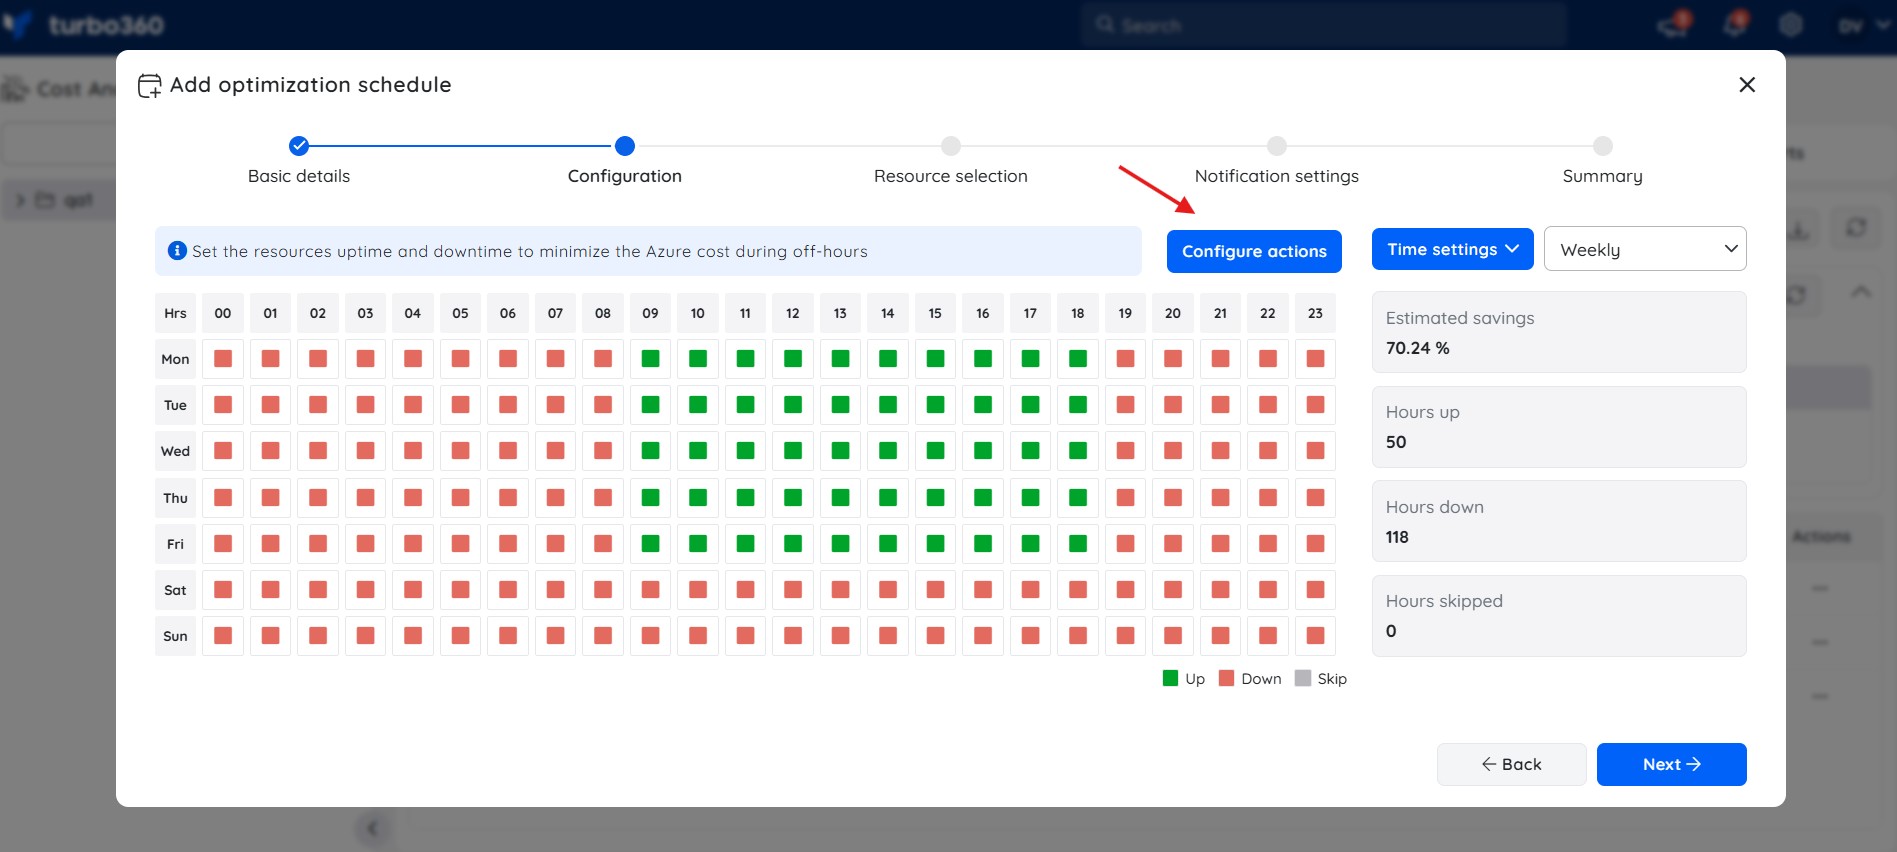
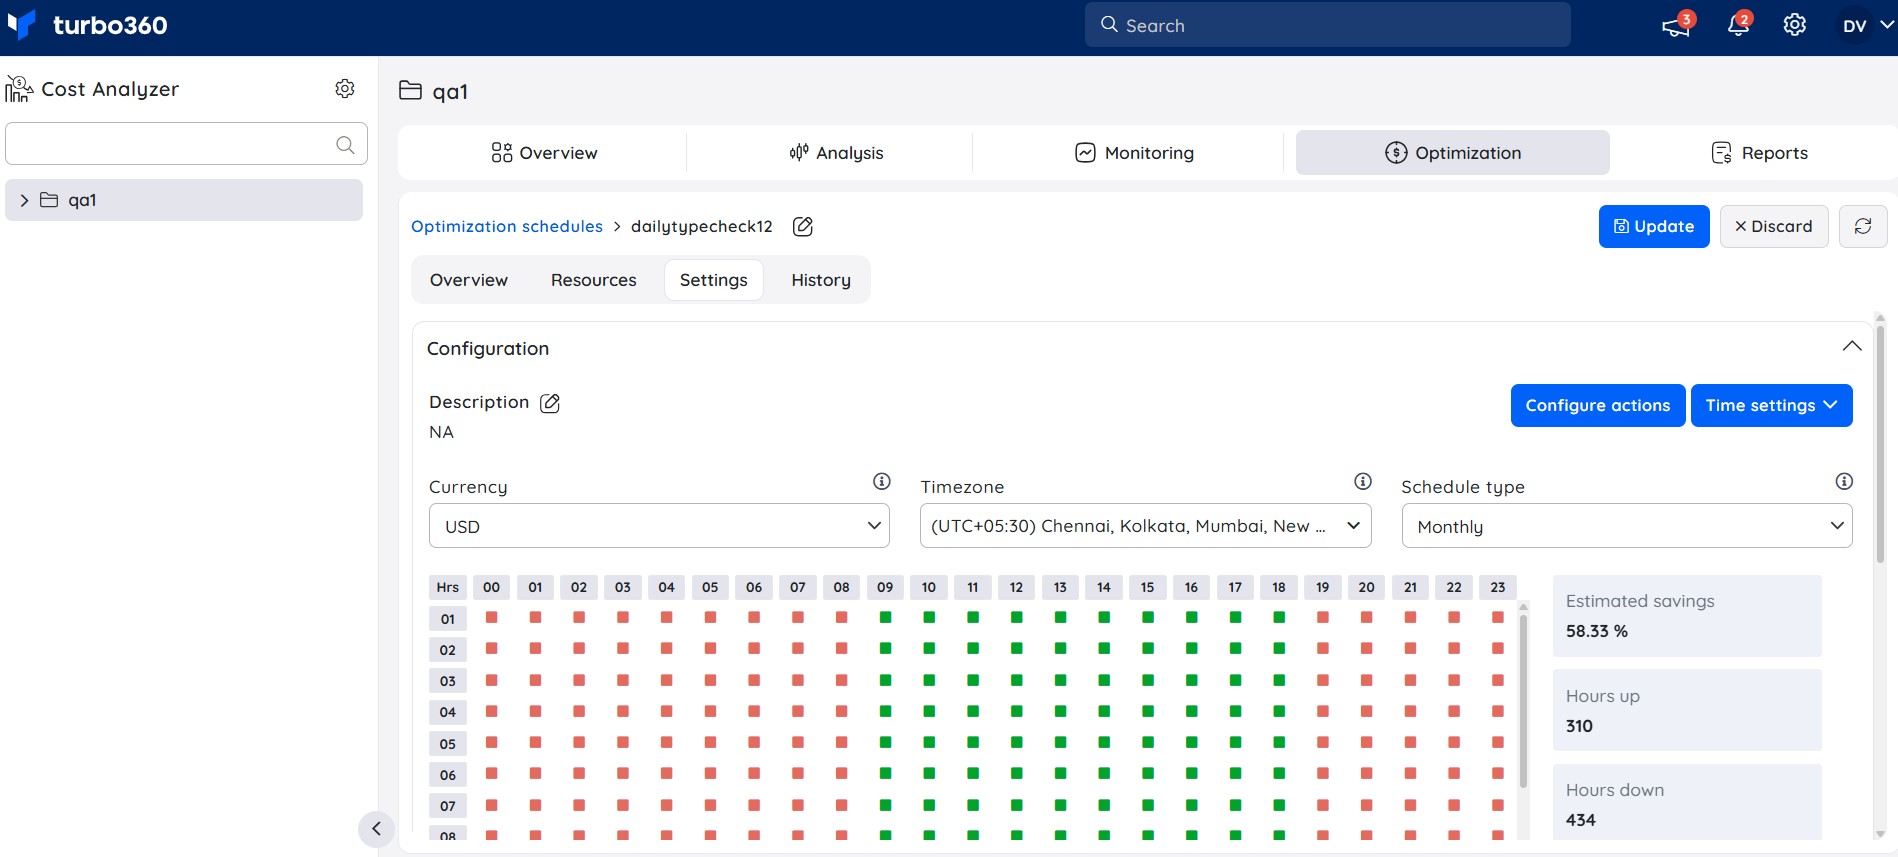
Scheduling configuration
- The next step is to specify the up, down, or skip hours for the selected schedule type for the associated resources, and set the recurrence as required.
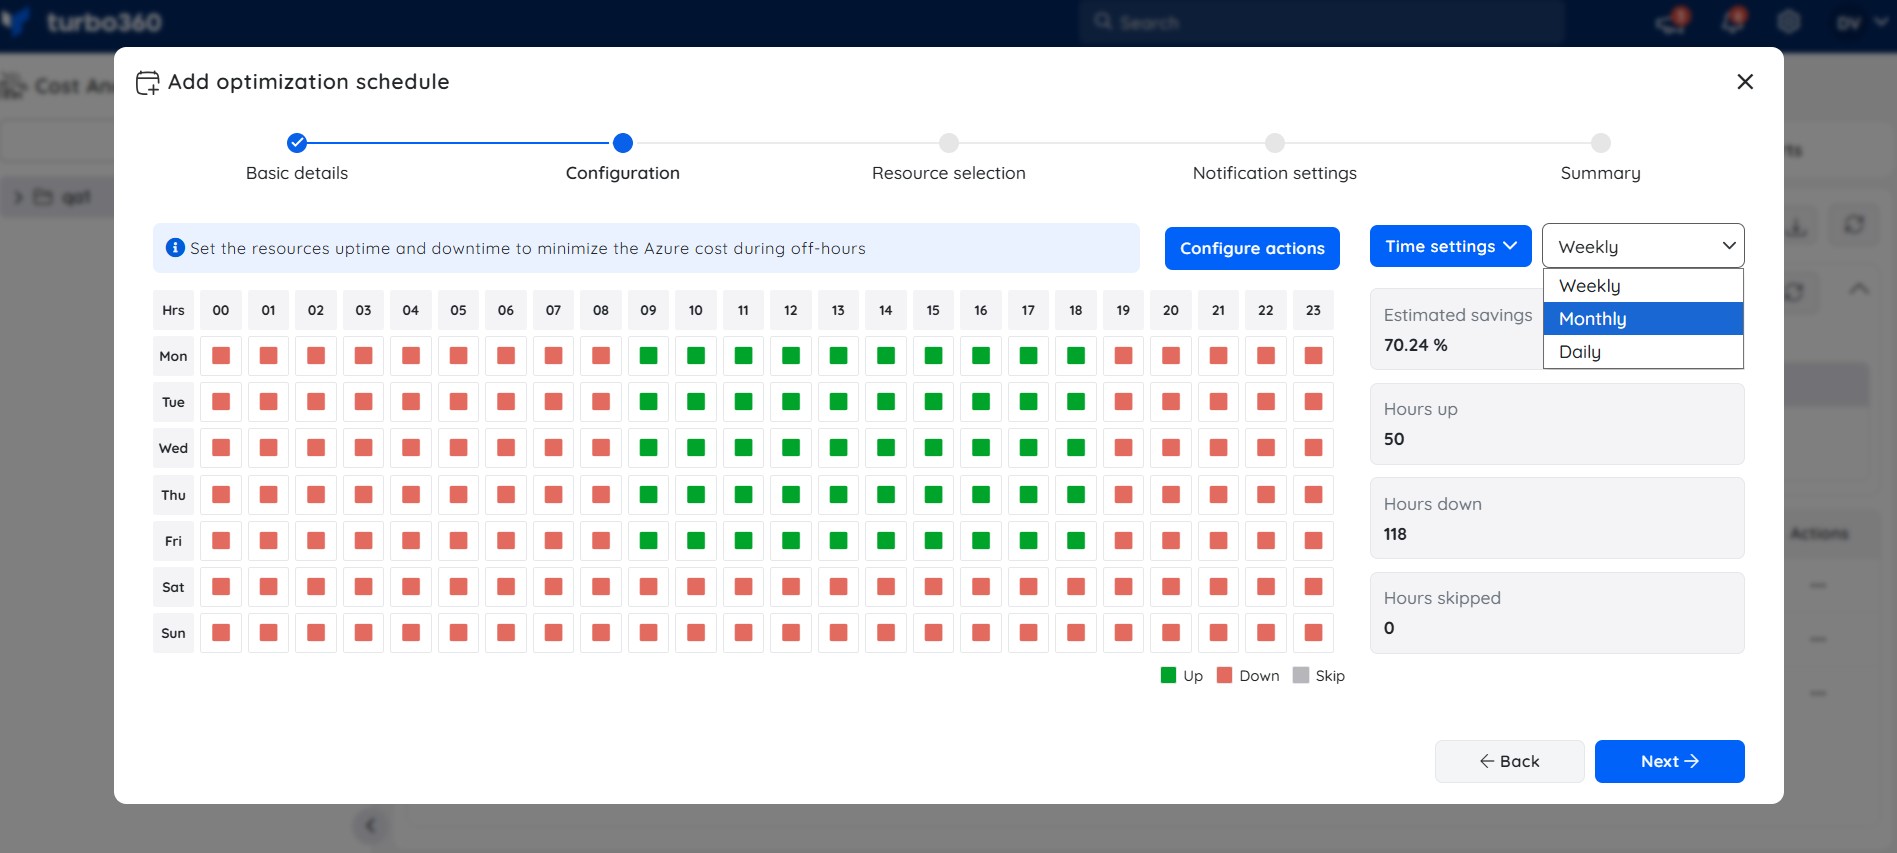
The optimization schedule includes 3 types for processing the associated resources, which are:
i) Weekly schedule: Enables the user to configure the resource's uptime and downtime on a weekly basis based on usage patterns.

Additionally, it enables users to set up recurrence, allowing the schedule to process automatically at regular intervals within the specified time range. Users can also define a custom recurrence pattern to match specific needs, such as repeating every second Wednesday and Friday.
ii) Monthly schedule: Enables the user to configure the resource's uptime and downtime on a monthly basis based on usage patterns.
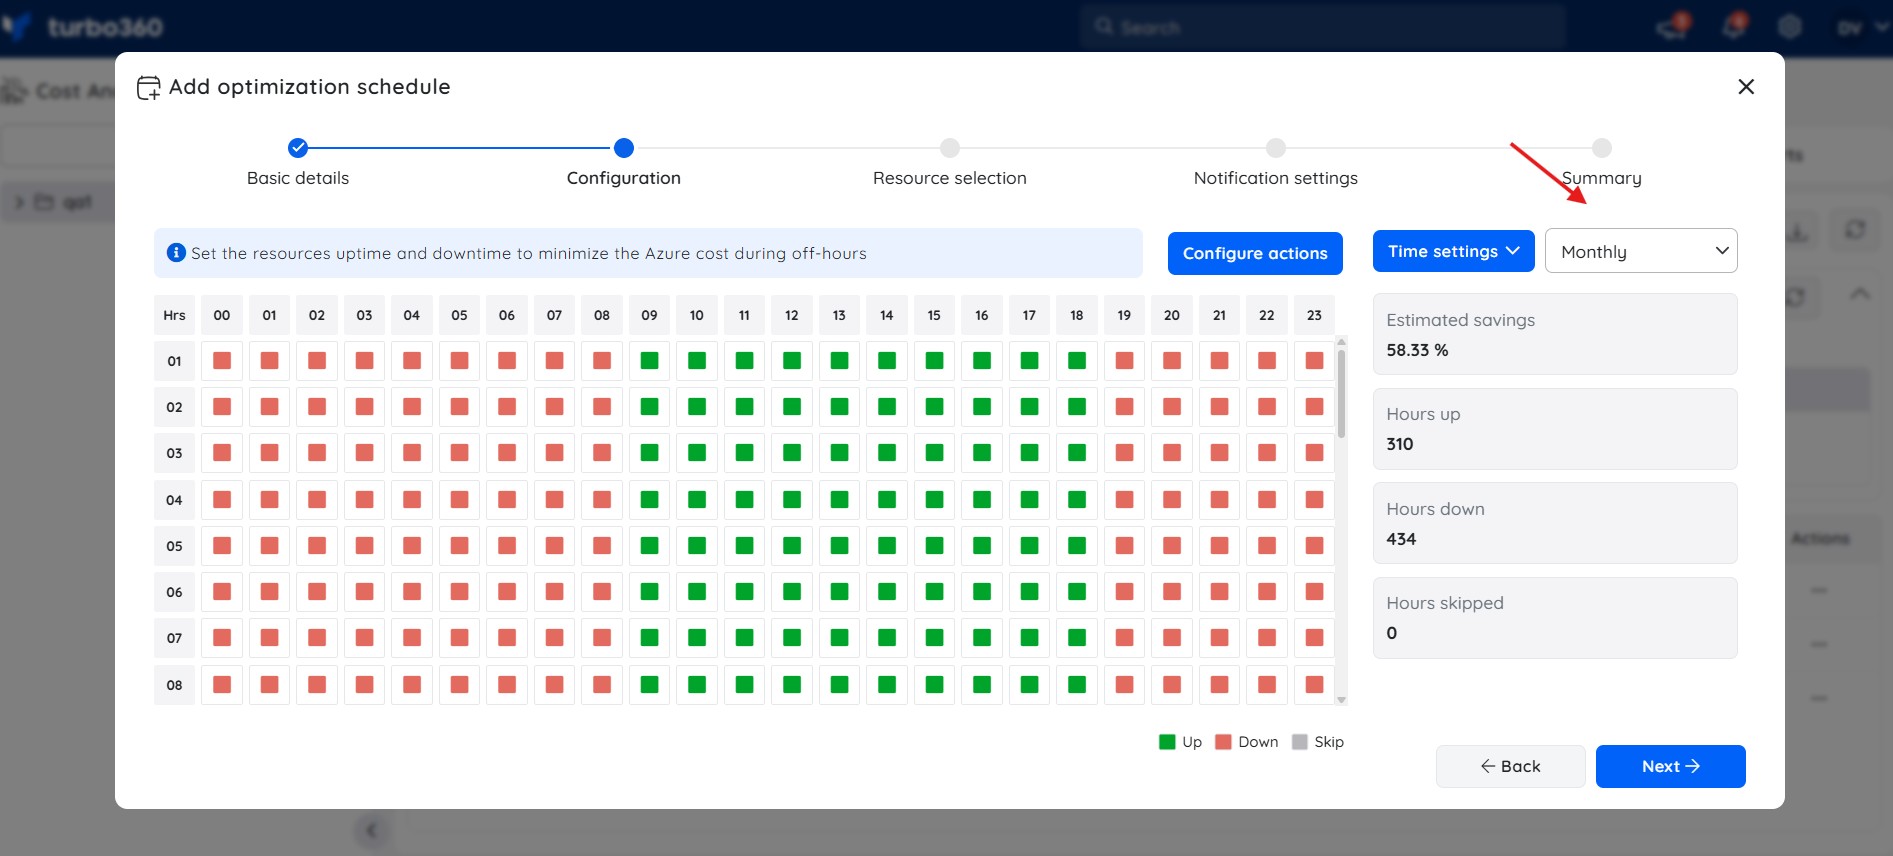
Additionally, it enables the schedule to repeat automatically at regular monthly intervals and offers the option to define a time range for ending the recurrence.
iii) Daily schedule: Allows the user to define the resource's start and end times for selected days to help optimize and reduce Azure costs.
During the start time, the resource is applied with the SKU specified in the up configuration or started, and during the end time, it is applied with the SKU specified in the down configuration or stopped.
Configure actions
The Configure actions feature in Optimization schedules enables users to trigger HTTP actions automatically before and after a schedule run. This allows seamless integration with external systems for notifications, validations, logging, or custom automation during schedule execution.
The Configure actions section includes two tabs that define when HTTP actions are triggered during the schedule lifecycle:
1. Before schedule run
Executes HTTP actions before the schedule processing starts.
Allows pre-run validations, notifications, or preparatory tasks.
2. After schedule run
Executes HTTP actions after the schedule processing completes.
Enables post-run notifications, reporting, or follow-up automation.
Configuration setup
Navigate to Optimization -> Schedules and add a schedule.
Open Configure actions and choose Before schedule run, After schedule run, or both.
Add one or more HTTP actions by providing the URI, message, and headers.
Default headers are added automatically (schedule name, group name, action type).
Custom headers can be added, and default headers can be removed if needed.
Save the configuration.
During execution, Before schedule run actions trigger before the schedule processing starts and After schedule run actions trigger after the schedule processing completes.
After execution, schedule actions run details are displayed along with resource-level execution details in Run details section
Pause settings
In Cost Analyzer, the Pause Optimization Schedule feature allows users to temporarily halt or disable the processing of the automated schedules that are responsible for optimizing associated cloud resources. These schedules are typically configured to perform tasks such as stopping idle virtual machines, resizing underutilized resources, or applying cost saving actions based on recommendations.
By pausing these optimization schedules, users can maintain full control over resource behavior during critical periods, such as business hours, deployments, or testing phases. This functionality helps ensure that automated changes do not interfere with performance, access, or operational continuity.
When a Schedule Is paused:
1. Pause behavior
The schedule will not execute during the configured pause period.
All associated resources are skipped, regardless of their individual settings.
2. Alerts and logs
No alerts or notifications are triggered while the schedule is paused.
All configurations and logs remain intact and accessible for reference.
3. Resuming the Schedule
The schedule automatically resumes after the specified pause end time.
Users can also resume the schedule manually by disabling the pause setting.
4. Manual execution
- A paused schedule can still be manually executed using the Run option, independent of the pause configuration.
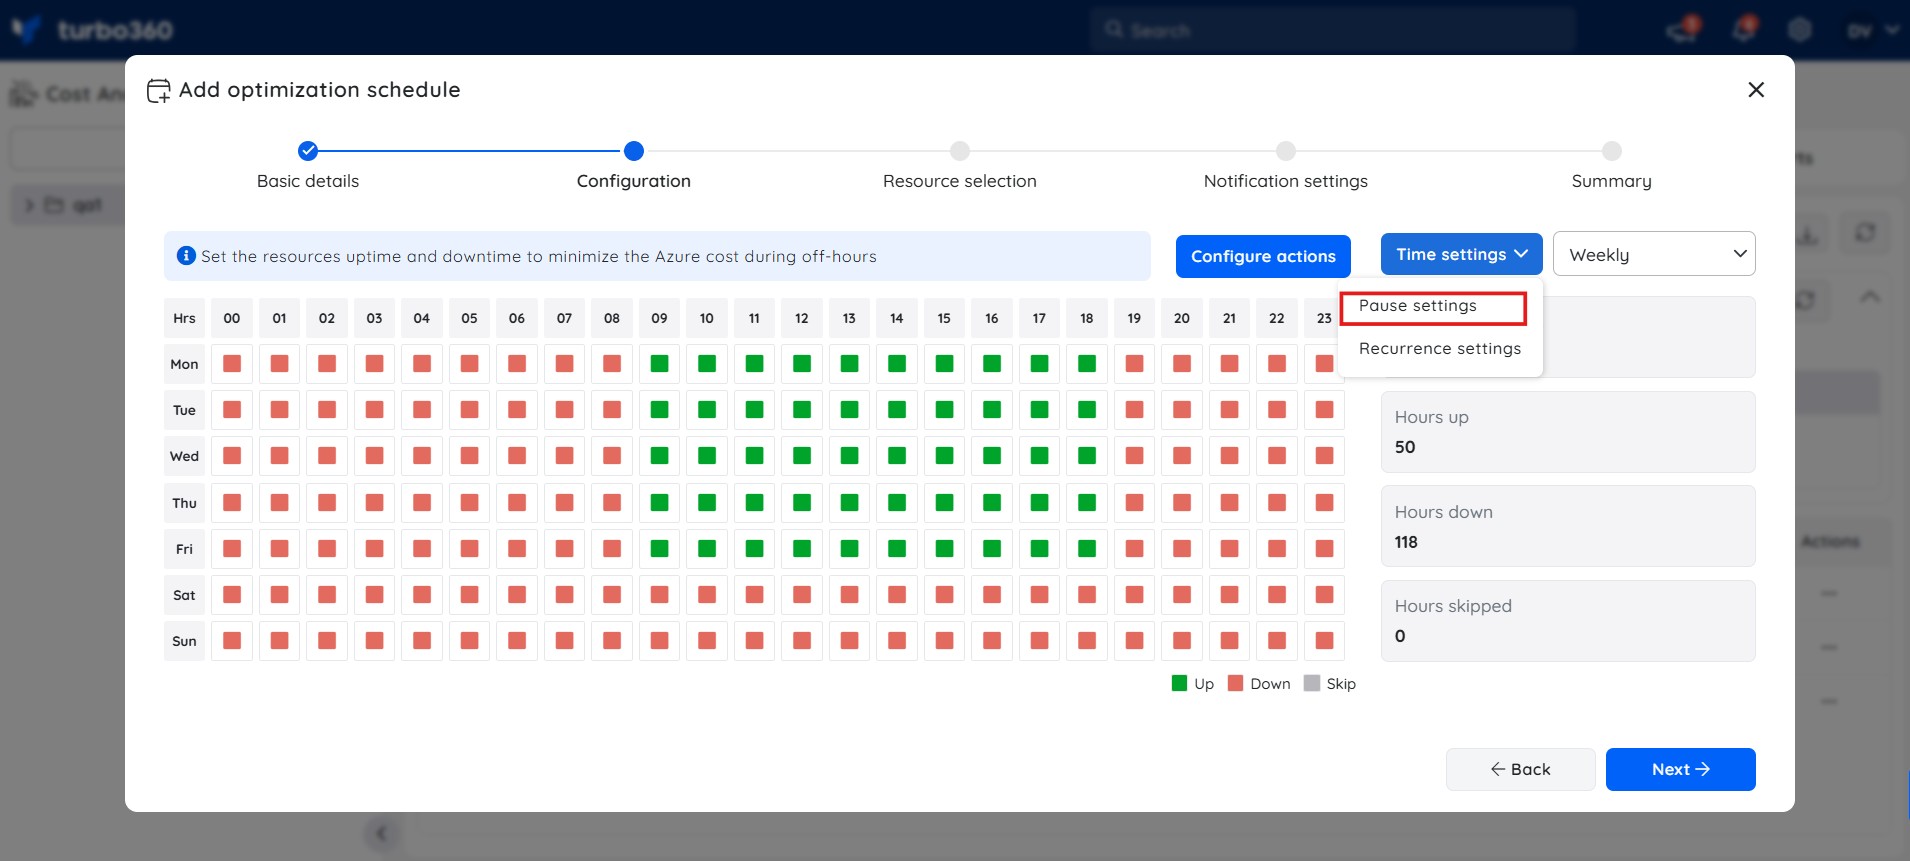
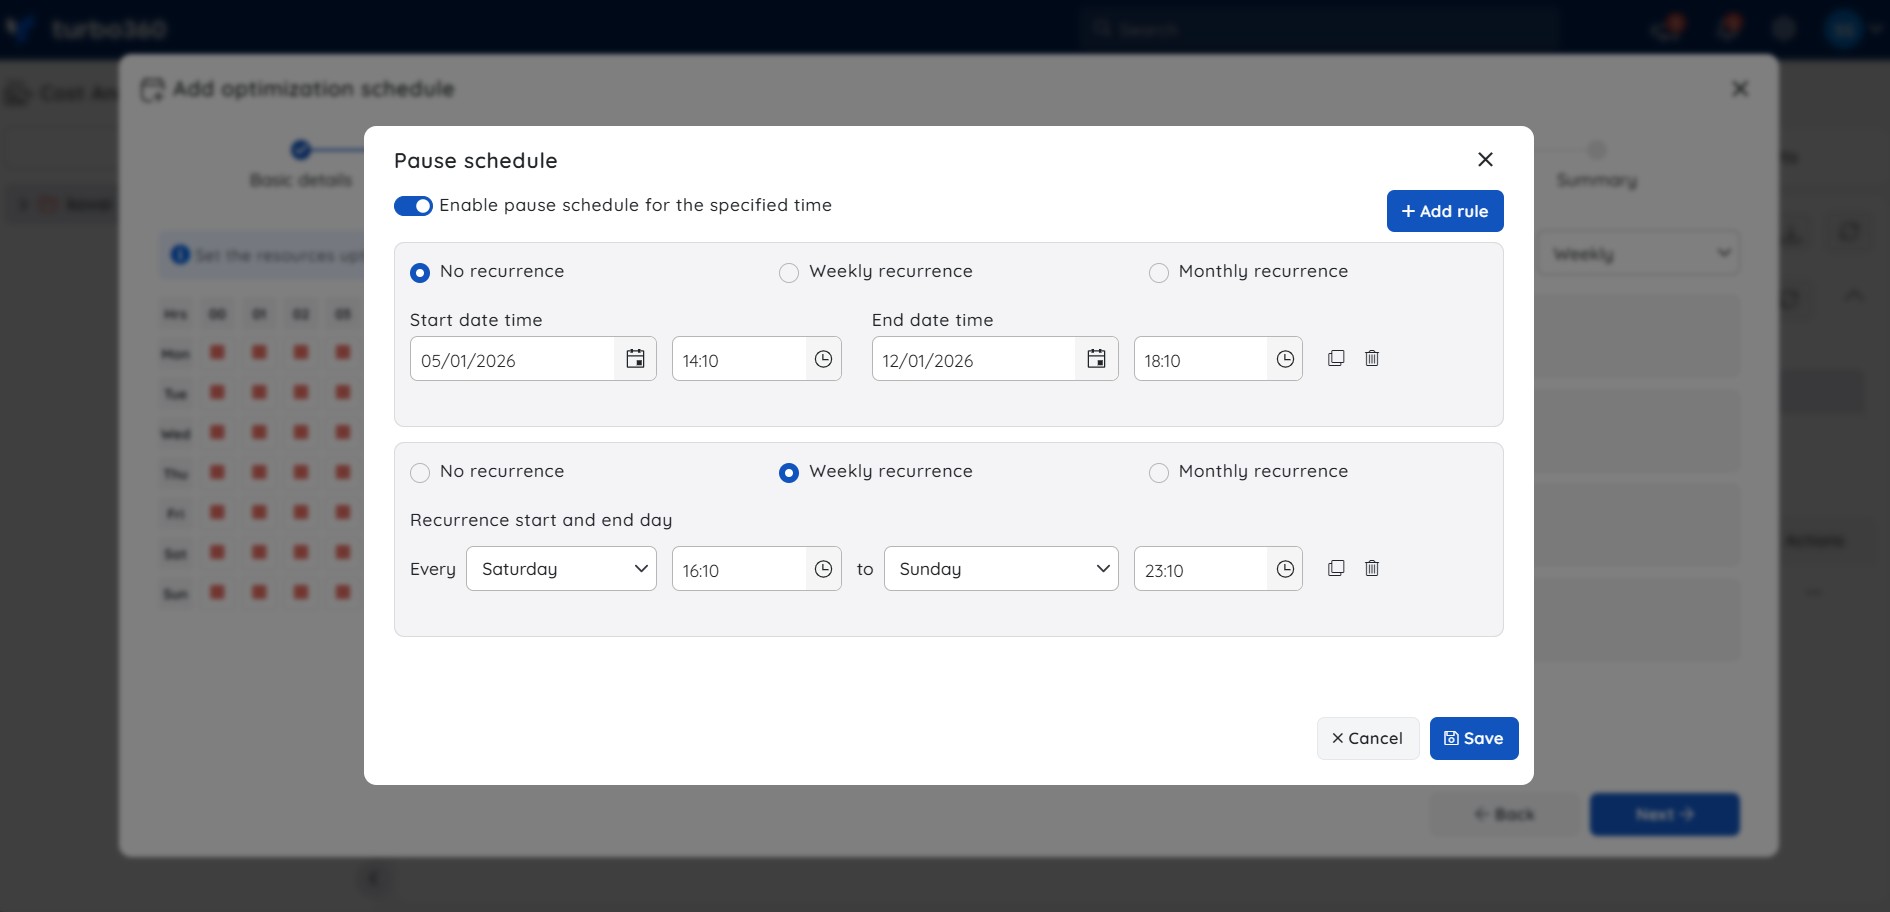
Steps to enable Pause settings
1. In the configuration table, click on the Time settings dropdown.
2. Select the Pause settings option from the dropdown menu.
3. Toggle the Pause switch to enable the configuration panel.
4. Configure Pause options
Choose from the following recurrence types based on your scheduling needs:
- No recurrence
Define a one-time window by specifying the start and end time during which the schedule should be paused. - Weekly recurrence
Automatically pause the schedule on selected days and time ranges, repeating every week within the defined timeframe. - Monthly recurrence
Configure the schedule to pause at regular monthly intervals using custom patterns, such as "every second Wednesday and Friday."
5. Add multiple rules
Use the Add rule option to define multiple pause rules. This allows for flexible, recurring pause configurations to match complex scheduling needs — all without requiring manual intervention.
6. Click Save to apply the pause settings
The hours in green will be considered Up hours, those in red will be considered Down hours, and grey will be considered Skip hours.
The resources will be configured to the Up setting or started at the beginning of each Up hour, set to the Down setting or stopped at the beginning of each Down hour, or skipped at the beginning of each skip hour, based on the specified configuration.
- Click Next.
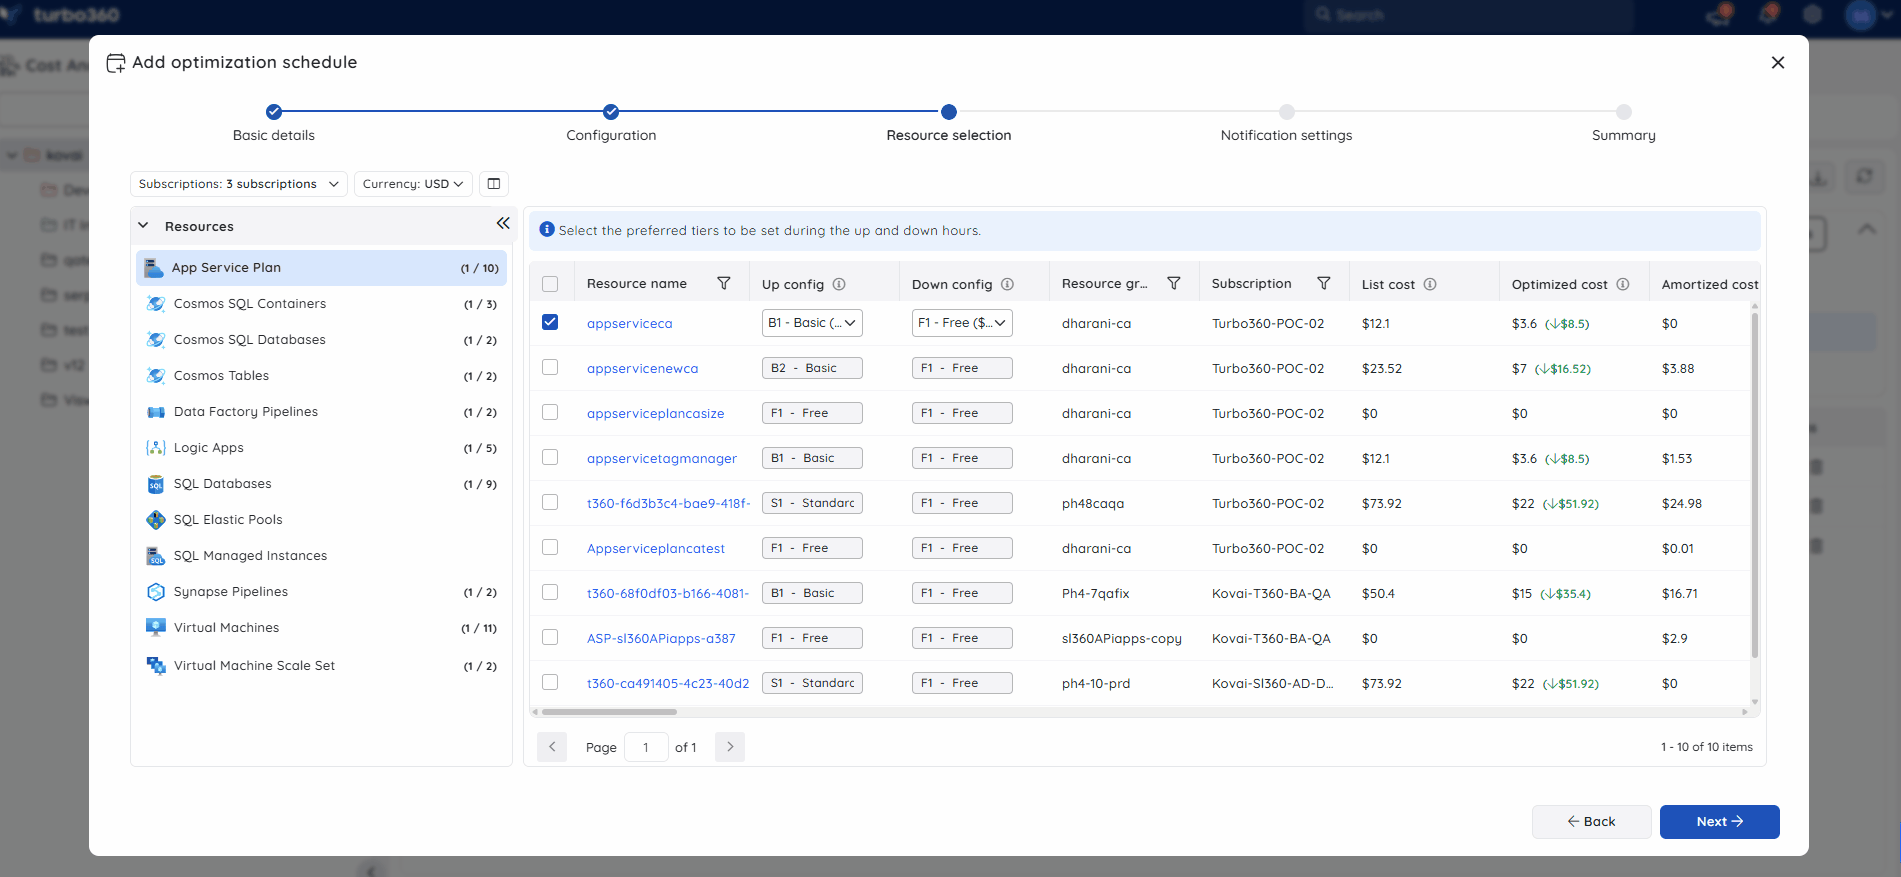
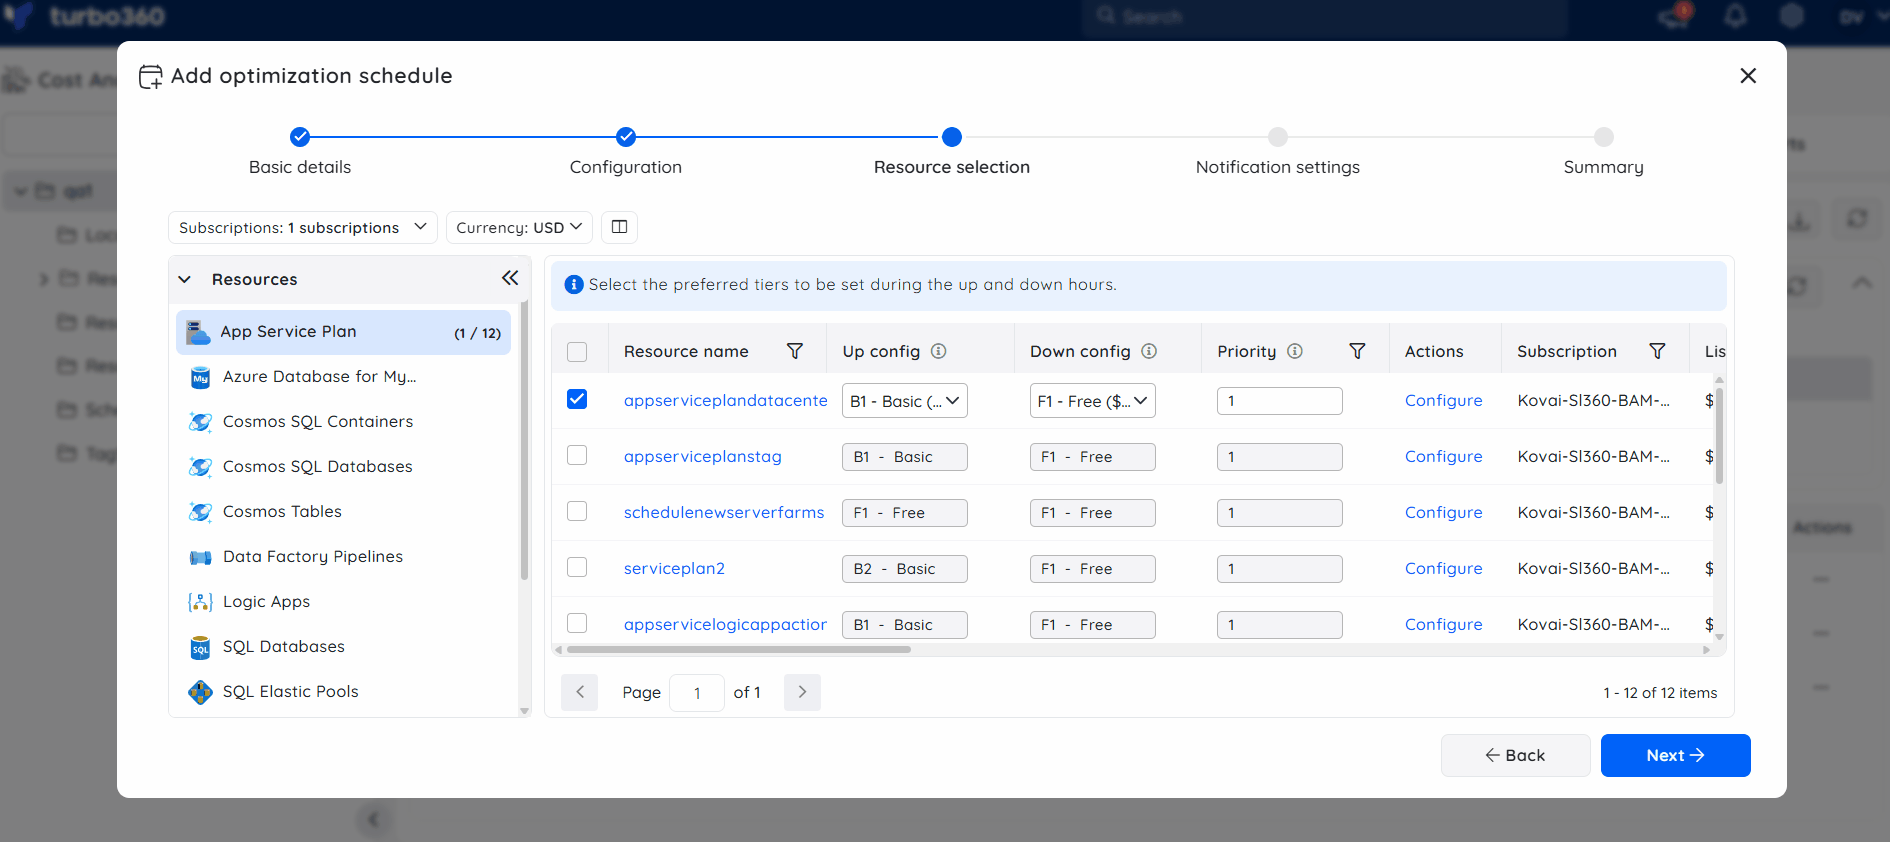
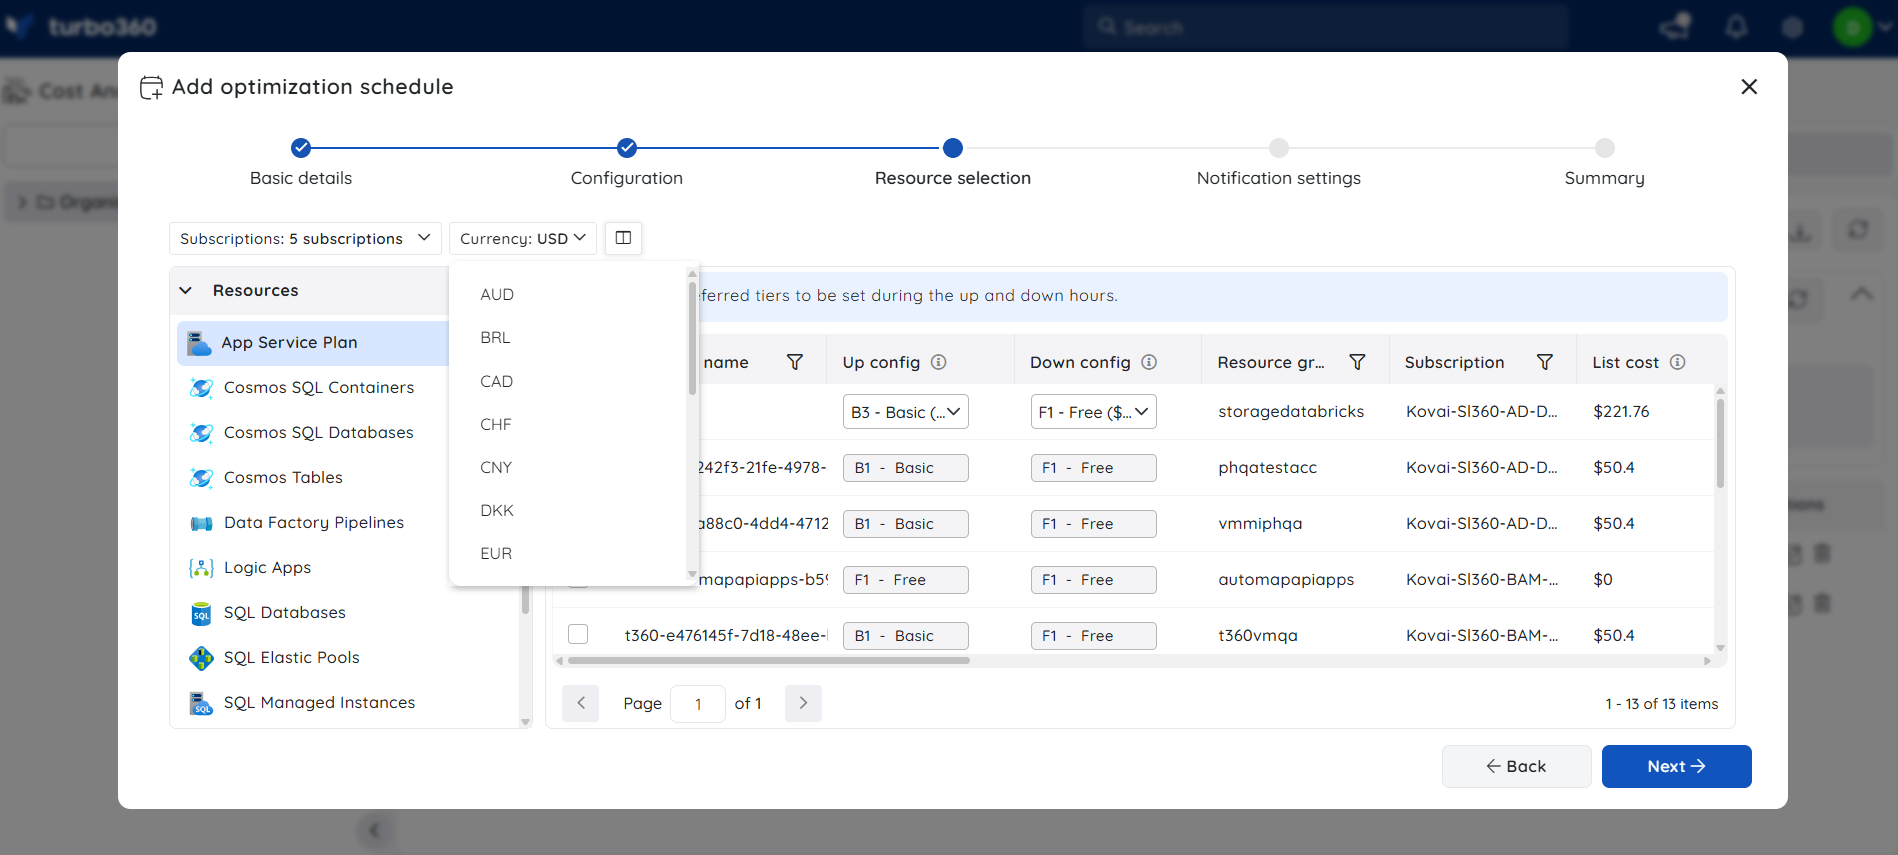
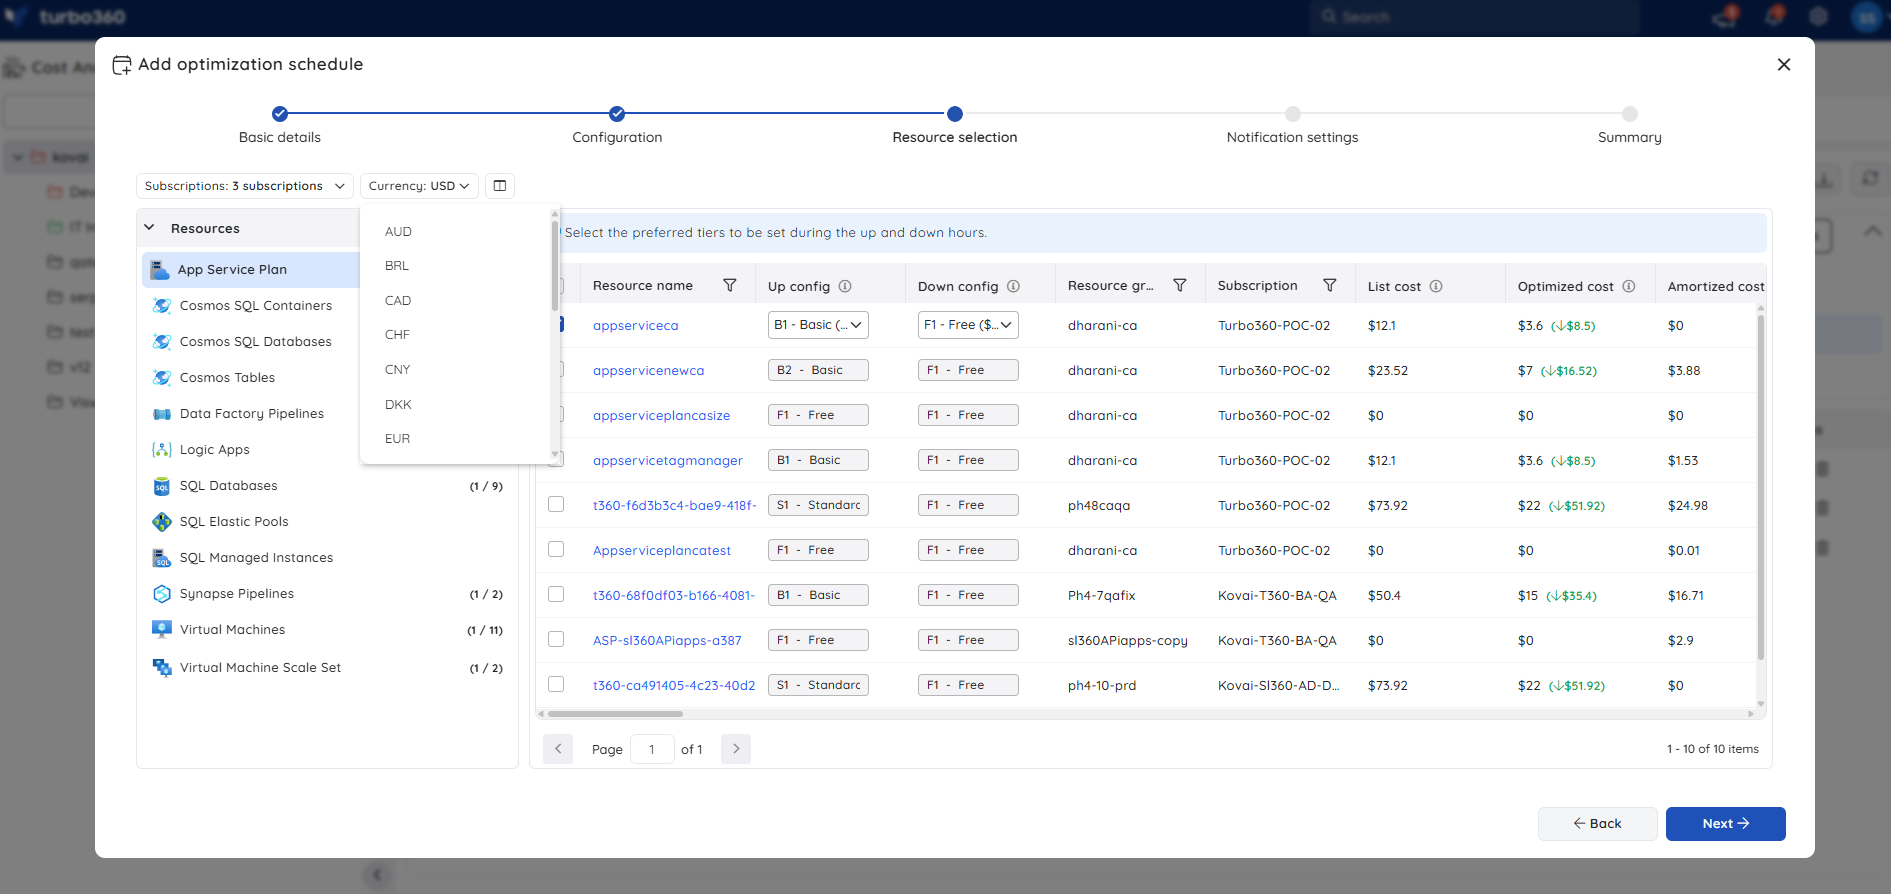
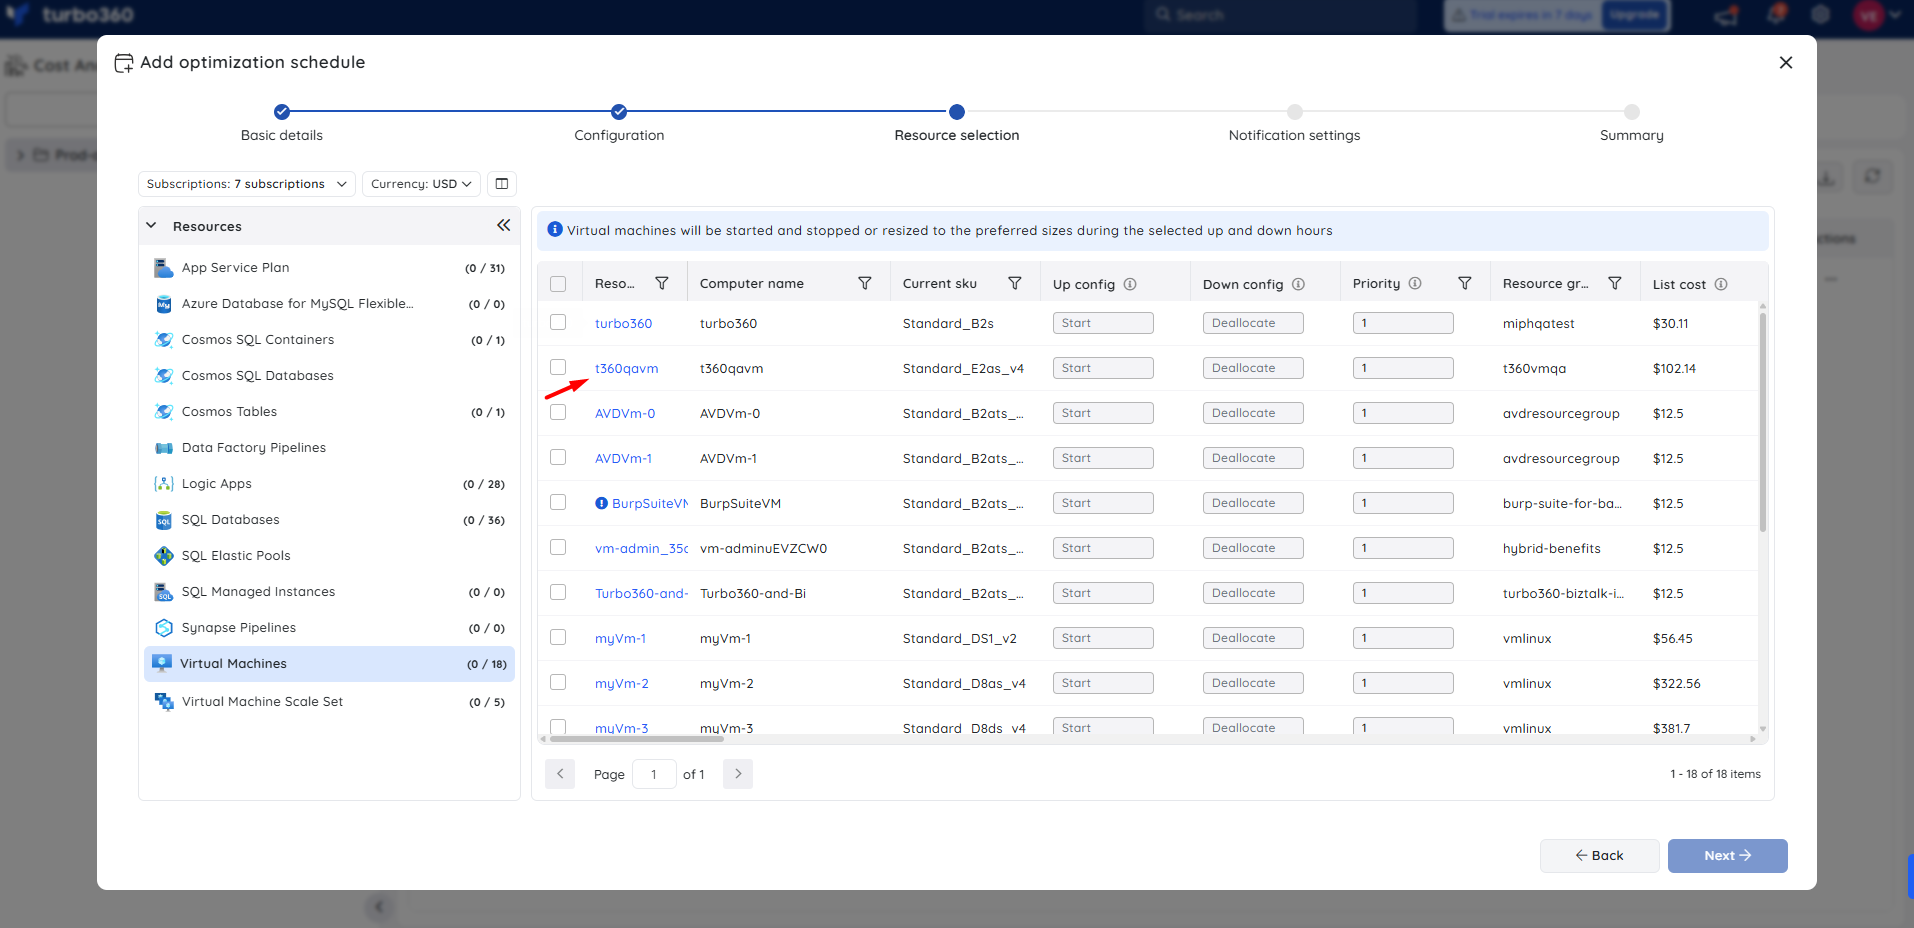
Resource selection
The column configuration grid in the Resource selection screen allows users to customize the resource view by adding or removing columns, including those related details. Additionally, users can rearrange the column order to ensure the displayed information aligns with their scheduling preferences and requirements.
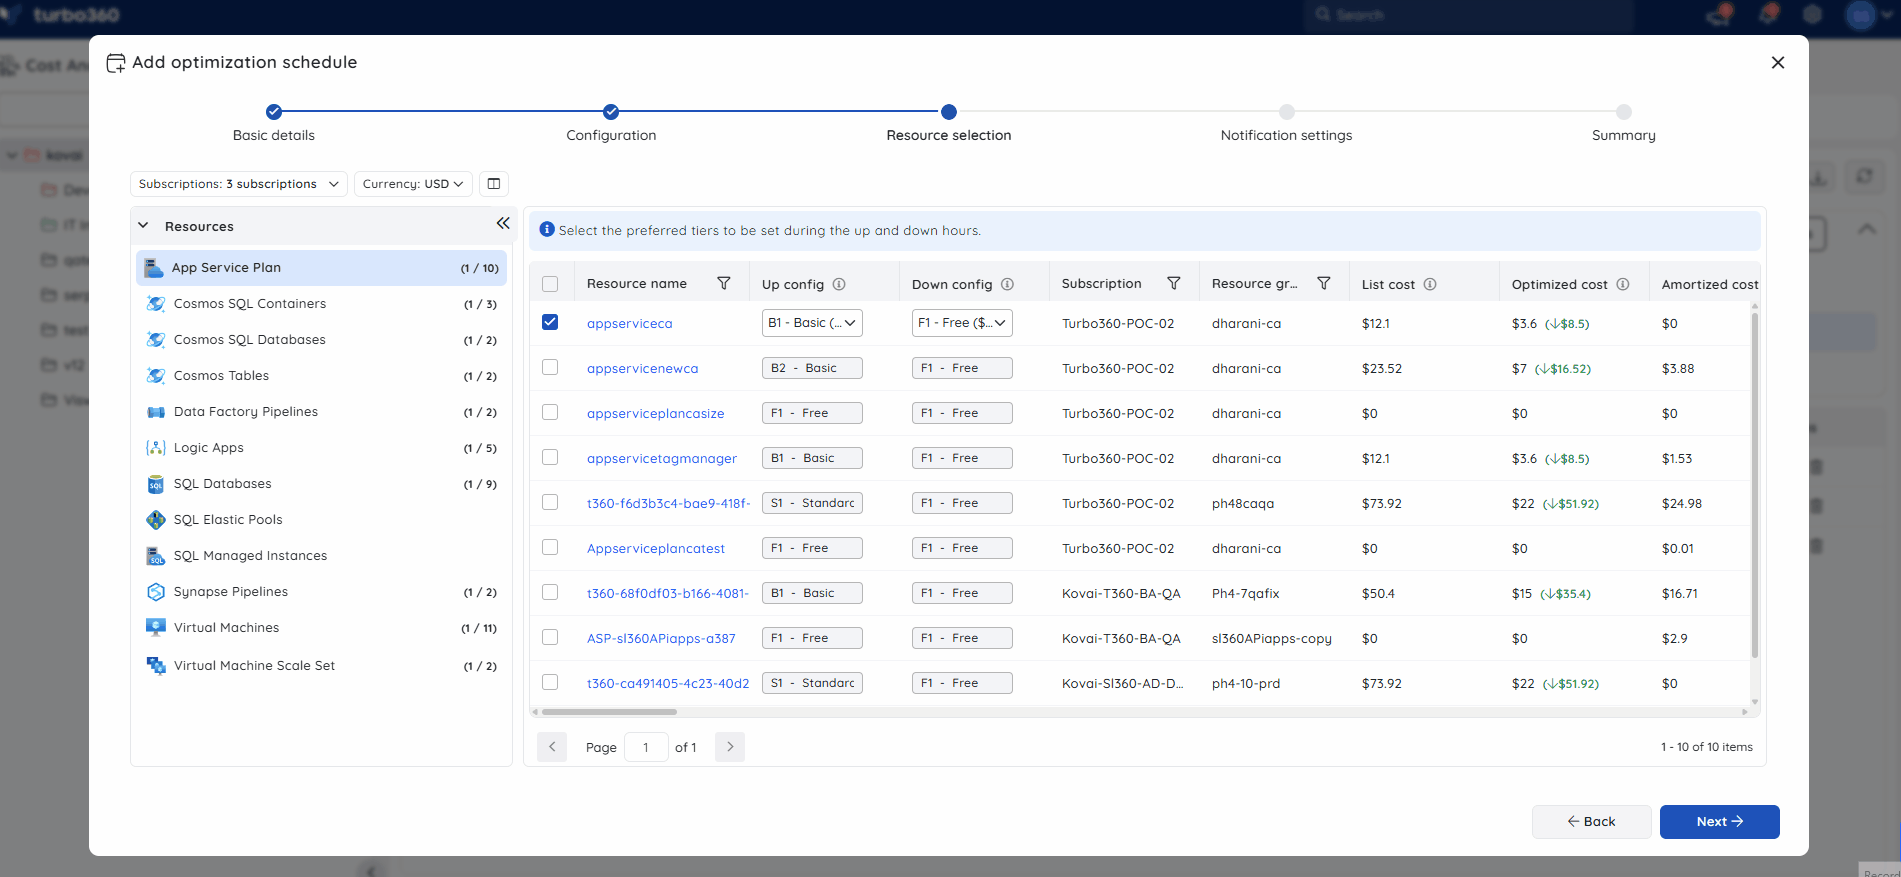
- Select resources from the chosen subscriptions and assign a priority to define the execution order of the optimization schedule. Lower priority values trigger faster execution.
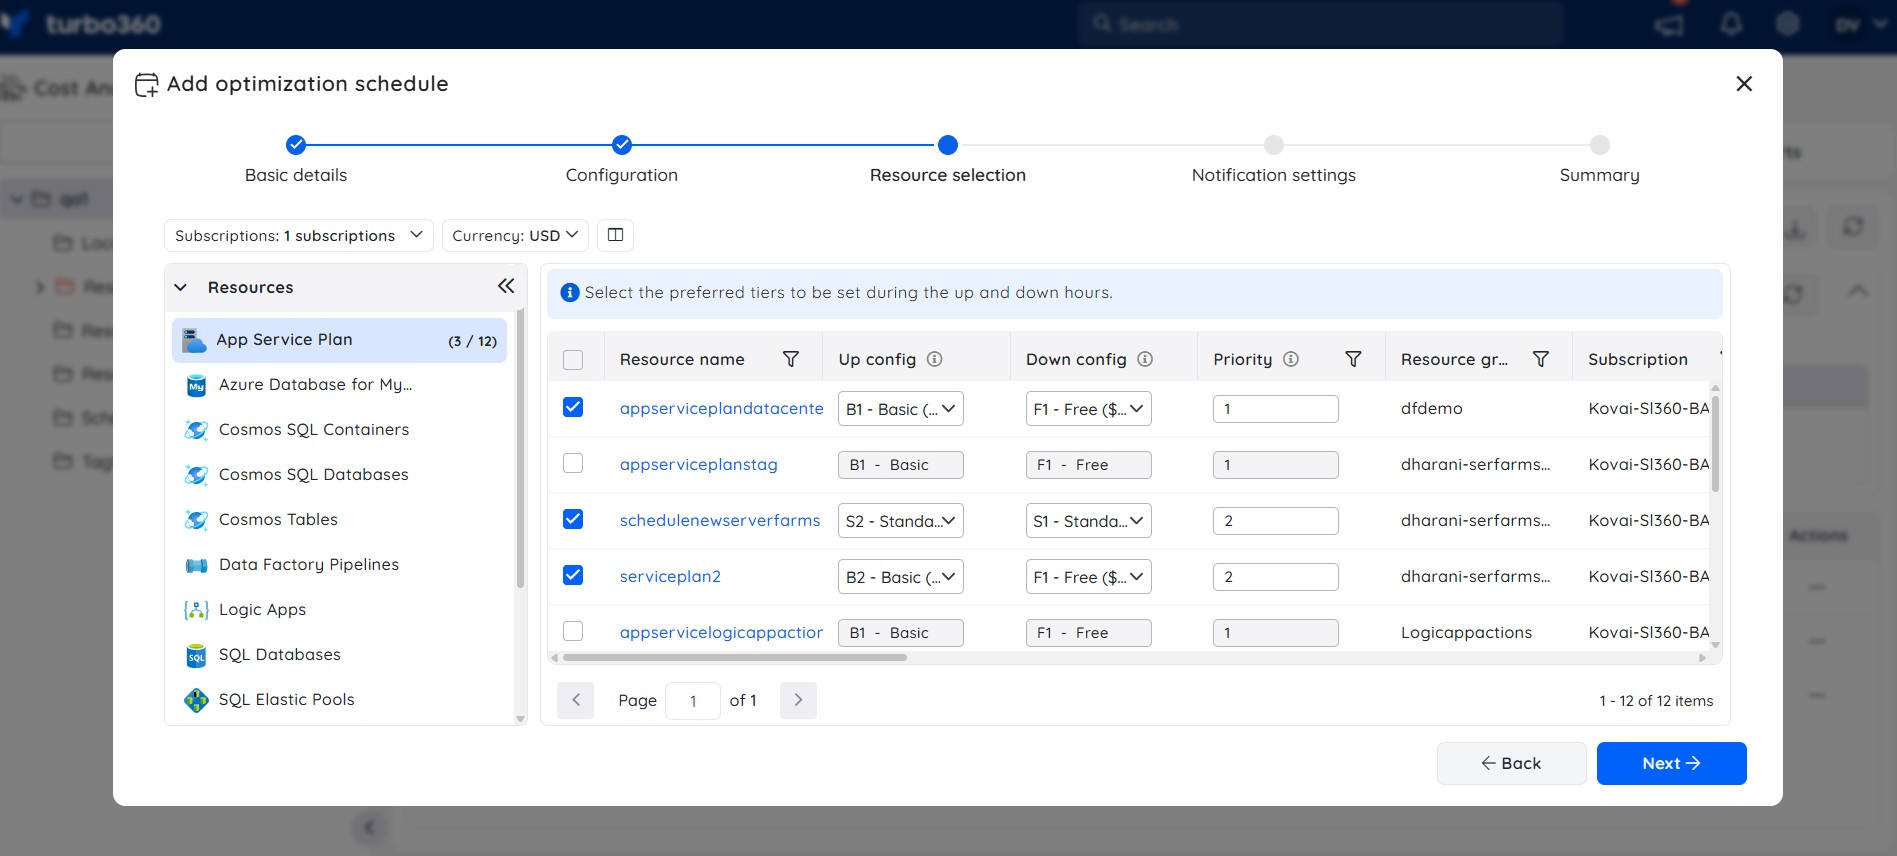
Additionally, the user can add a custom comment to the resource included in the schedule.
Configure actions (Resource-level)
The Configure actions feature at the resource level enables users to trigger HTTP actions for individual resources during an optimization schedule run. This feature is available for all resources across all supported resource types and allows integration with external systems at specific stages of resource processing.
The feature ensures that HTTP actions are executed before and after each associated resource is processed within a schedule.

For each resource associated with an optimization schedule, the Configure Actions option provides two tabs:
1. Before resource action run
Executes HTTP actions before the processing of a specific resource begins.
Supports pre-processing validations, notifications, or custom automation.
2. After resource action run
Executes HTTP actions after the processing of the specific resource is completed.
Supports post-processing notifications, logging, or follow-up automation.
Configure actions (Resource-level) – Setup
Select the resources to be processed.
Open Configure actions option of the selected resources from the resource selection section (available for all resource types).
Choose Before resource action run or After resource action run, or both.
Configure one or more HTTP actions by providing the URI and message.
Default headers are added automatically (Schedule Name, Group Name, Action Type, Resource ID); custom headers can be added and default headers can be removed if required.
Save the configuration.
Execution behavior
When a schedule is executed and a resource is picked for processing:
HTTP actions configured under Before resource action run are triggered before the resource processing starts.
The resource is then processed as per the schedule configuration.
HTTP actions configured under After resource action run are triggered after the resource processing completes.
The Resource action runs details are included in the Schedule run details section.
This behavior is repeated for each associated resource in the schedule.
At present, the following resource types are available for optimization:
- App service plan
- Cosmos SQL container
- Cosmos SQL database
- Cosmos table
- Data Factory Pipeline
- Logic Apps
- SQL Database
- SQL Elastic pool
- SQL Managed Instances
- Synapse Pipeline
- Virtual machine
- Virtual machine scale set
Provide the Up and Down config values to the corresponding resources for the selected Up and Down hours.
Click Next.
Note:
The same resource can be added to multiple optimization schedules.
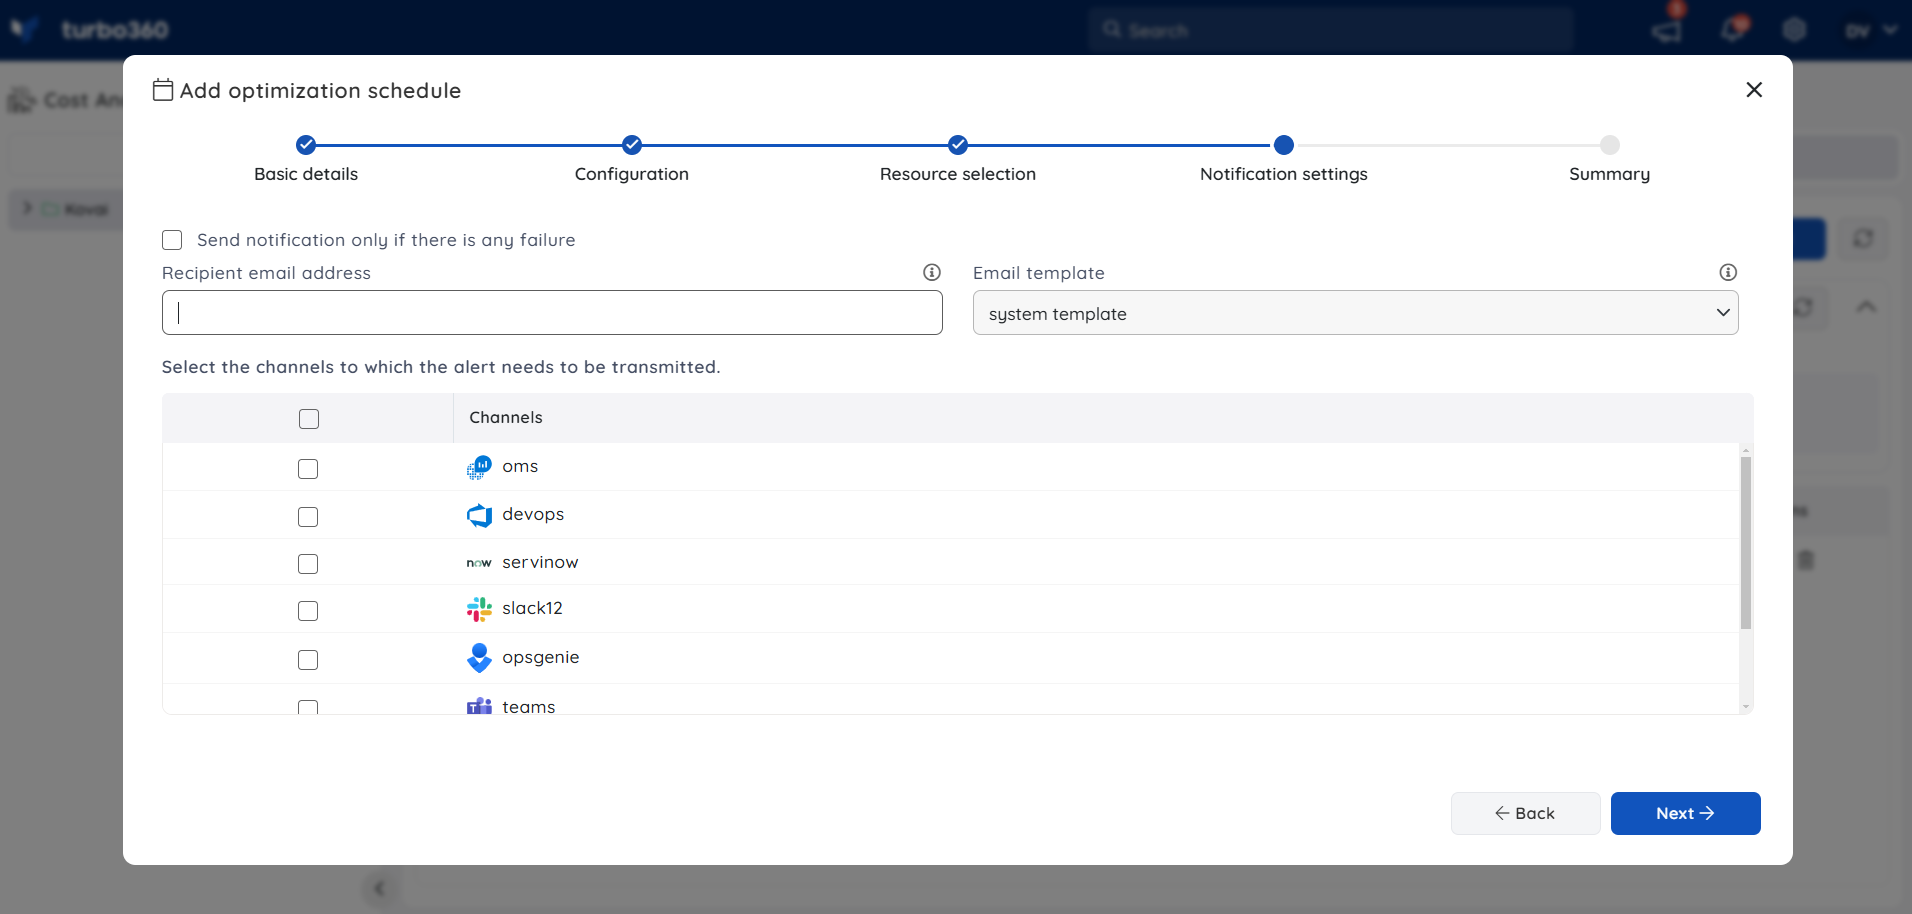
Notification settings
- Configure notification channels to the schedule to receive notification when the optimization schedule run is complete.
- Click Next.
The user can also choose to receive alerts only when there is a failure for any of the scheduled resources while running the optimization schedule.
Summary
The schedule summary displays detailed information about the optimization schedule, including a Cost Savings chart that helps users gain insights on the cost that can be saved when resources are scheduled for optimization.
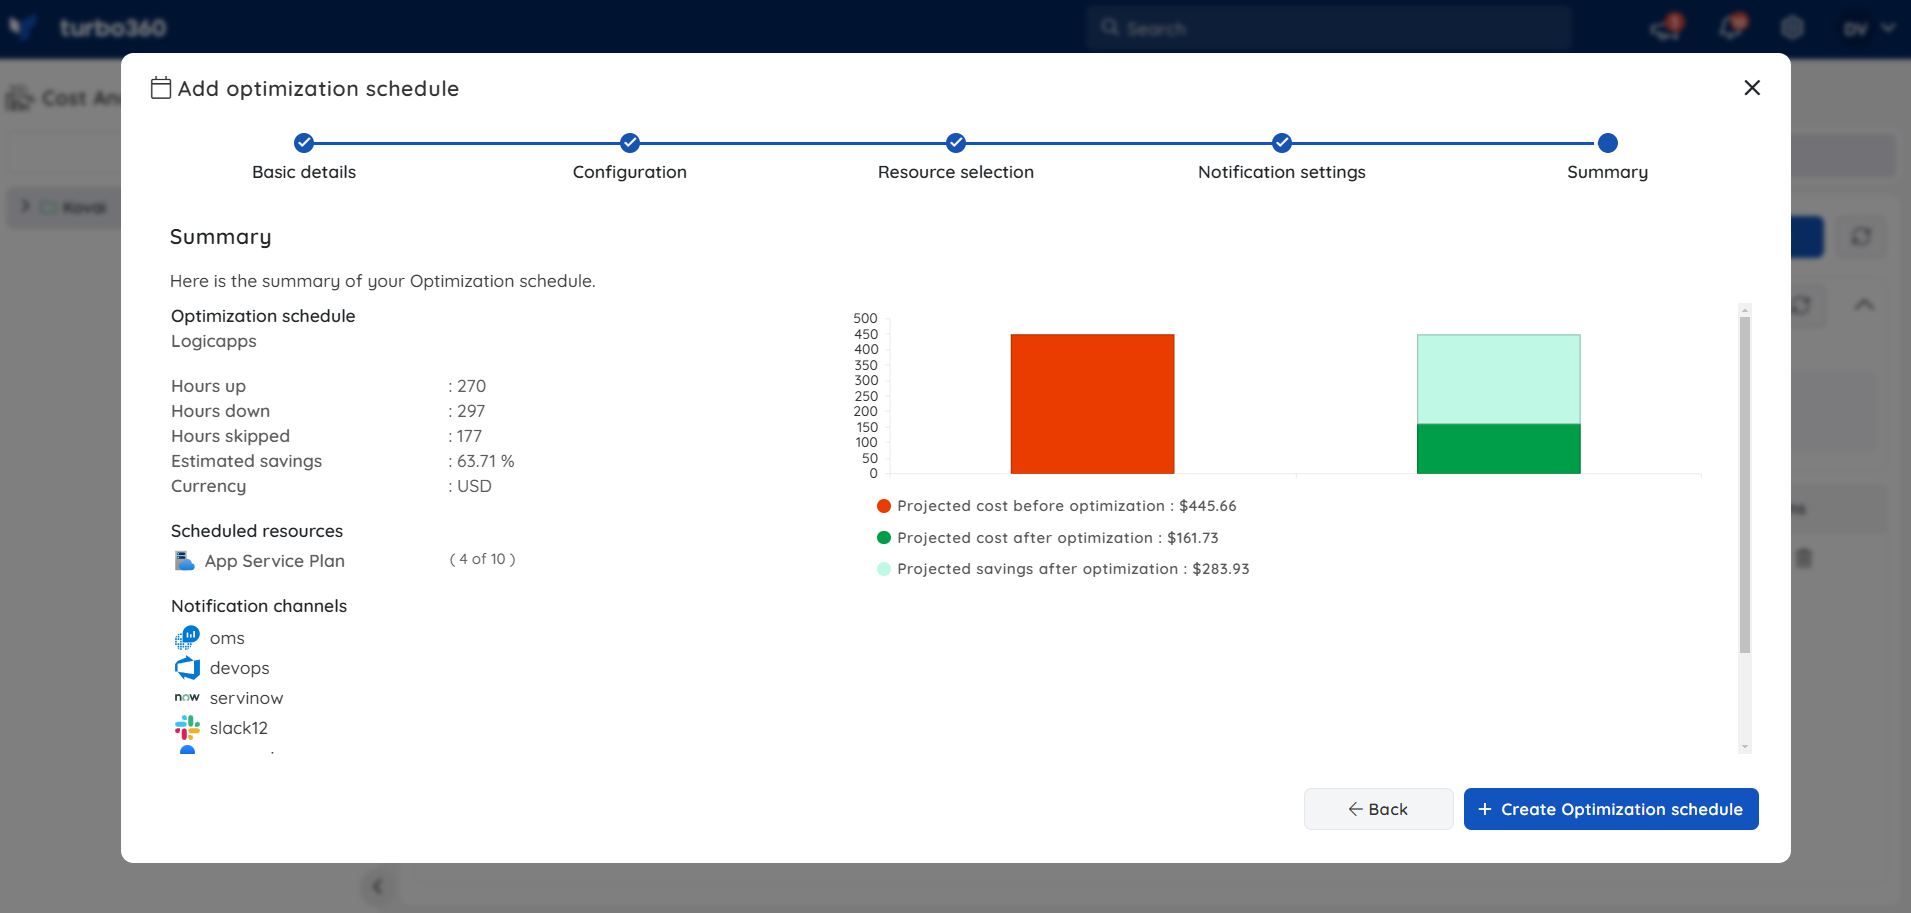
- Click Create optimization schedule to finish creating the schedule.
The Schedule runs once in every hour based on the provided timezone.
Note:
- The optimized SKU can only be applied when the Service Principal has Contributor access.
Currency selection
When creating a schedule, the Currency filter available in Resource selection allows users to select any available currency types to display cost values based on their preferences.
If the currency filter value is updated, any resource chosen prior to the update will be updated with the new currency type.
The currency type can be updated from the Schedule settings as well.
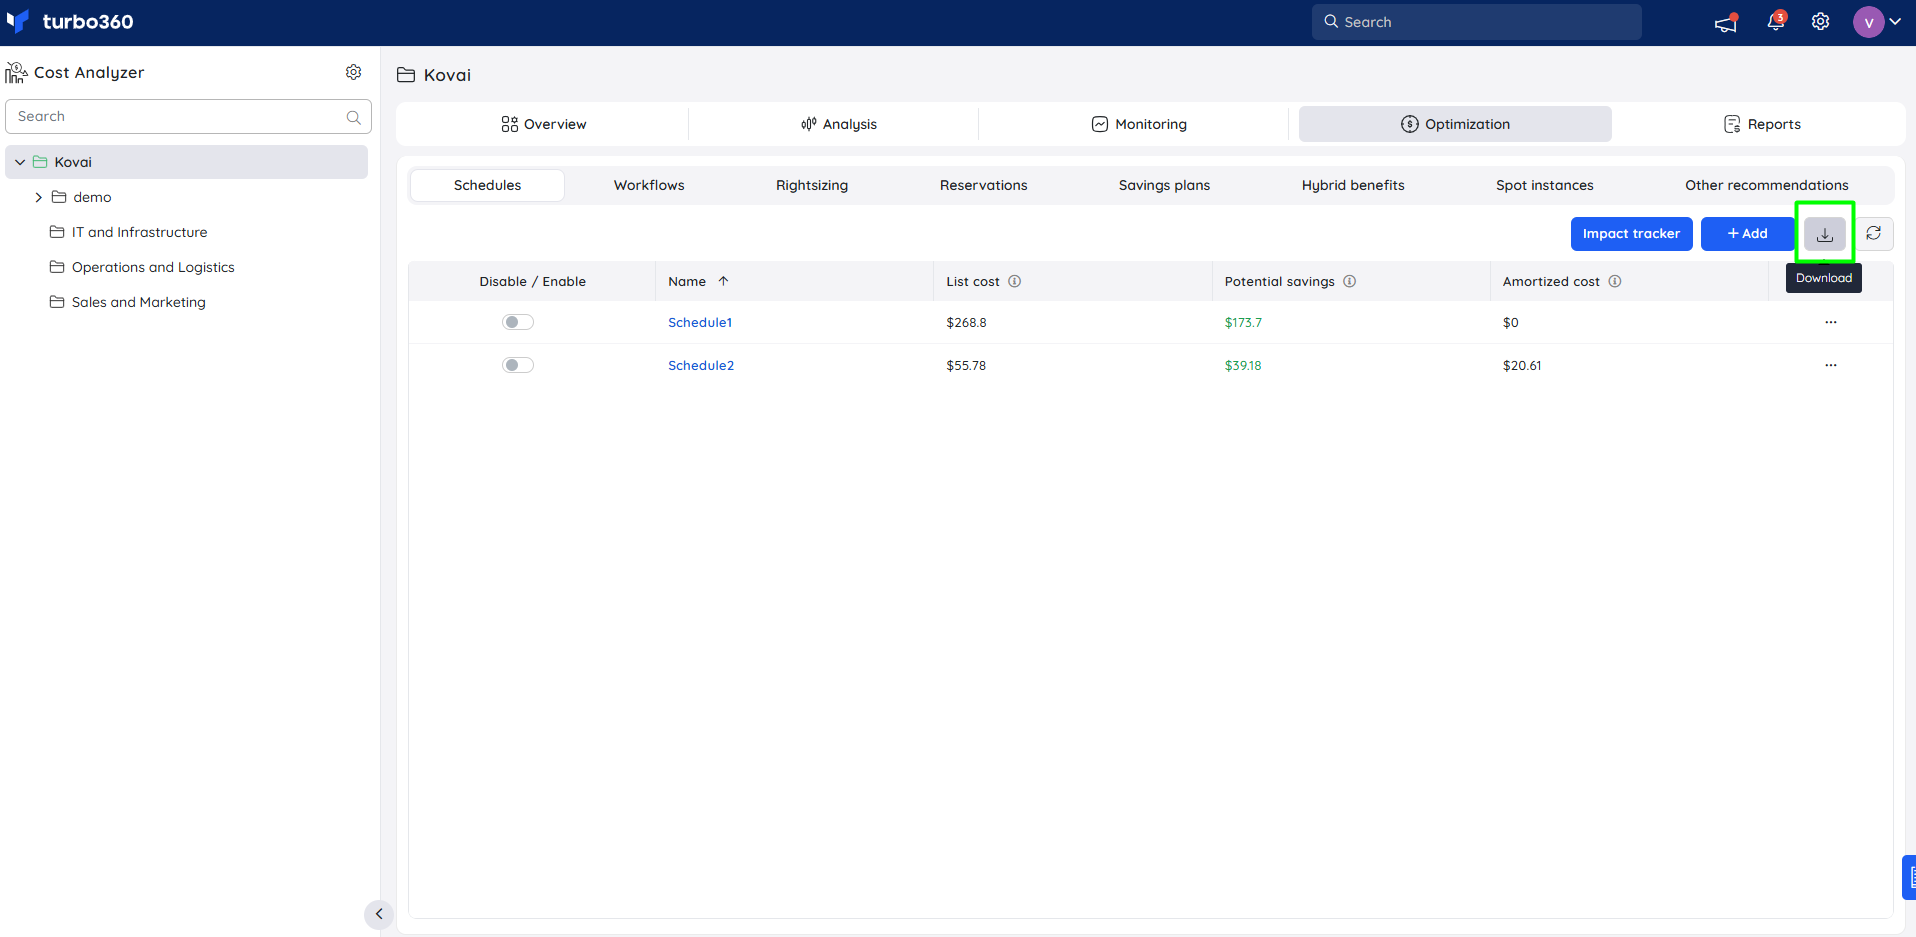
Export schedules
Optimization schedules can be downloaded as an excel workbook. Use the download icon available
- Go to the Schedules section and click the Download icon.
The downloaded file includes available schedules along with associated cost details.
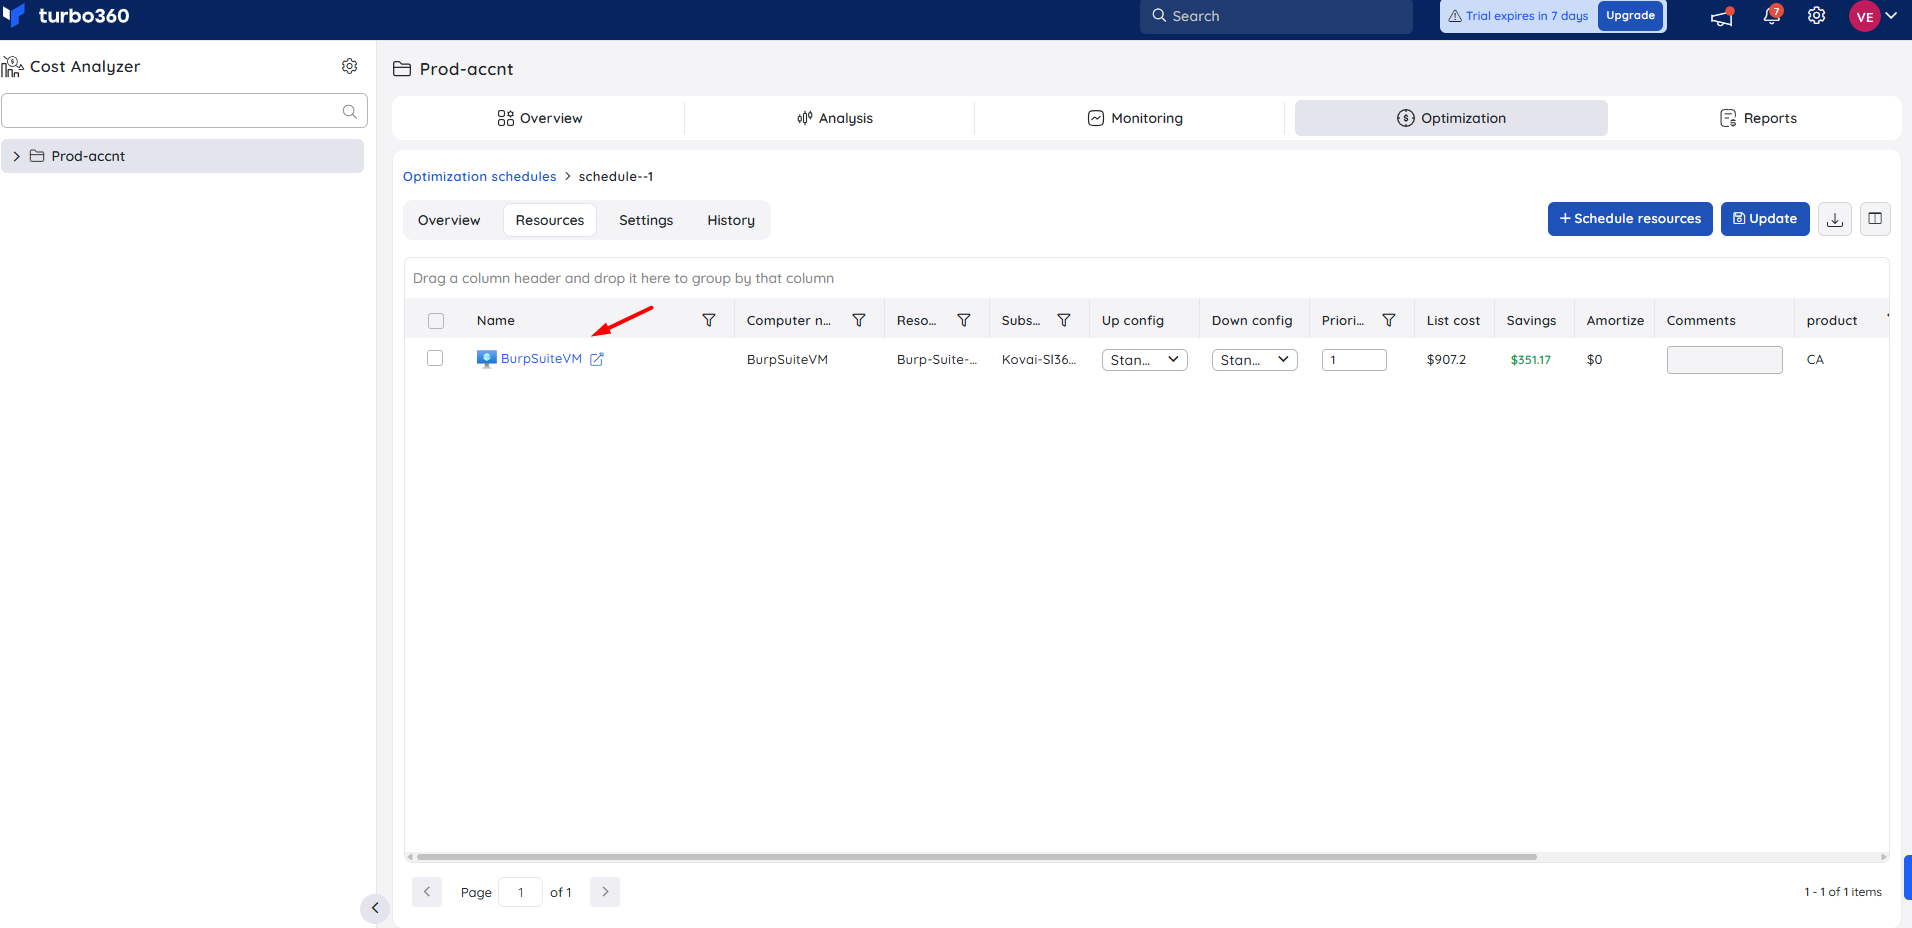
Scheduled resources
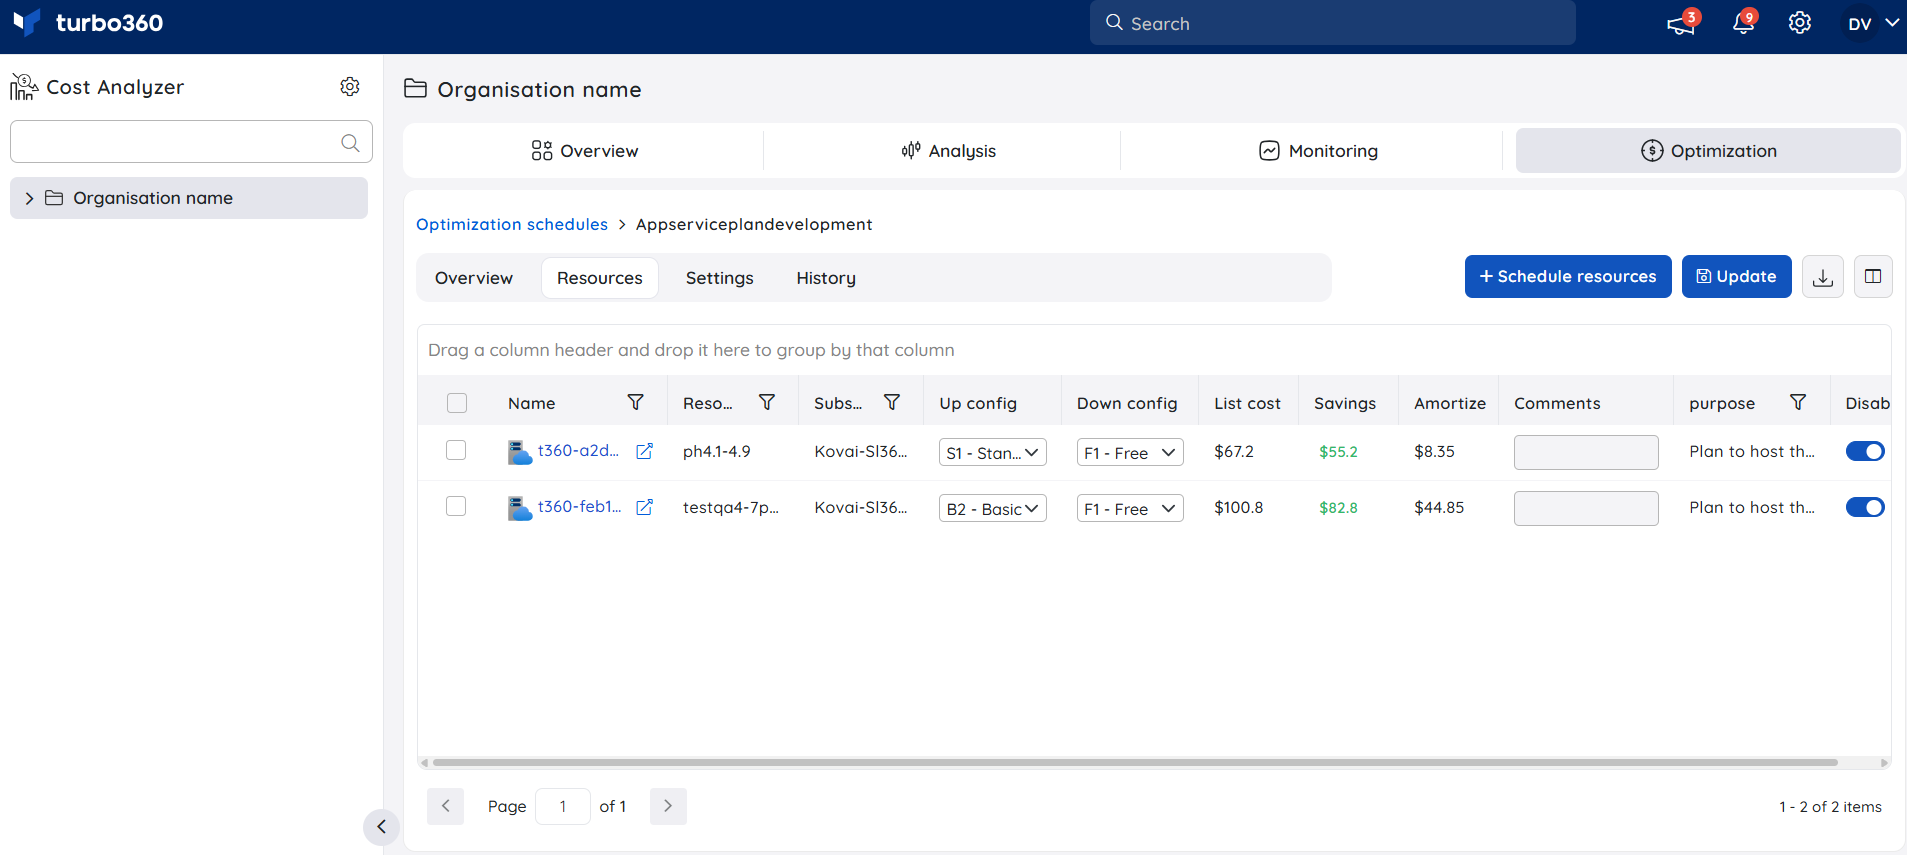
A resource can be added to an existing optimization schedule at any point by using the Schedule resources option available in the Scheduled Resources tab within Resources section.
All the scheduled resources will be listed in the Scheduled Resources tab within the Resources section.
The same resource can be added to multiple optimization schedules.
Cost intelligence view
The Cost intelligence view structures resource data into distinct categories and visual sections, providing users with a detailed overview of cost distribution and utilization. It highlights key optimization opportunities by identifying areas of high or low resource efficiency.
Through these categorized insights, users can easily monitor spending patterns, evaluate cost performance, and take data-driven actions to optimize resource usage and reduce overall expenses.
Click this link to know more about its capabilities.
How to access this view?
Users can access the Cost intelligence view either during schedule setup or after schedules have been created:
During schedule setup:
- Go to Optimization -> Schedules and create a schedule.
- On the Resource selection screen, select a resource to open the Cost intelligence view.
After schedule creation:
- Open a schedule that has resources associated with it.
- Switch to the Resources tab.
- Click a resource to view Cost intelligence view for that resource.
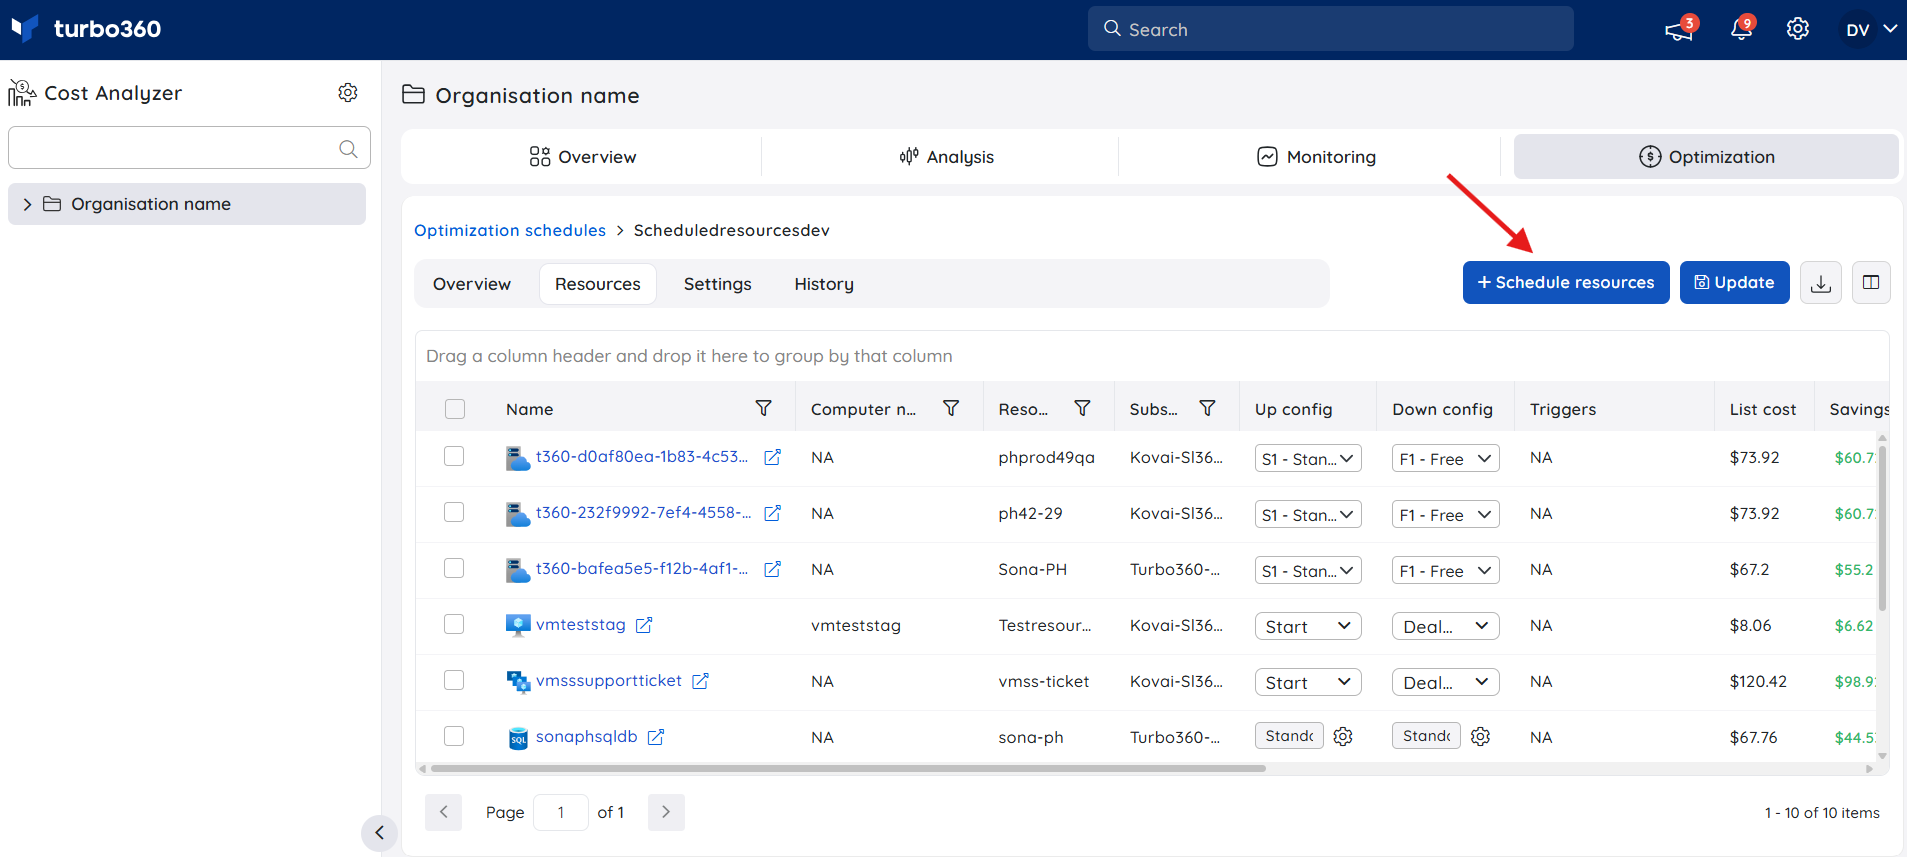
Export scheduled resources
Scheduled resources can be downloaded as an excel workbook.
- Move to the Scheduled resource section and click the Download icon.
The downloaded file includes detailed resource information along with its scheduled configuration.
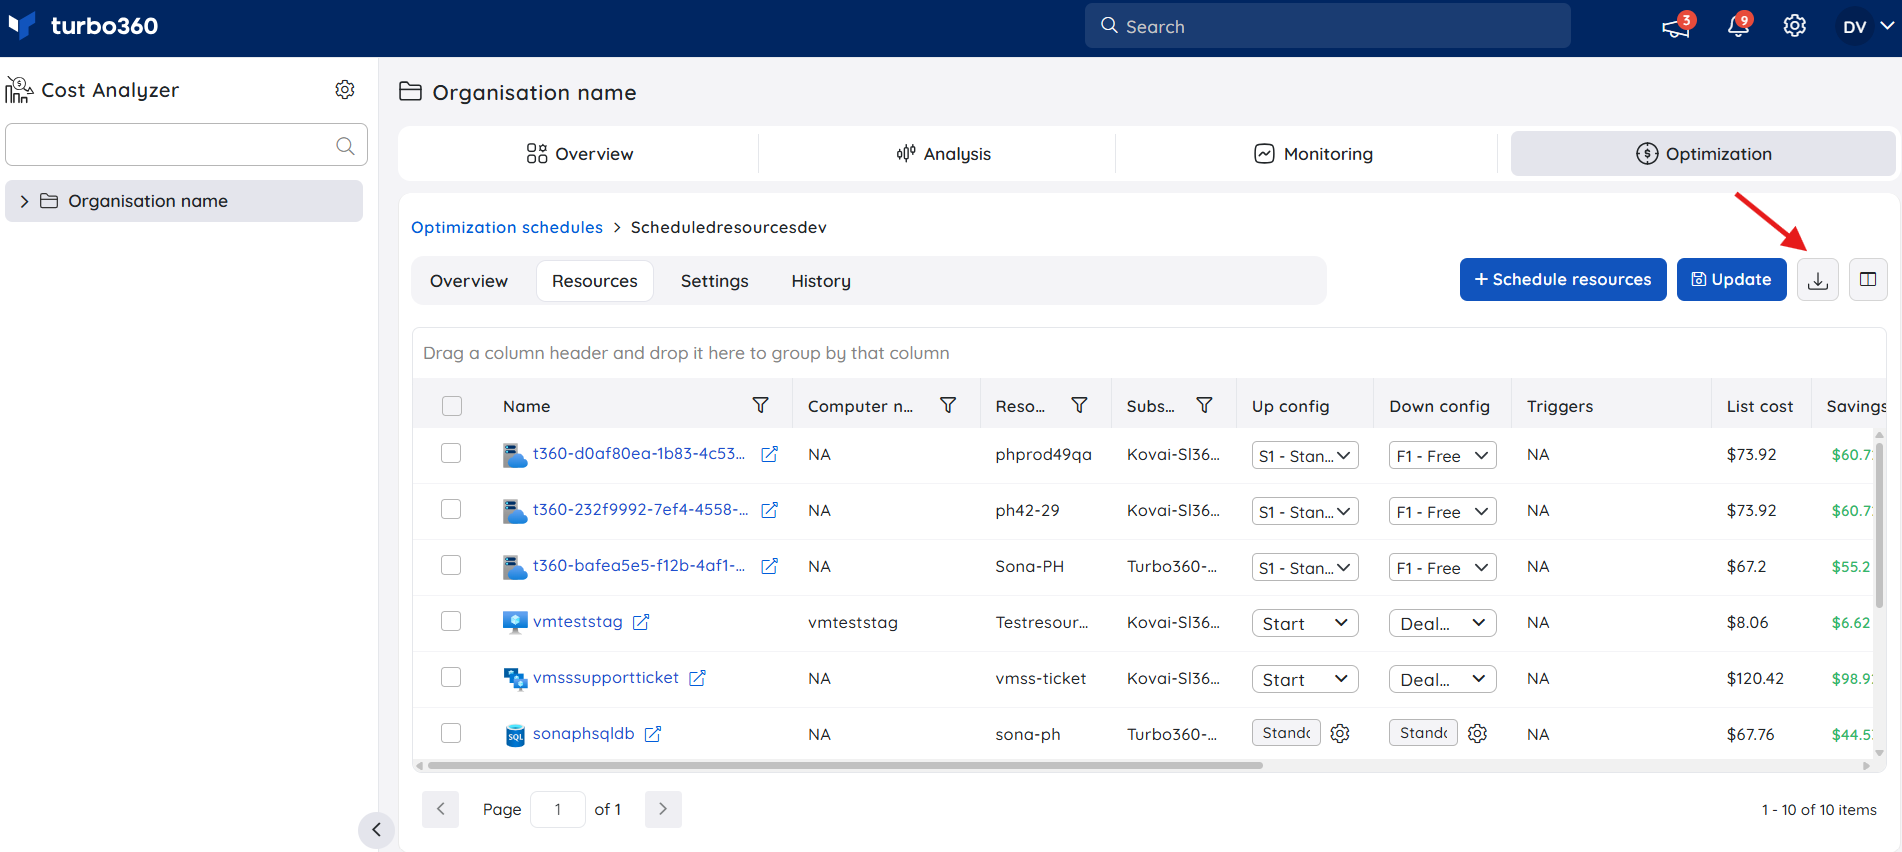
Adding resources to the schedule
Any unscheduled resource can be added to a schedule by clicking the Schedule resources option and selecting the required resource.
Enable/Disable scheduled resources
The user can enable or disable resources mapped to a schedule to determine their inclusion or exclusion in the subsequent run.
- Enable/Disable the toggle next to the required resource
- Click Update
Scheduling for mapped resources will be reflected based on the recent changes made to the toggle status.
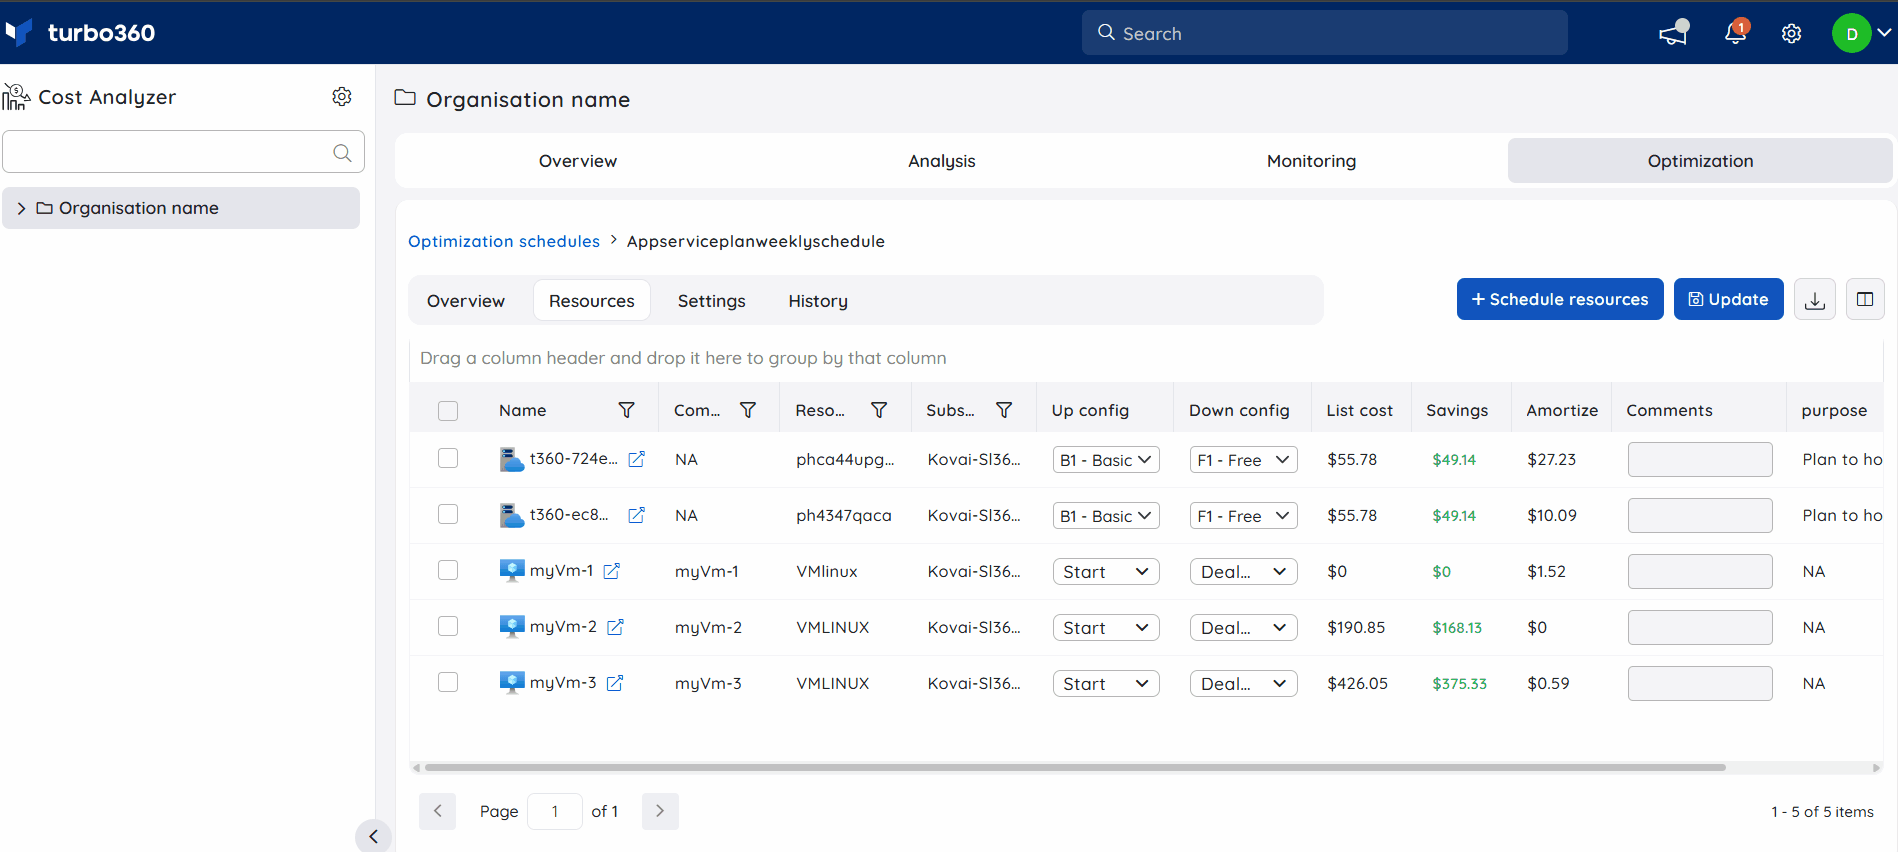
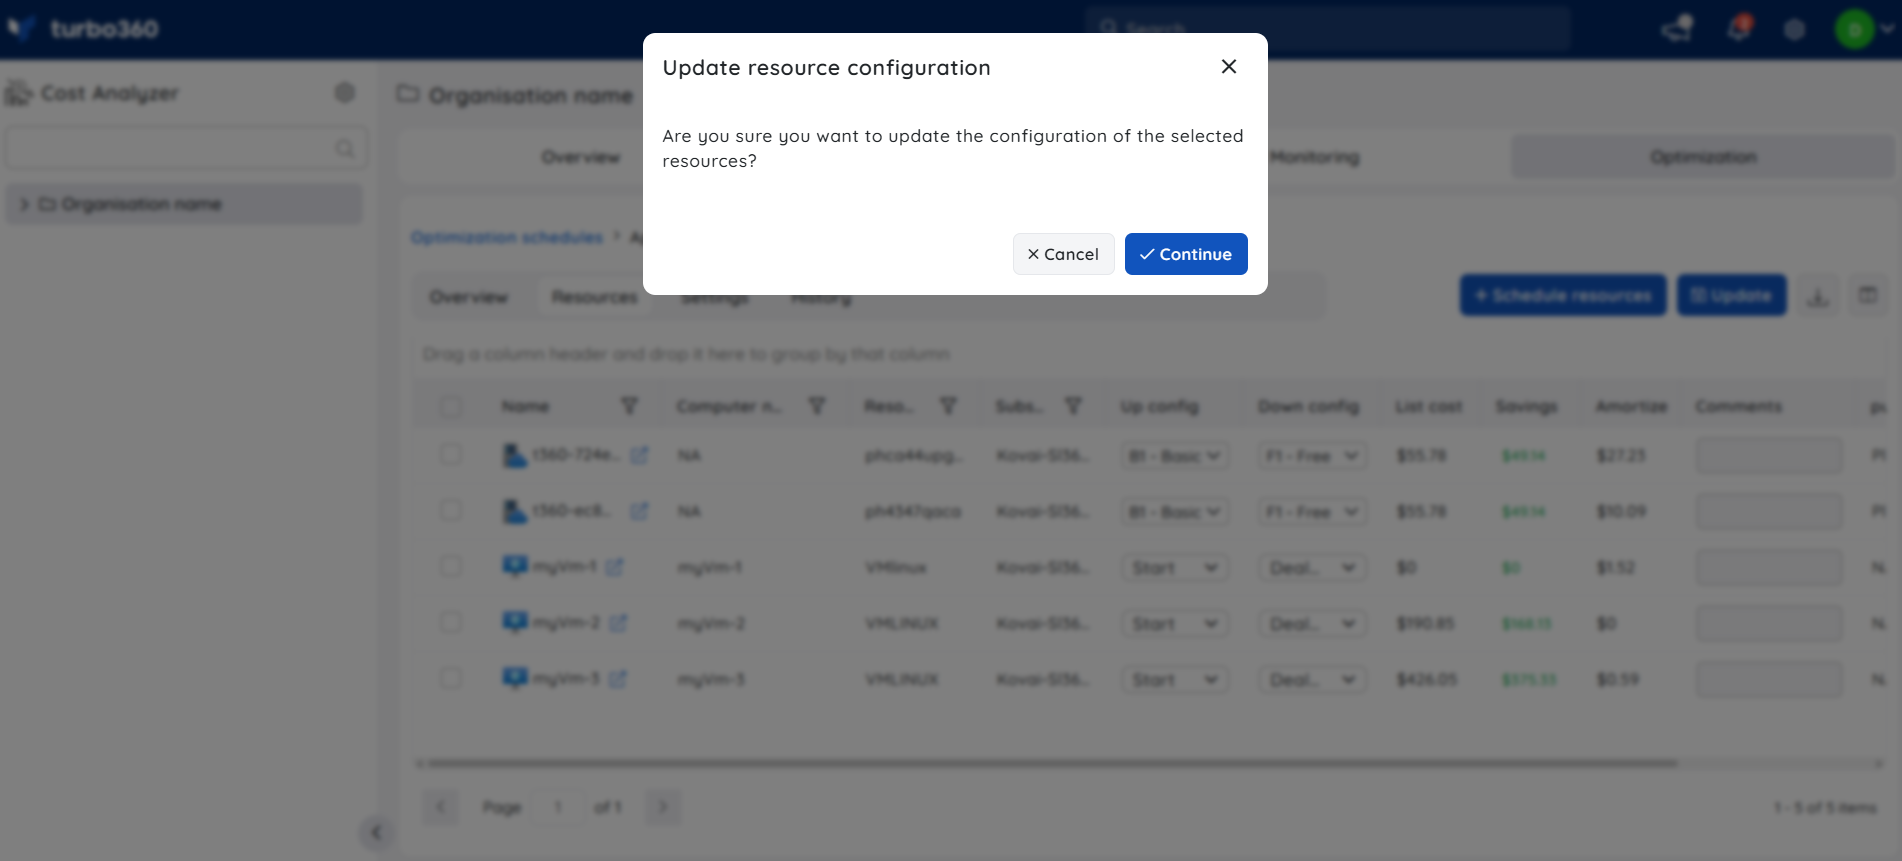
Update configuration values
The configuration values of App Service Plans and Cosmos resources can be updated even after creating the schedule.
- Navigate to the following path: Optimization schedule -> Resources -> Scheduled Resources.
- The Up and Down config values can be modified.
- Click Update.
Update a schedule
- Go to Optimization schedule -> Settings.
- The schedule name, currency type, timezone, and scheduling configuration can be modified.
- Click Update.
On demand runs
Optimization schedules can be started manually right away, without having to wait for their scheduled time.
- Navigate to the following path: Cost group -> Optimization -> Schedules.
- Select Run schedule option from the Actions menu of the relevant schedule. The resources mapped to the schedule will be listed here, allowing for selection according to user preferences.
.png)
- Choose Start (Scale Up) or Stop (Scale Down) to trigger the schedule according to the Up and Down settings configured for the mapped resources.
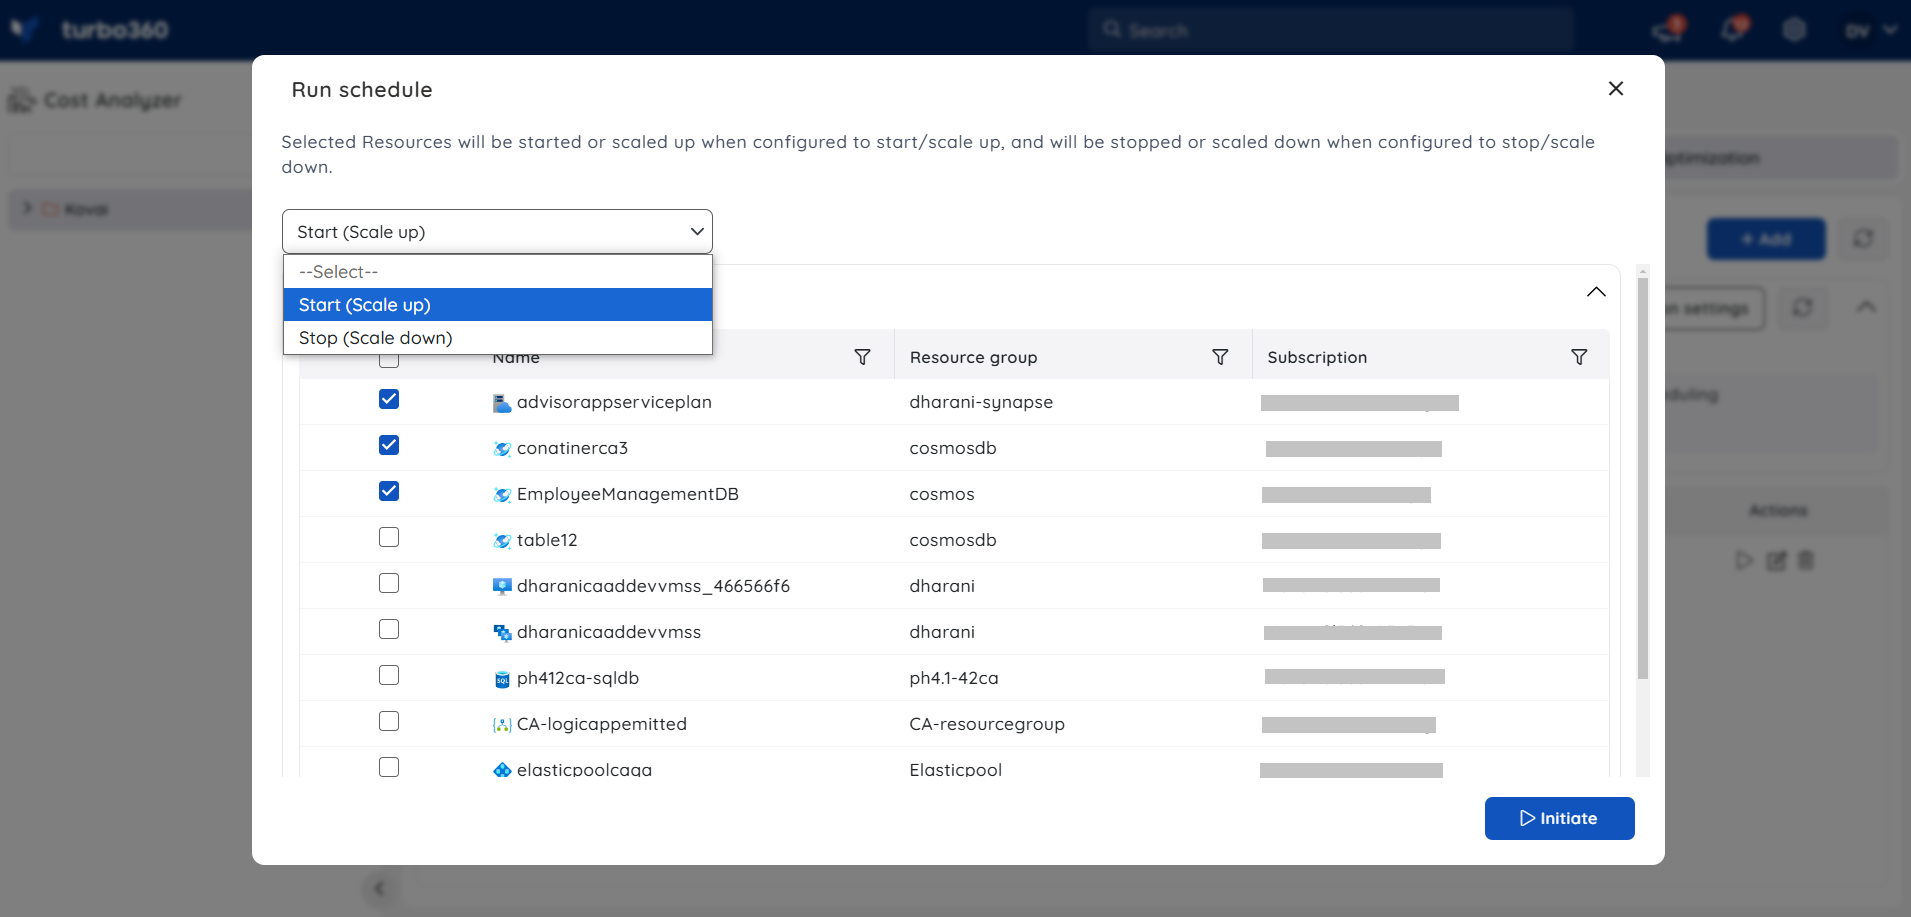
- Click Initiate to run the schedule.
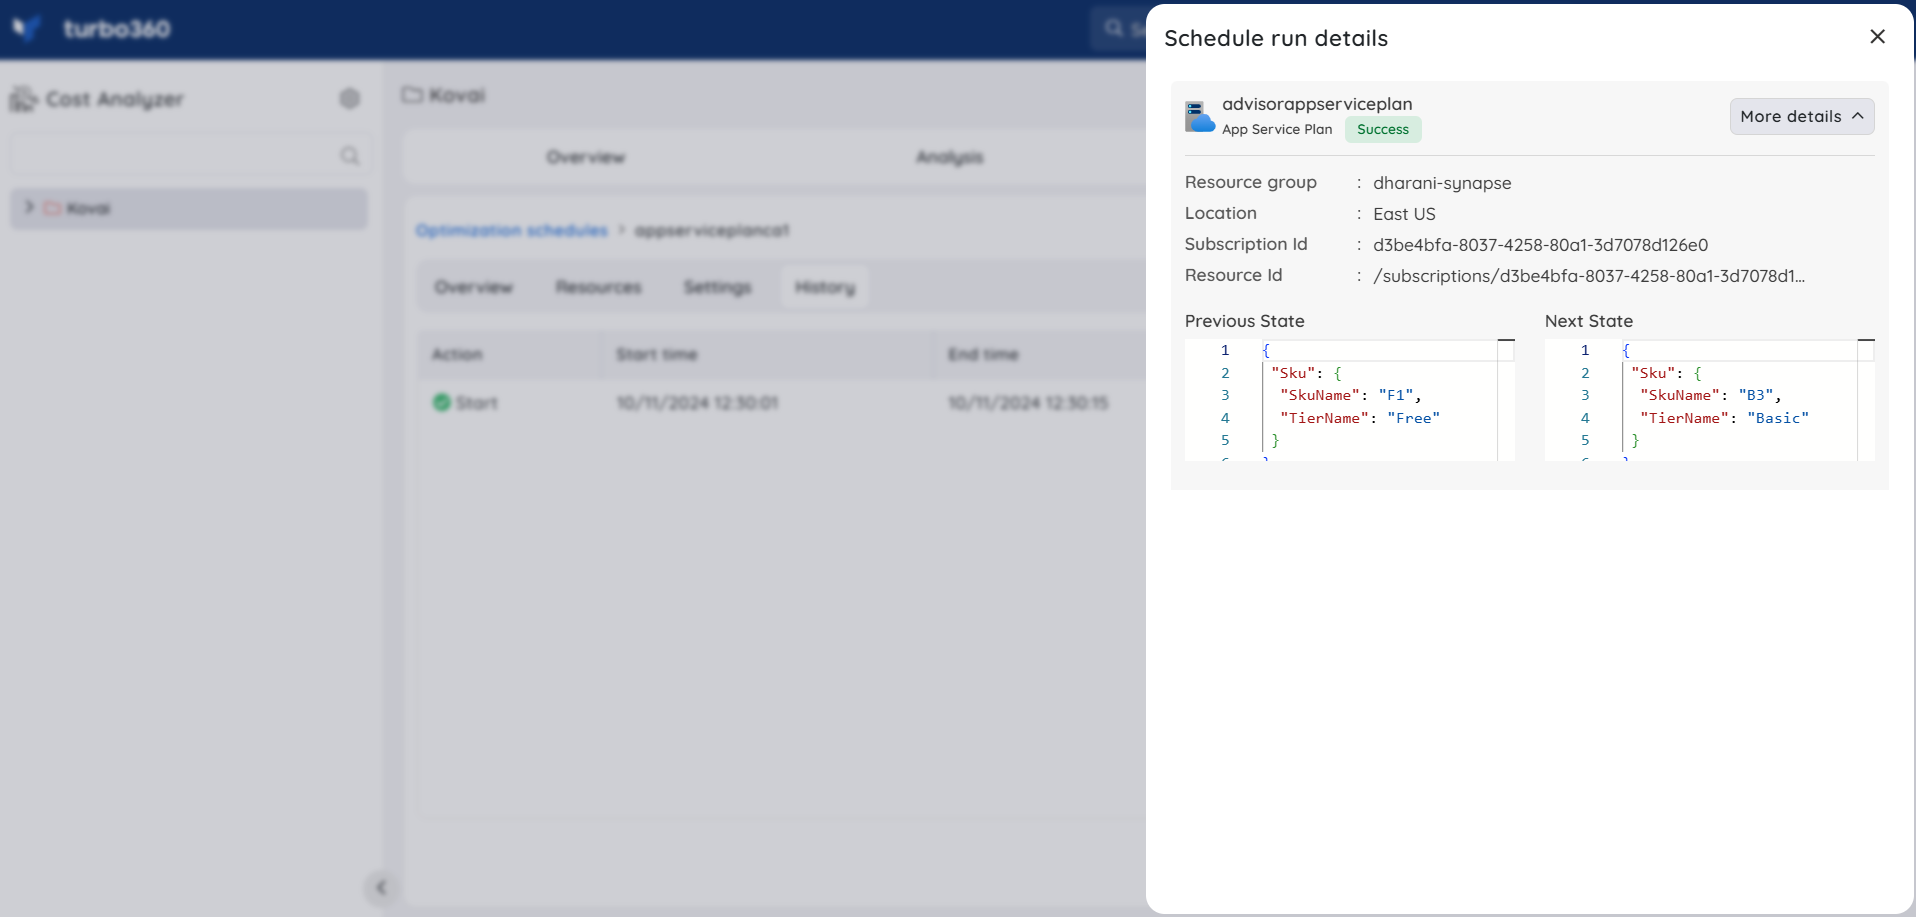
Run history
The optimization schedule runs only once every hour, irrespective of the Up and Down hours specified, and performs the necessary action.
The History section of an optimization schedule will display the details of the schedule run only when the previous and the next state are different.
Delete a schedule
- Navigate to Optimization -> Schedules in a Cost Group.
- Select Delete option from the Actions menu of the schedule to be deleted.
- Click Delete.
.png)
User access policy
The Cost Analyzer module now offers improved user access management within the Schedules section. This enhancement enables Account Owners and Owners to grant specific permissions to users for performing Schedule-related actions, ensuring greater flexibility and control without altering their overall module-level permissions.
.png)
Manage users option is now available in the Actions menu of each schedule.
This option lists all users in the Cost Analyzer module and allows the account owner or owners of specific accounts to grant additional schedule-level permissions to team members.
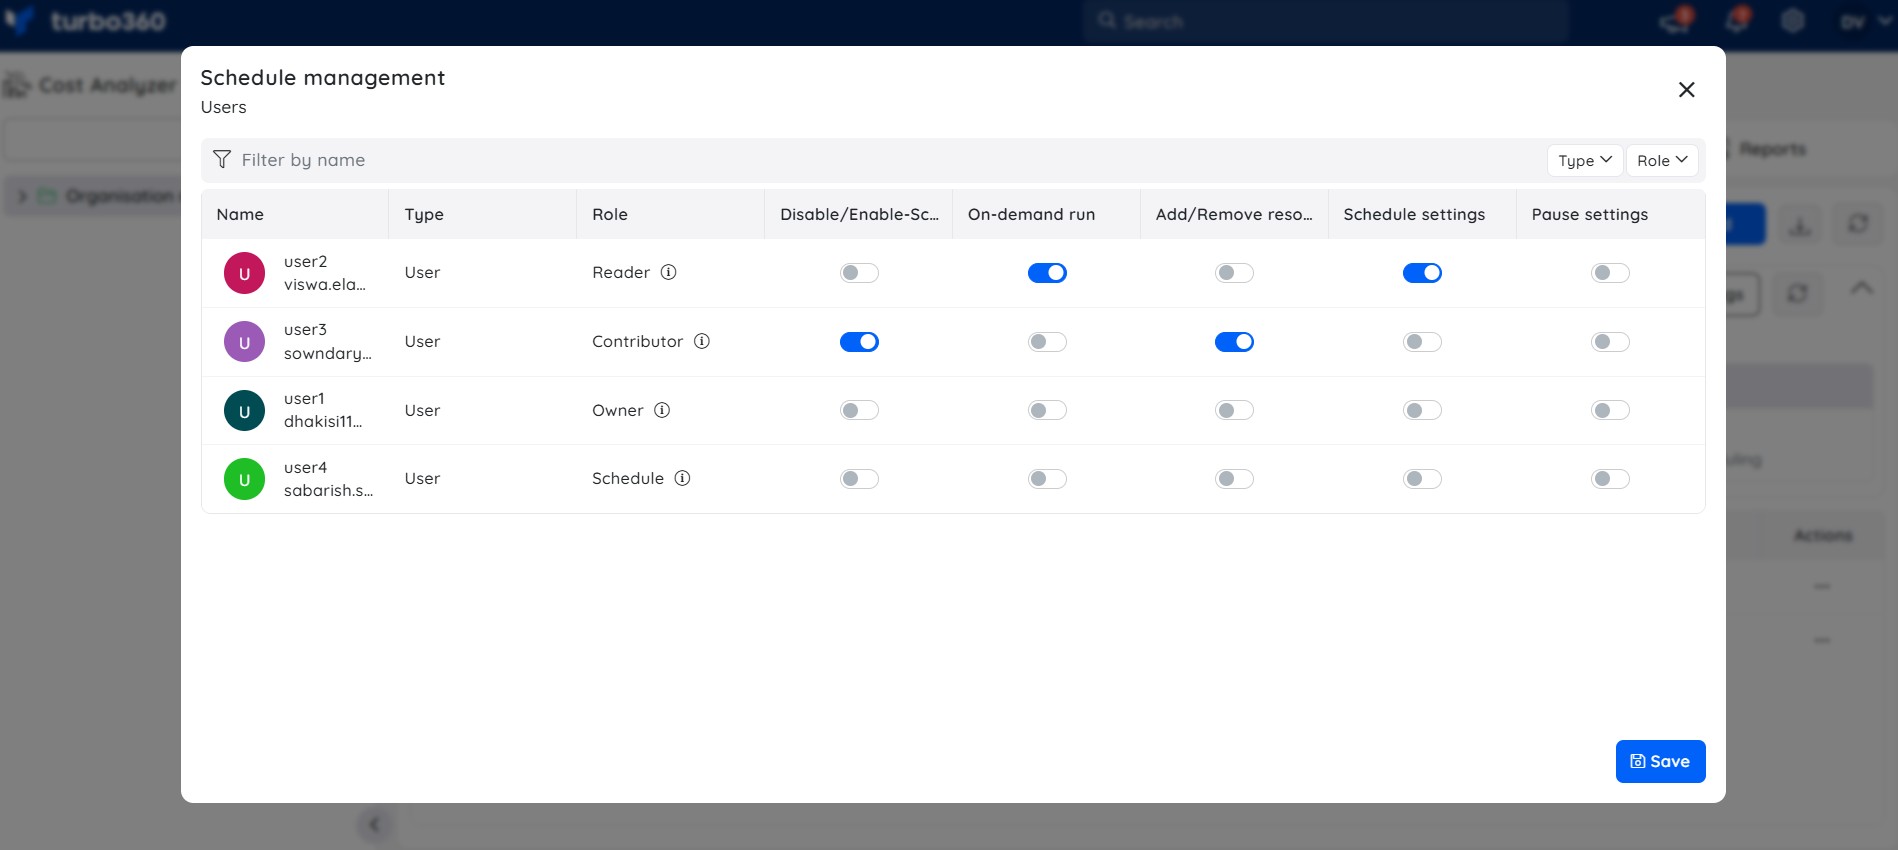
Using this feature, users including those with restricted permissions can now be granted rights to:
- Run schedules on demand
- Add or remove resources
- Update schedule settings
- Pause schedules
Benefits:
Provides fine-grained control and flexibility in managing schedule-level permissions.
Reduces dependency on higher-level roles such as Owner or Contributor.
Was this article helpful?