

Configuring Storage Account automated tasks
- 05 Aug 2026
- 7 Minutes to read
- Print
- DarkLight
- Download PDF
Configuring Storage Account automated tasks
- Updated on 05 Aug 2026
- 7 Minutes to read
- Print
- DarkLight
- Download PDF
Article summary
Did you find this summary helpful?
Thank you for your feedback!
Overview
Storage Account automated tasks let you schedule recurring jobs that automatically purge or modify data across Azure Storage services — blobs, queues, files, and tables. You define conditions for which data to target, and Turbo360 executes the cleanup or tier-change operations on a schedule.
Business value
Storage data accumulates continuously across blob containers, queues, file shares, and tables. Without automated cleanup, storage costs grow and data governance becomes a manual burden. Storage Account automated tasks remove the need for custom scripts or manual deletion, enforcing retention and tiering policies consistently at scale from within Turbo360.
How it works
When a Storage Account automated task runs, Turbo360 connects to the target Azure Storage account and applies your configured operation and filter conditions to identify matching data. The operation then executes — purging blobs, queue messages, files, or table entities, or changing blob access tiers — for all items that meet the conditions.
Turbo360 records the outcome in the task history, including the completed count and any errors encountered. You can review results from the Automated Tasks history view.
Steps
Use the following steps to create and configure a Storage Account automated task. Navigate to Business Applications > Automated tasks to get started.
Create a Storage Account automated task
Creating an automated task schedules Turbo360 to perform a specific storage operation on the target Storage account resource based on the conditions and schedule you define.
- Click New Automated Task.
- Select Storage Account as the resource type.
- Select the target Storage account from your Business Application.
- Select the operation type: Purge Storage Blobs, Purge Storage Queue Messages, Purge Storage Files, Purge Storage Table Entities, or Change Storage Blob Access Tiers.
- Configure the operation-specific filters (see Operations below).
- Configure the task schedule.
- Under Notifications, configure your notification channels and recipients (see Notifications).
- Click Save.
Operations reference
Purge Storage Blobs
Purge Storage Blobs removes blobs from a container based on the conditions you specify. Specify at least one of the following conditions:
- Blob created time
- Blob modified time
- Blob type (defaults to All if not specified)
- Blob name constraints
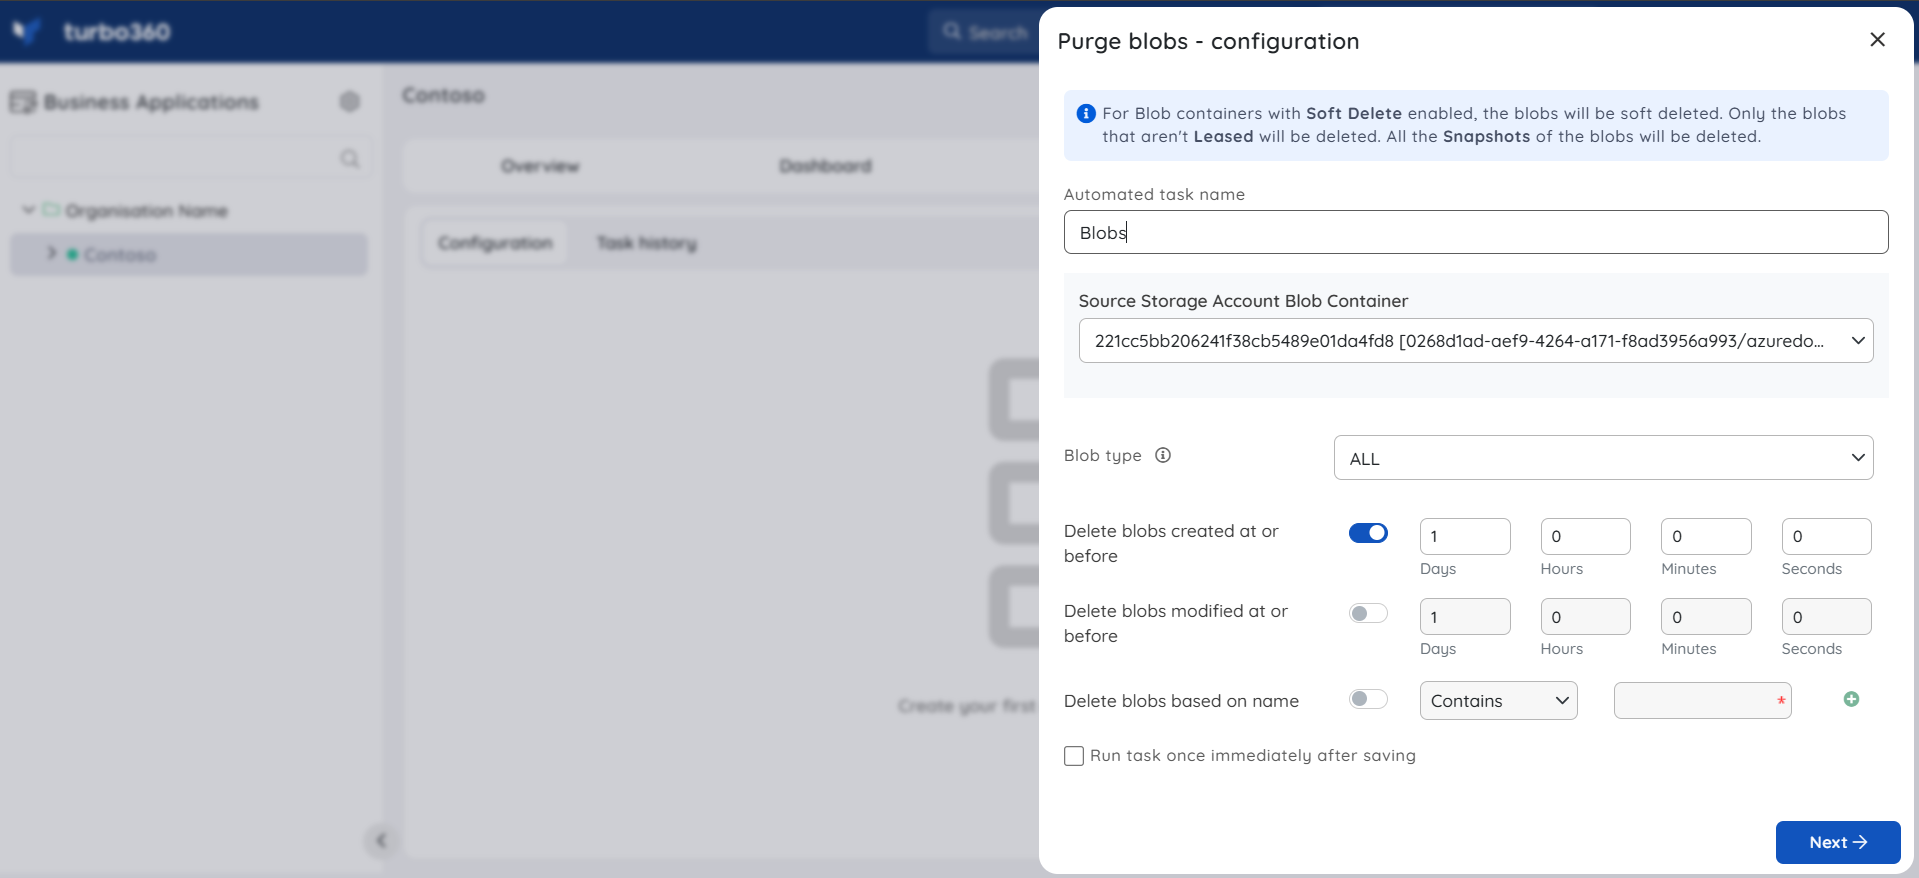
The Blob Type is set to All by default.
- For Blob Containers with Soft Delete enabled, the blobs will be soft deleted.
- Only blobs that are not Leased will be deleted.
- All Snapshots of the blobs will also be deleted.
Purge Storage Queue messages
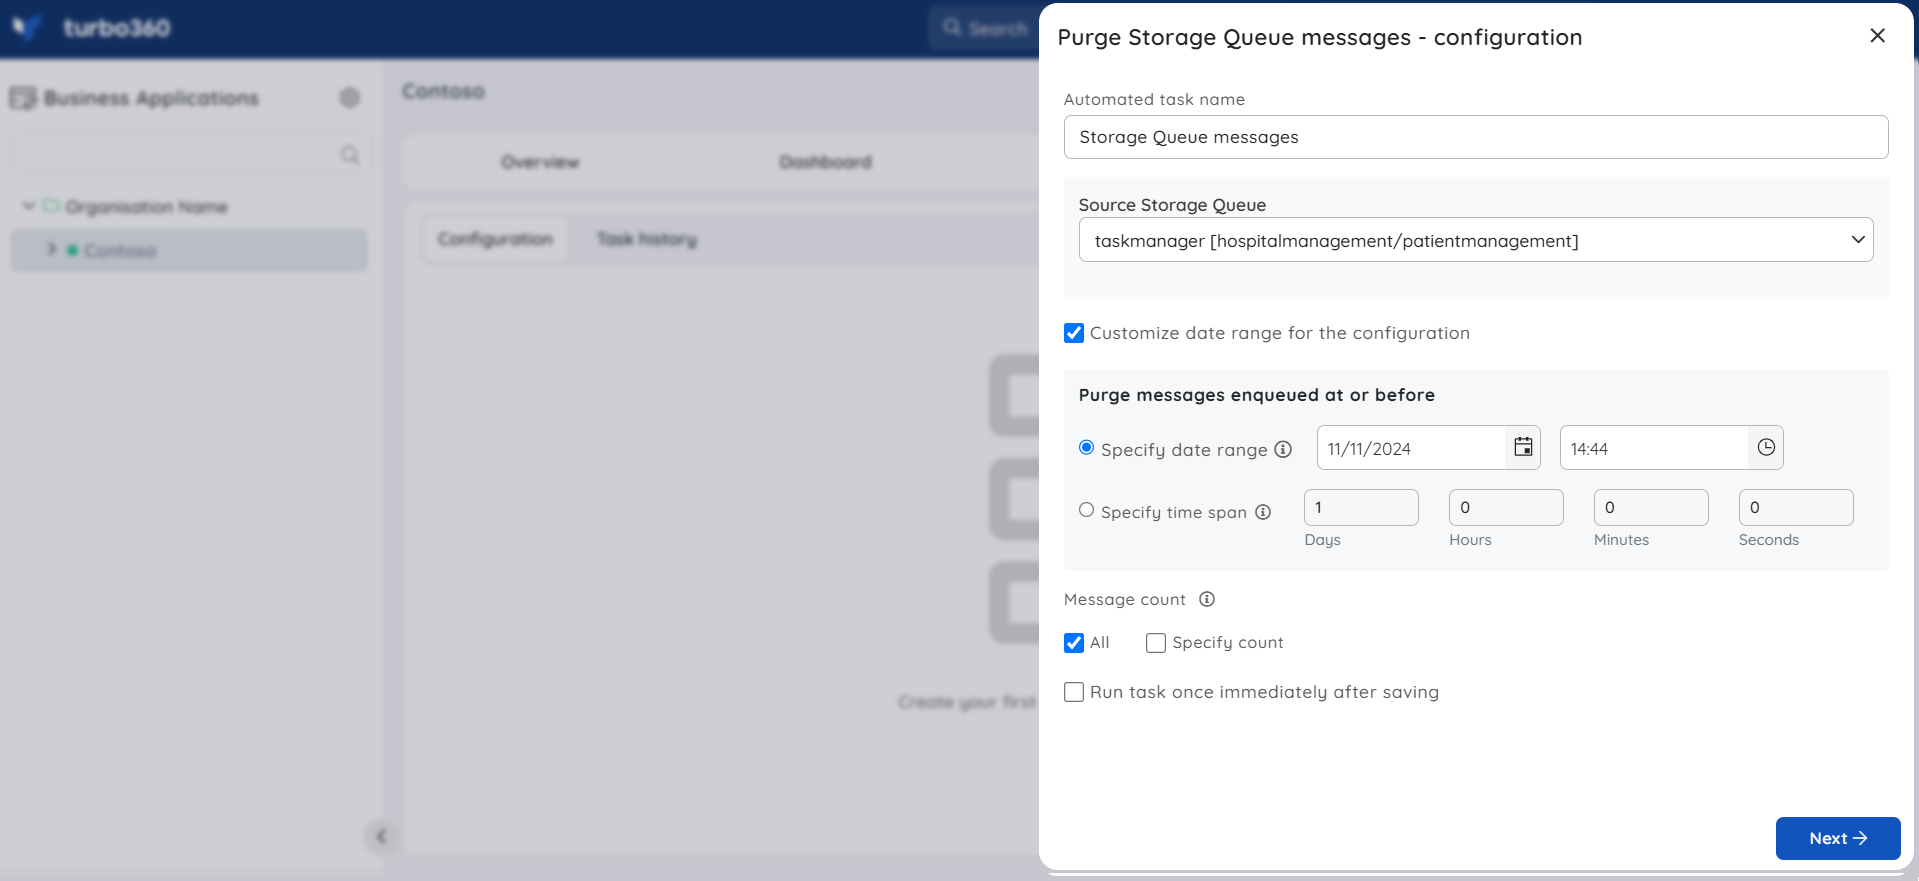
Purge Storage Queue messages removes messages from a Storage Queue based on the conditions you specify. Specify at least one of the following:
- Message count — the number of messages to process.
- Message Enqueued date range — process only messages enqueued at or before the specified date range. Enable Customize date range for the configuration to activate this filter.
- Message Enqueued time span — process only messages enqueued at or before the specified time. Enable Customize date range for the configuration to activate this filter.
Purge Storage Files
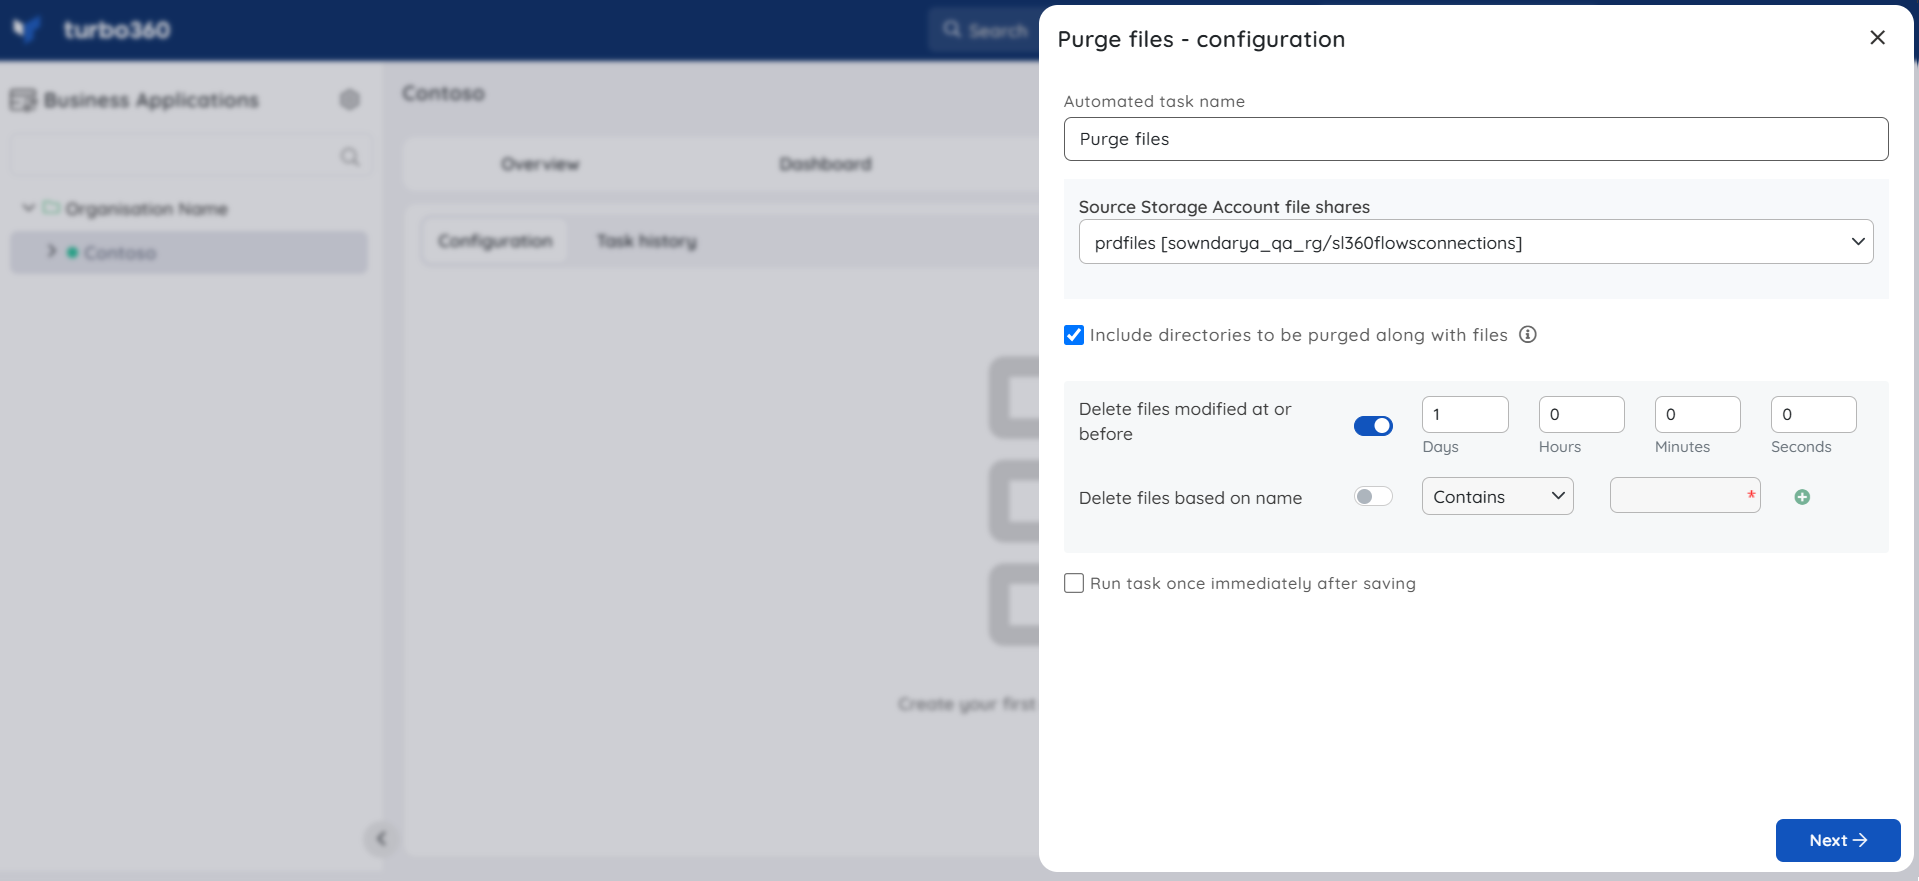
Purge Storage Files removes files from an Azure file share. Specify at least one of the following conditions:
- File modified time
- File name constraints
Note:
Files that are deleted will be permanently erased unless a snapshot of the file share or a backup has been taken.
Including directories to purge along with files
- When this option is enabled, the same conditions used to purge files (modified time and name constraints) are also applied to the file share's directories.
- When the automated task executes and the specified conditions for a directory are met, the directory and all files and subdirectories within it are deleted.
Purge Storage Table entities
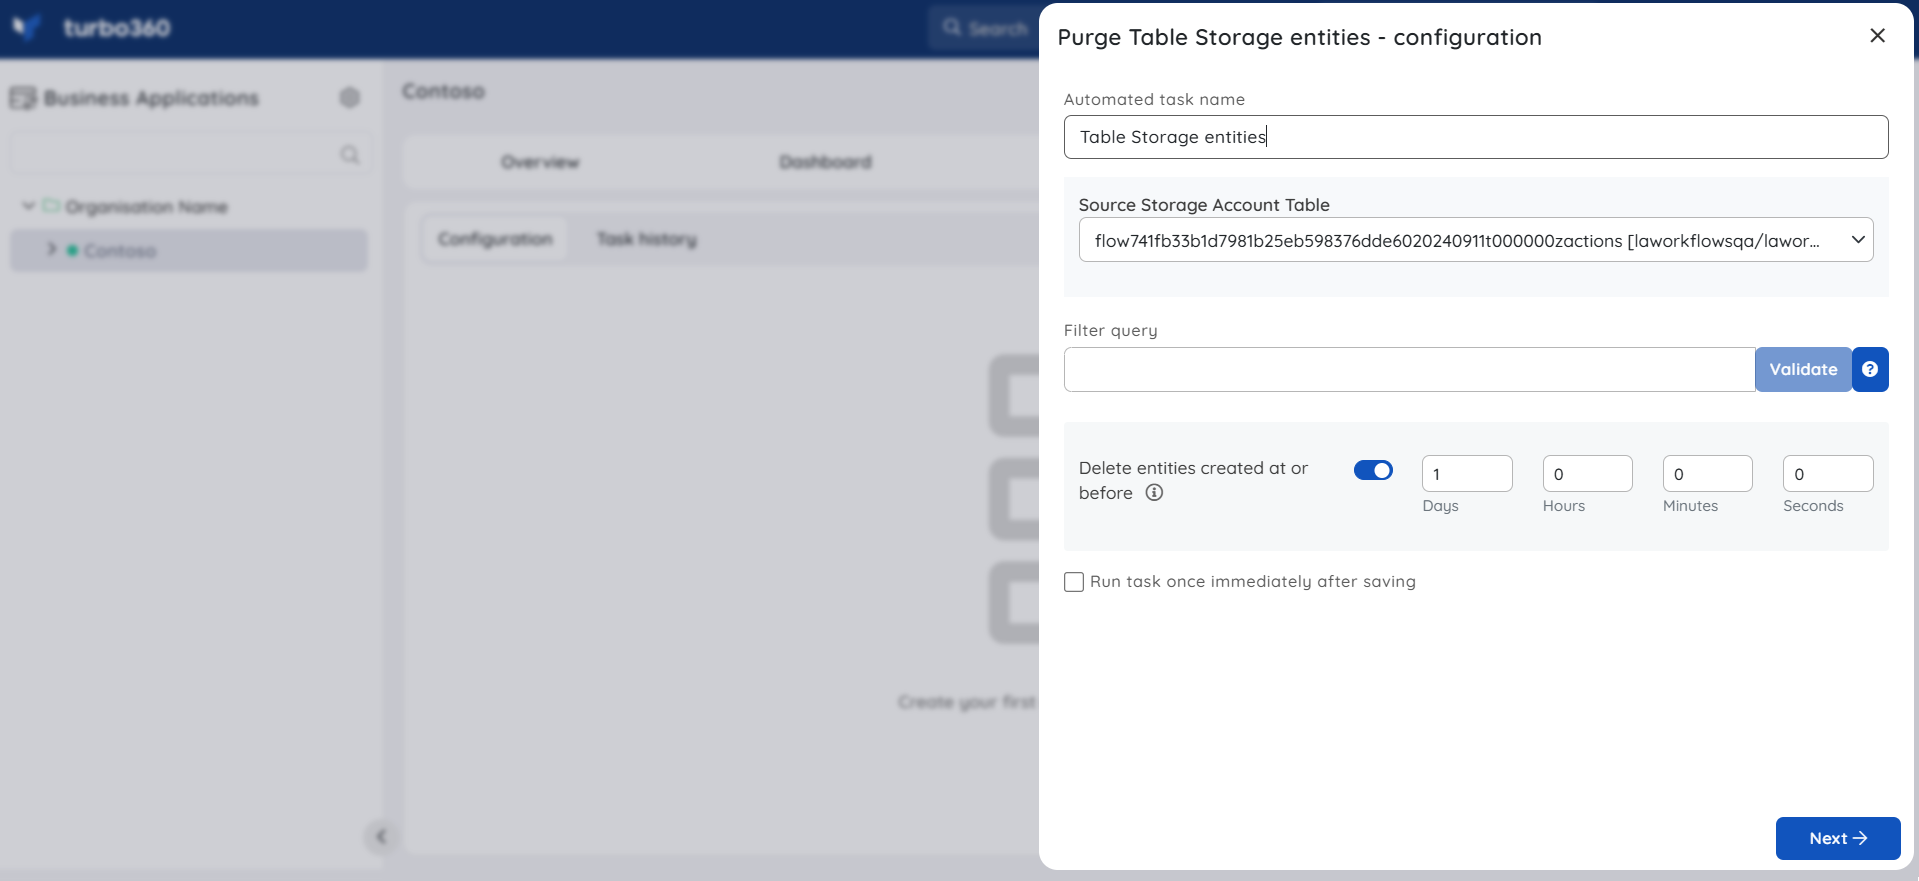
Purge Storage Table entities removes entities from an Azure Table based on conditions you specify. Specify at least one of the following:
- Timestamp — purge entities created at or before a specified time using the Delete Entities Created At or Before option.
- Filter Query — purge entities that match a custom OData filter query.
Filter Query
You can purge table entities by adding a Filter Query against properties including PartitionKey, RowKey, Timestamp, and user-defined properties. After adding the filter, validate it before saving the task.
The Filter Query conforms to the OData Protocol Specification.
Tips
- Use
DateTime 'ISO date-time formatted string'for DateTime values. Alternatively, useDateTime 'dd/MM/yyyy HH:mm:ss'— Turbo360 converts it to ISO format during validation. Provide a local time; Turbo360 converts it to UTC before validation. - Use
guid 'Your 128-bit Guid'for Guid values. - Use the suffix
Lafter values of type Int64. - Use
trueorfalsefor Boolean values. - Use single quotes for string values. Escape single quotes within the string with two consecutive single quotes.
Supported Comparison Operators
| Operator | Expression |
|---|---|
| Equal | eq |
| Not Equal | ne |
| Less than | lt |
| Greater than | gt |
| Less than or Equal | le |
| Greater than or Equal | ge |
Supported Binary Operators
| Operator | Expression |
|---|---|
| And | and |
| Or | or |
| Not | not |
Sample Filter Query strings
PartitionKey eq 'PartitionKey' and RowKey eq 'RowKey'
PartitionKey ne 'PartitionKey' or not IsActive
PartitionKey eq 'PartitionKey' and ( UserKey lt 10 or datetime'25/09/2020 10:30:00' )
UserKey eq 'Device''s Info'
Change Storage Blob Access Tiers
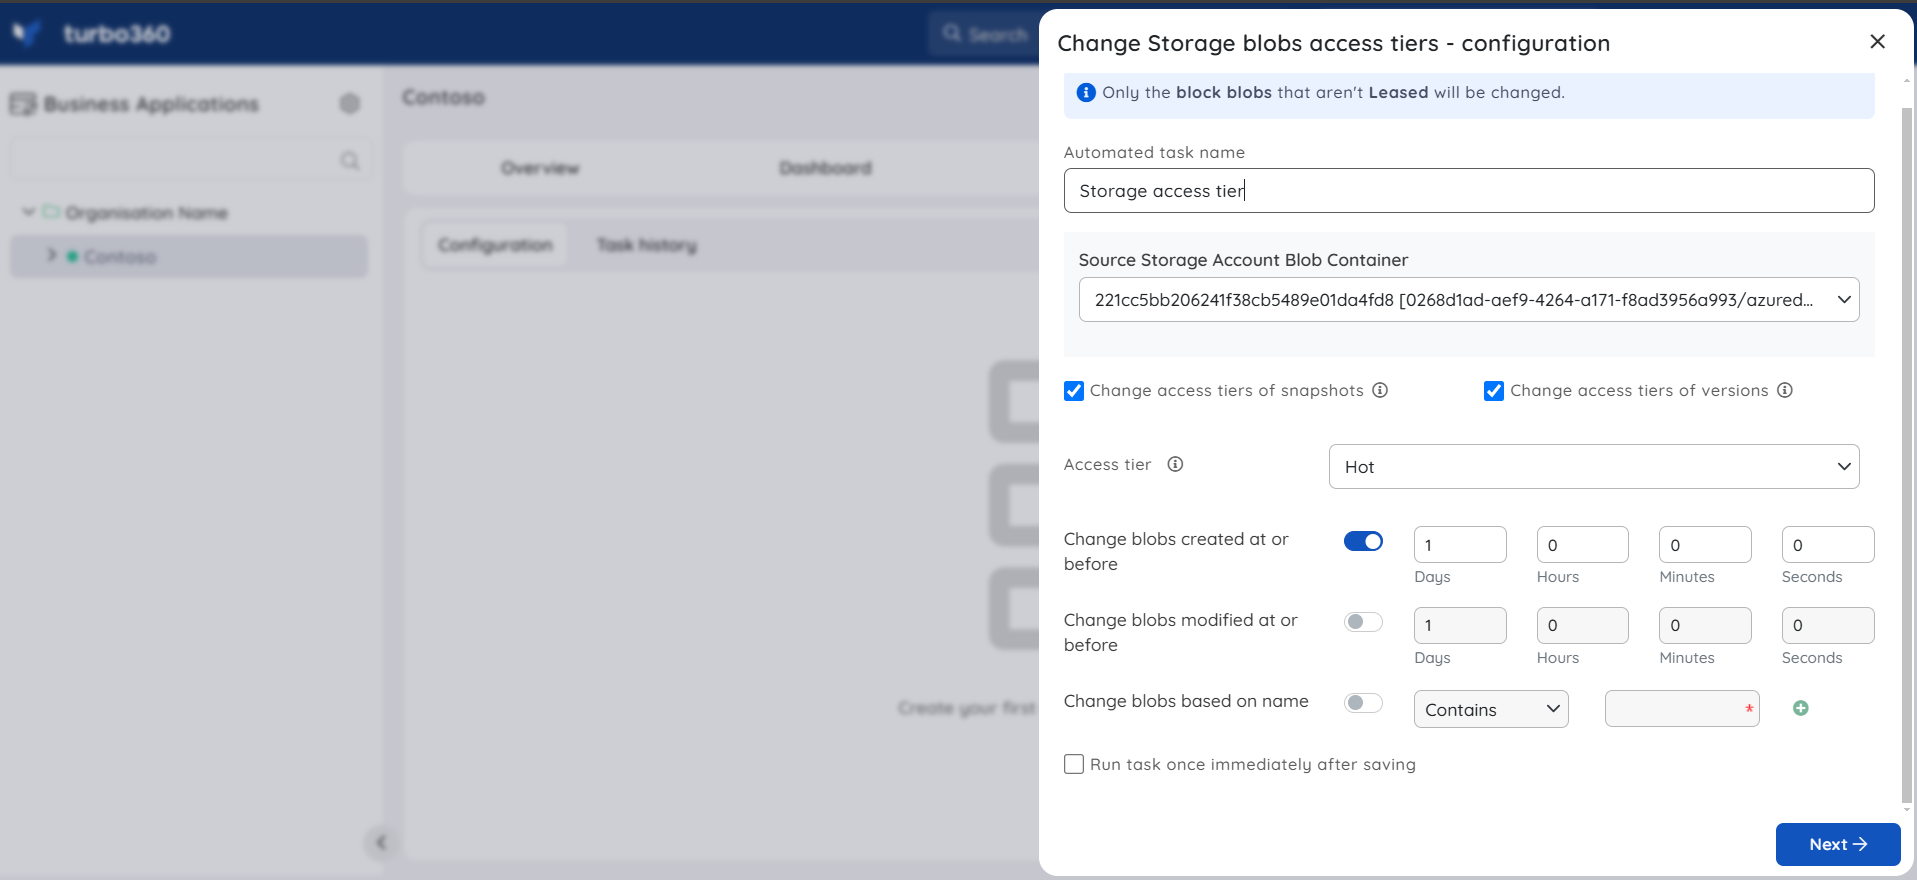
Change Storage Blob Access Tiers automatically moves blobs between Azure Storage access tiers based on the conditions you specify. Azure Storage access tiers include:
- Hot tier — optimized for frequently accessed or modified data. Highest storage costs, lowest access costs.
- Cool tier — optimized for infrequently accessed or modified data. Minimum retention of 30 days. Lower storage costs, higher access costs than Hot.
- Archive tier — offline tier for rarely accessed data with flexible latency requirements. Minimum retention of 180 days.
Automating tier changes reduces billing impact by ensuring blobs move to lower-cost tiers as their access frequency decreases. Specify at least one of the following conditions:
- Blob created time
- Blob modified time
- Blob access tier type
- Blob name constraints
- Snapshots and versions of blobs in the archive tier cannot be changed to hot or cool tiers.
- The tier cannot be changed for a blob that is currently being rehydrated.
- The tier cannot be changed to archive when soft delete is disabled for the storage account's blobs or containers.
- When a Storage account uses GRS, GZRS, or ZRS replication, its blobs, snapshots, and versions cannot be moved to the archive tier.
- Deleted versions completed count, if any, will be included in the automated task run count.
- Snapshots and versions of leased blobs can have their access tier changed only from Turbo360; the completed task count for these will also be included.
Alert configuration
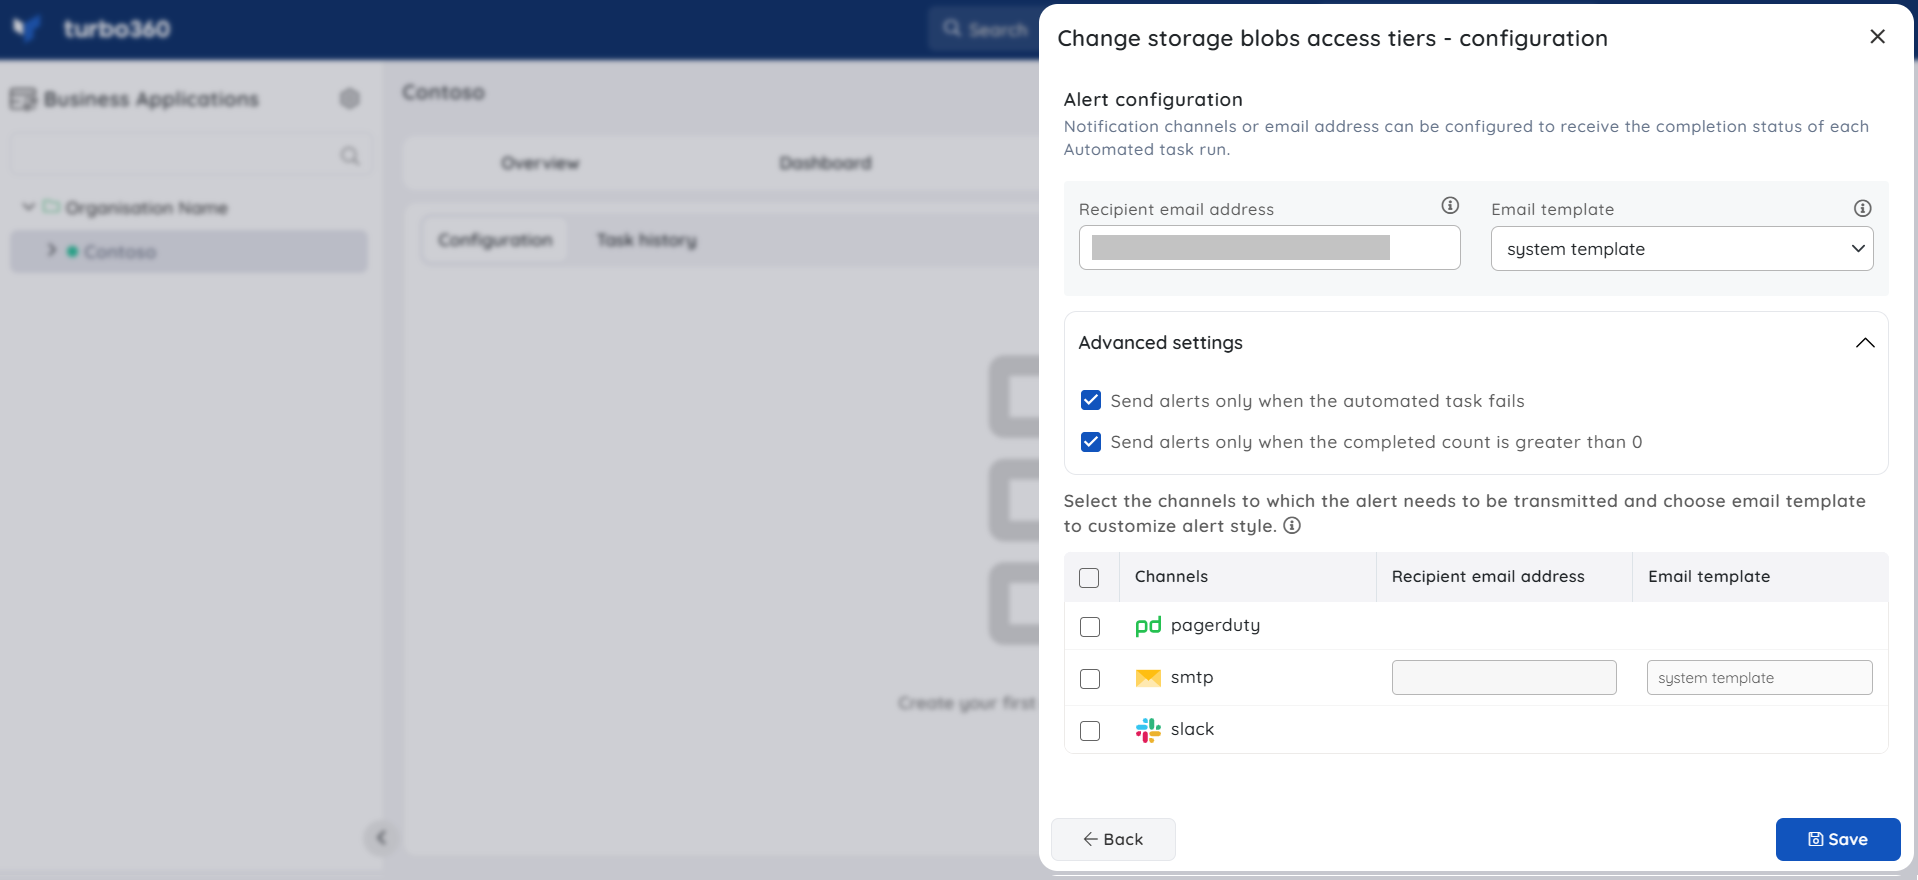
Configure notifications in the final section of the automated task configuration panel. You can set one or more notification channels and provide individual email addresses or a group distribution list.
Under Advanced settings, you can restrict when notifications are sent:
- Send alerts only when the automated task fails — you receive a notification only if the task itself fails to execute.
- Send alerts only when the completed count is greater than 0 — you receive a notification only when at least one item was processed.
Enabling both options notifies you when the task fails or when the completed operation count exceeds zero.
Example scenario
Your integration platform writes all processed Service Bus messages as block blobs into a Storage account container. After processing, blobs are no longer accessed but accumulate indefinitely. You configure two automated tasks: one to move blobs older than 30 days to the Cool tier, and one to purge blobs older than 180 days. Both run nightly. You enable Send alerts only when the completed count is greater than 0 so that you only receive notifications on days when data is actually moved or deleted.
Troubleshooting
Automated task runs but no items are processed
Cause: No blobs, messages, files, or entities matched the configured filter conditions.
Fix: Review the filter conditions and verify that matching data exists in the target storage resource. Broaden or remove filters to test.Blob purge task deletes blobs but they still appear in the container
Cause: Soft Delete is enabled on the container. Soft-deleted blobs remain visible until their retention period expires.
Fix: This is expected behavior. If hard deletion is required, disable Soft Delete on the container in Azure before running the task.Change Storage Blob Access Tiers task fails for archive-tier blobs
Cause: Archive-tier blobs being rehydrated cannot have their tier changed. GRS/GZRS/ZRS accounts cannot move blobs to archive.
Fix: Wait for rehydration to complete before changing the tier. For replication-restricted accounts, choose a supported target tier (hot or cool).Table entity purge fails with a filter validation error
Cause: The OData Filter Query contains a syntax error or an unsupported operator or value format.
Fix: Review the filter syntax against the supported operators and value formats. Validate the filter using the built-in validation step before saving the task.Notifications are not being received
Cause: Notification channels are not configured, or the Advanced settings filters are preventing delivery.
Fix: Confirm that at least one notification channel and recipient is configured. If Send alerts only when the completed count is greater than 0 is enabled, verify that the task is processing items.
Related articles
Was this article helpful?