

Cost monitors
- 05 Aug 2026
- 5 Minutes to read
- Print
- DarkLight
- Download PDF
Cost monitors
- Updated on 05 Aug 2026
- 5 Minutes to read
- Print
- DarkLight
- Download PDF
Article summary
Did you find this summary helpful?
Thank you for your feedback!
Overview
Cost monitors let you track Azure spend against narrow, rule-based criteria — going beyond the broader Group budget and Anomaly detection options. Scope a monitor to a single resource type (such as virtual machine costs) or a specific tag, so targeted overruns don't get lost inside an aggregate budget.
Business value
Cost monitors catch cost deviations within narrow segments that broader budgets can miss, giving teams earlier, targeted alerts instead of waiting for an aggregate threshold breach.
Prerequisites
A Cost management group must exist before you can configure a cost monitor. You can create a monitor from an existing Cost management group, or create a new one first and then configure the monitor for it.
Required permissions
Cost monitors use the Monitoring feature permission, available under Specify feature permissions during role creation.
- Read — allows users to view all monitors.
- Manage — allows users to perform operations such as editing and enabling monitors.
.png)
Dependencies
Cost monitors depend on a Cost management group.
How it works
- Each monitor runs on a defined interval — Daily, Monthly, or Last 7 days.
- A monitor applies one or more rules, each scoped to selected subscriptions and a cost metric — Actual cost or Amortized cost.
Actual cost: raw usage and purchase charges for Azure and third-party Marketplace offerings, as they appear on the invoice.
Amortized cost: reservation purchase charges divided evenly across the term, linked to the resources that consumed them.
- Filters narrow each rule to specific cost data. See Cost filtering for details.
- Each rule defines a budget as Static (a fixed value) or Dynamic (a defined cost difference that triggers a violation).
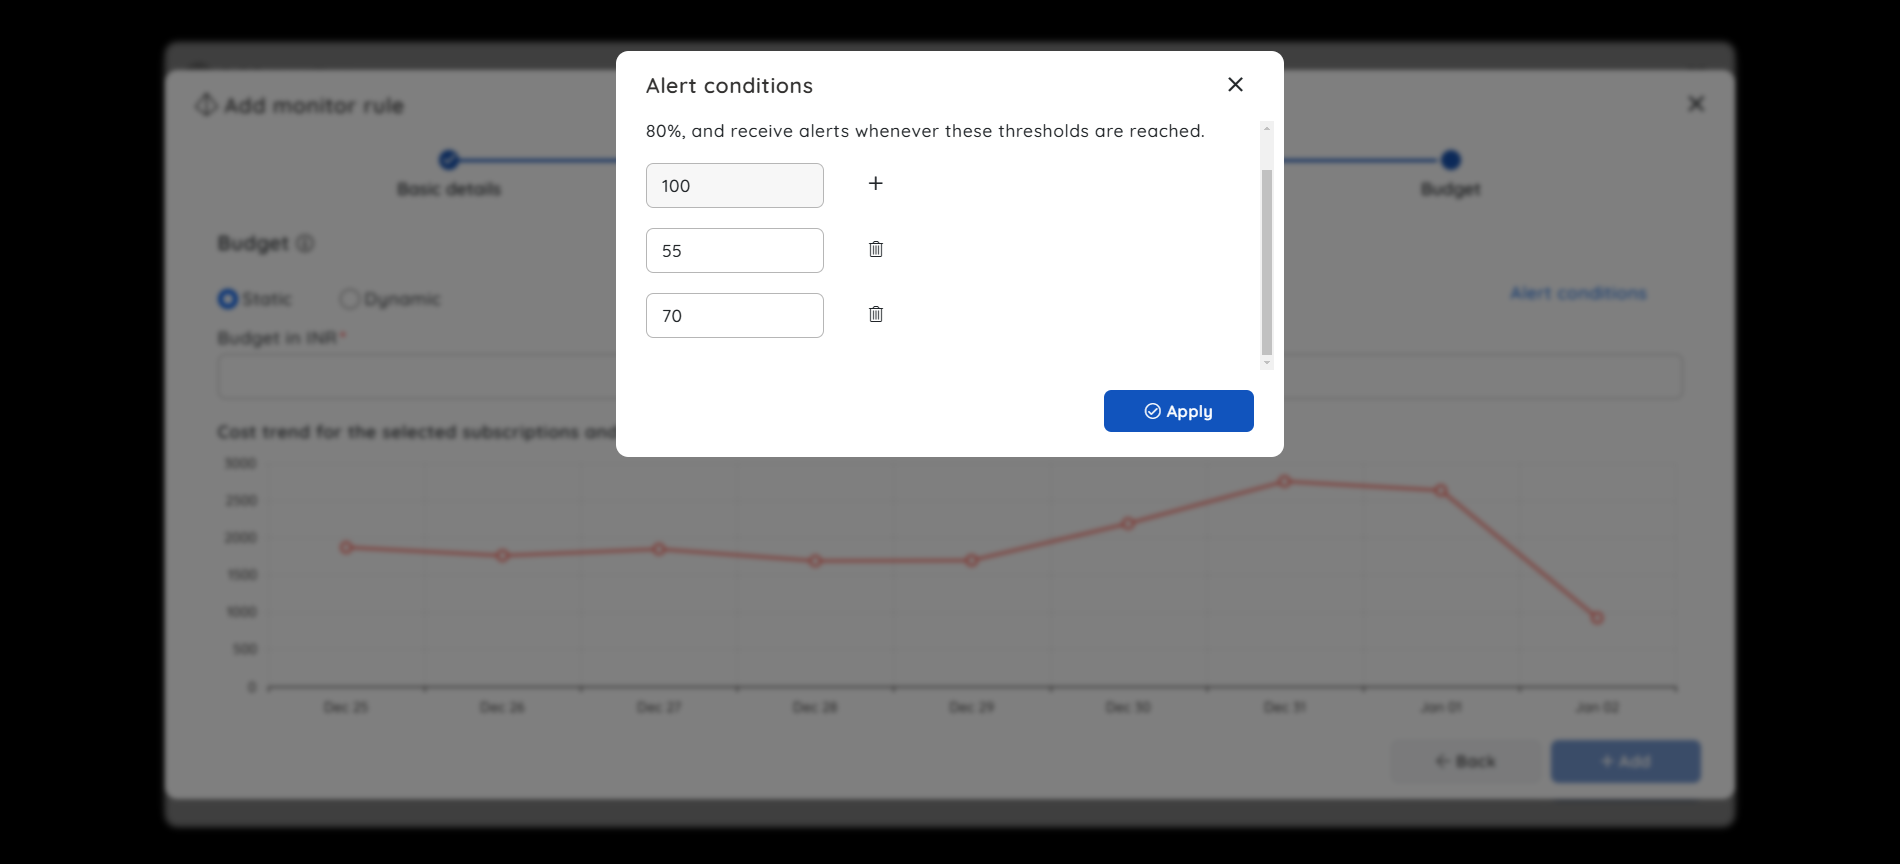
For Static budgets, you can also configure alert conditions — percentage thresholds that trigger alerts as spend approaches the limit, before a full breach occurs.
- Alerts route through a selected escalation policy and notification channel.
- On every monitoring cycle, the latest values are compared against the budget — and percentage thresholds, for Static budgets — and alerts trigger on breach.
- Triggered alerts become Incidents, which can be tracked, resolved, and reopened at any time.
Steps
Use the following steps to create, update, remove, enable or disable cost monitors, and manage alert incidents. Navigate to the Monitoring card within the relevant Cost management group to get started.
Create a cost monitor
Creating a cost monitor defines the rules, budget type, and alert configuration that Cost Analyzer evaluates on every monitoring cycle.
- Go to Cost management group > Monitoring and click Configure in the Monitoring card.
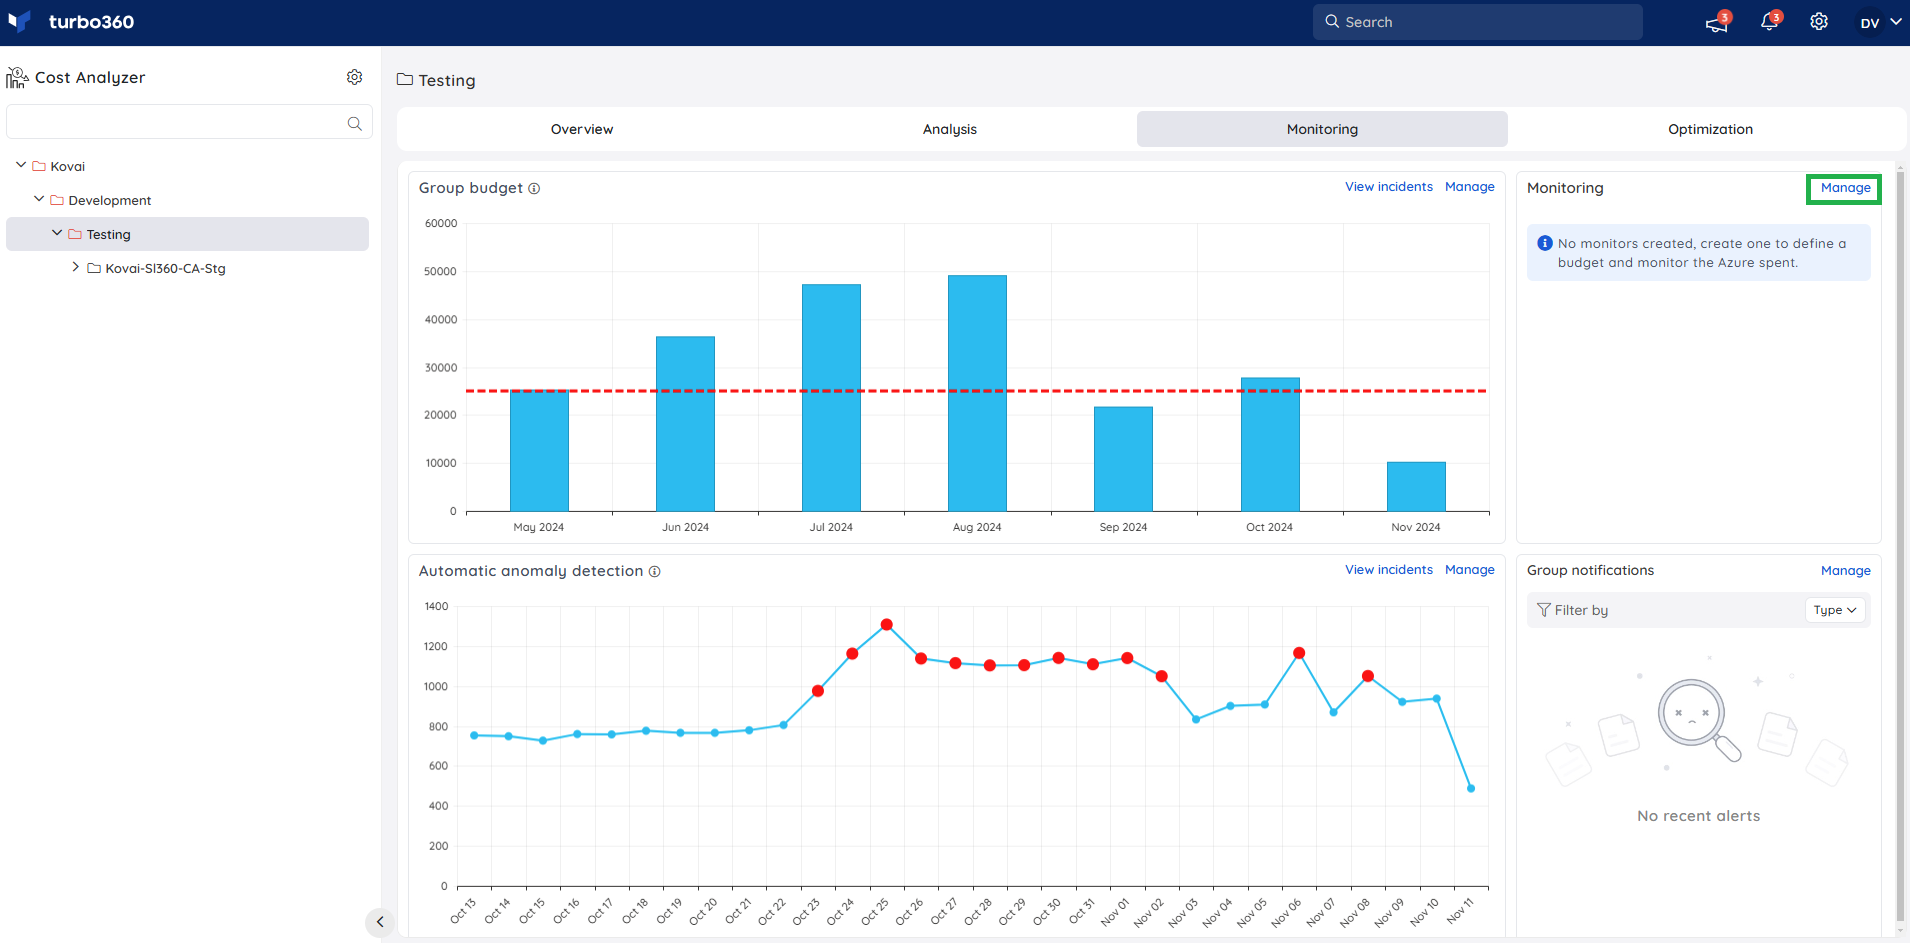
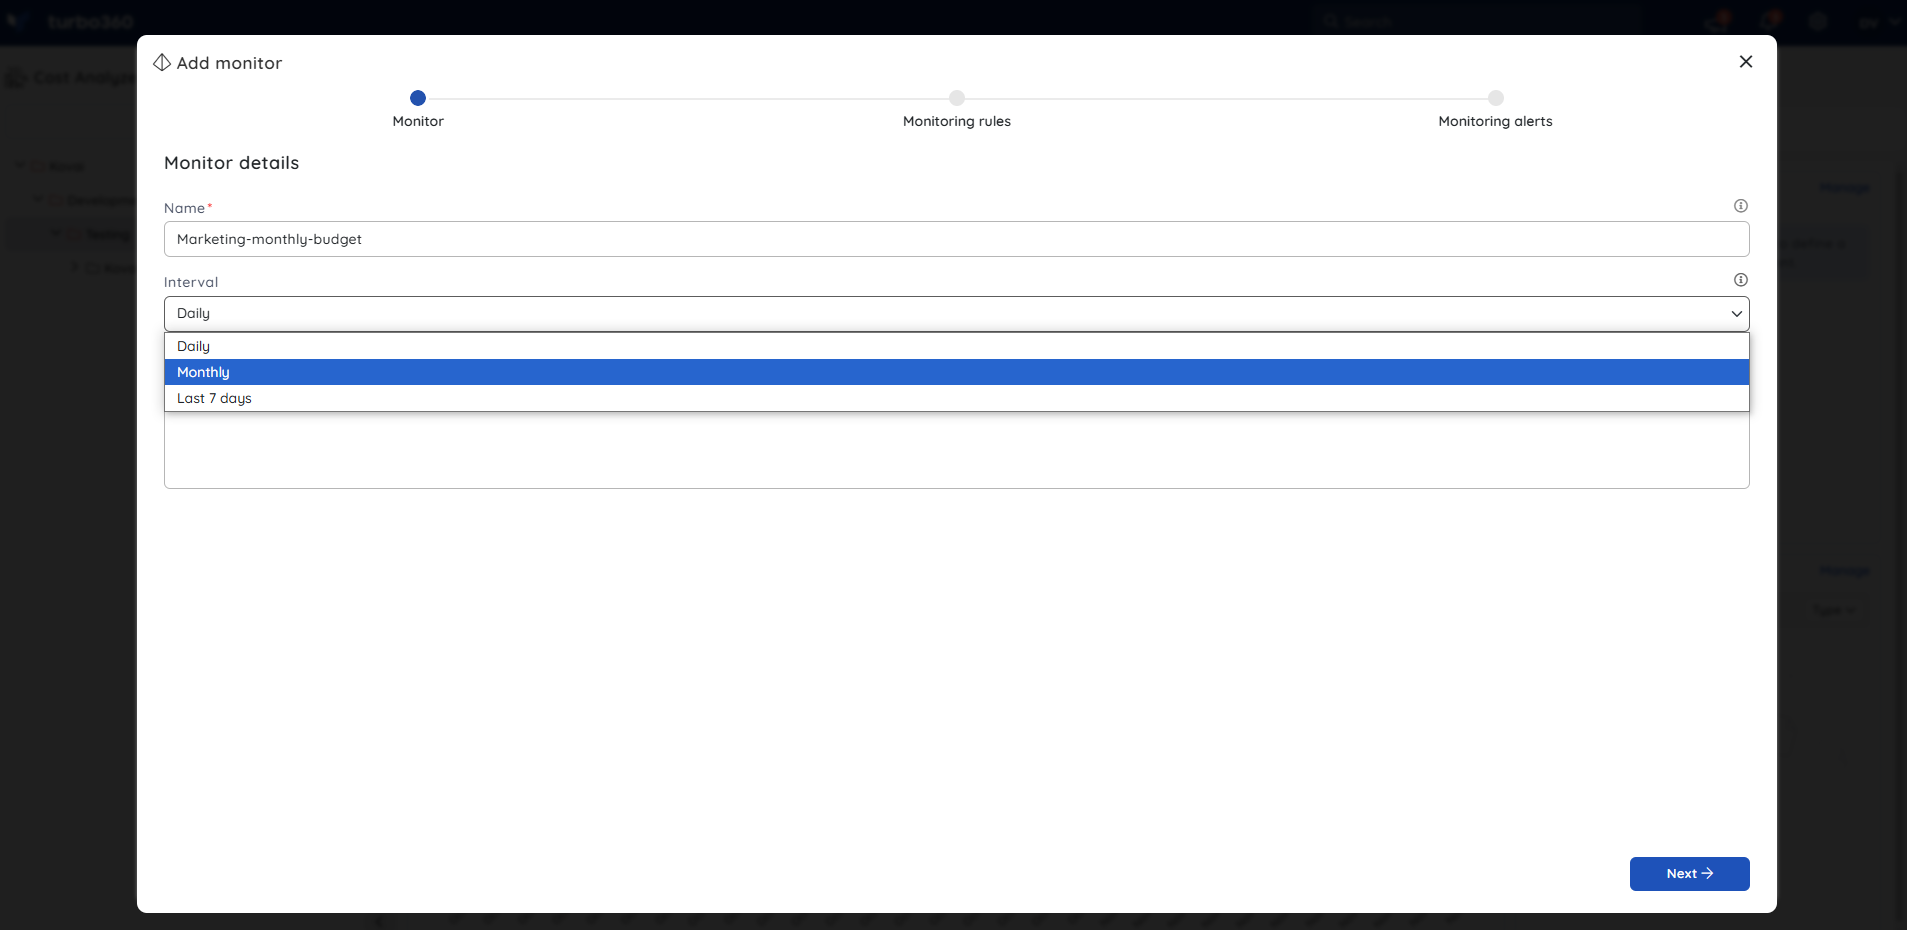
- Click Configure monitor and enter a name for the monitor.
- Choose Daily, Monthly, or Last 7 days as the run interval. Click Next.
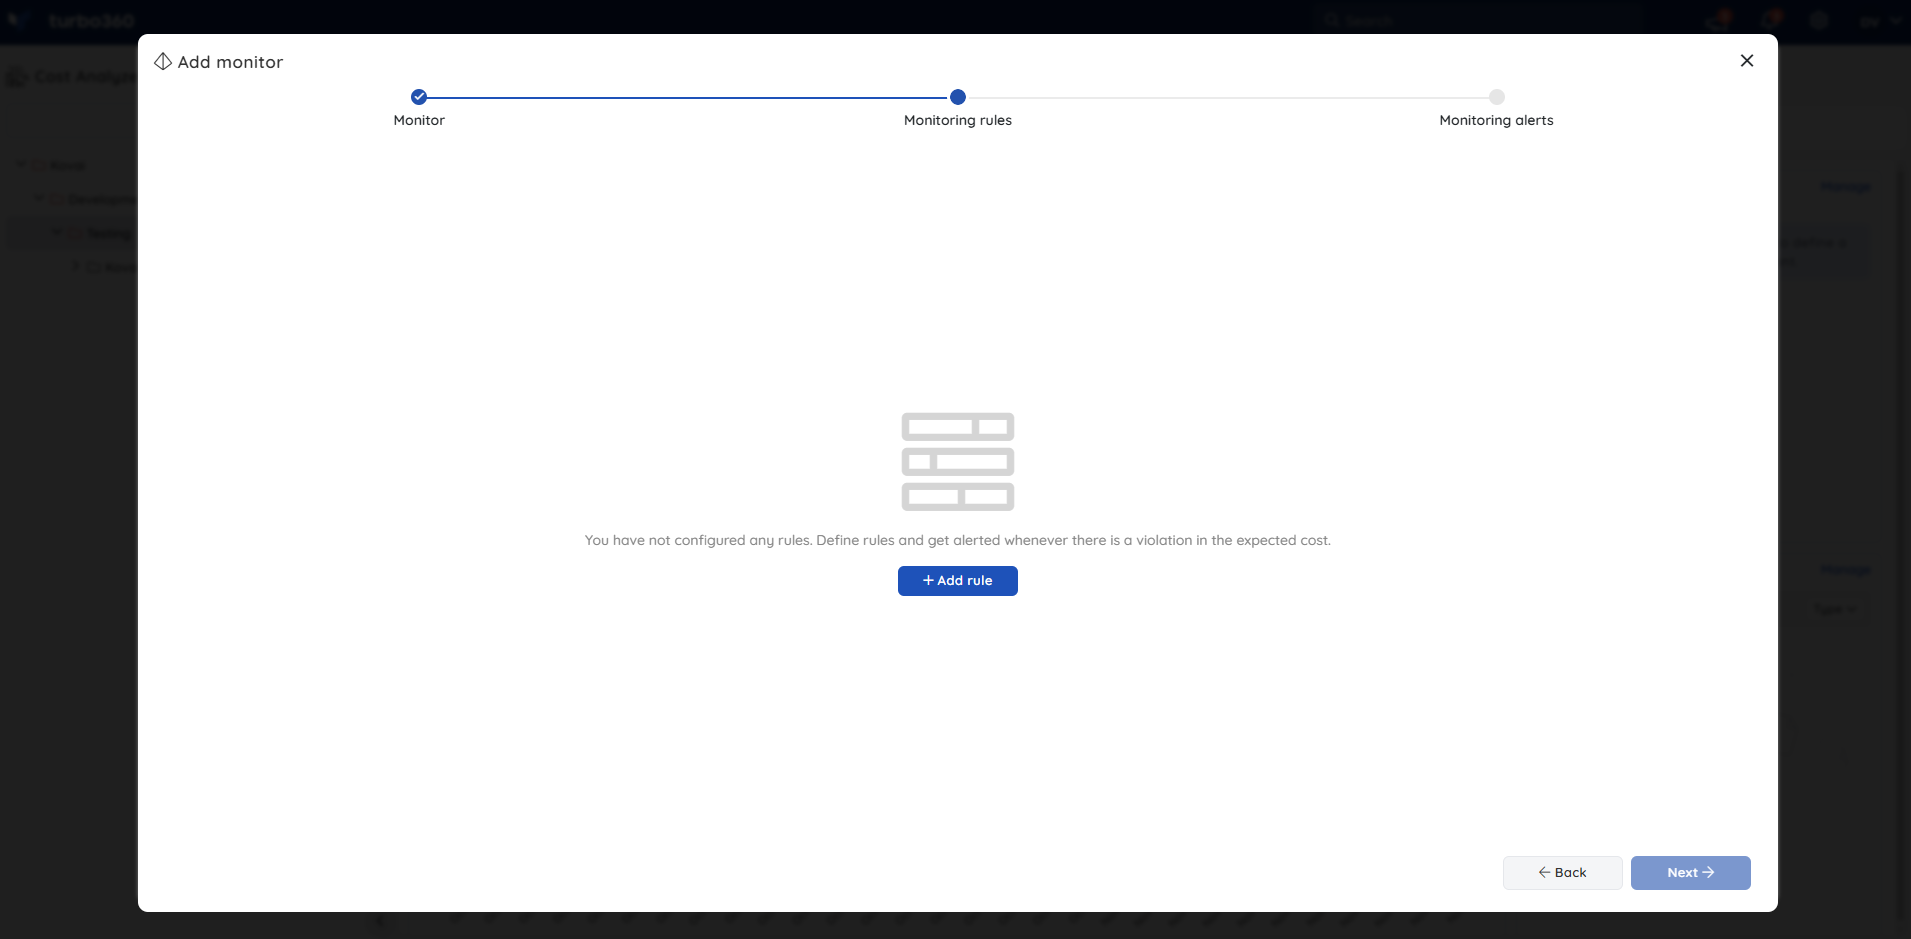
- Click Add rule to define a monitoring rule.
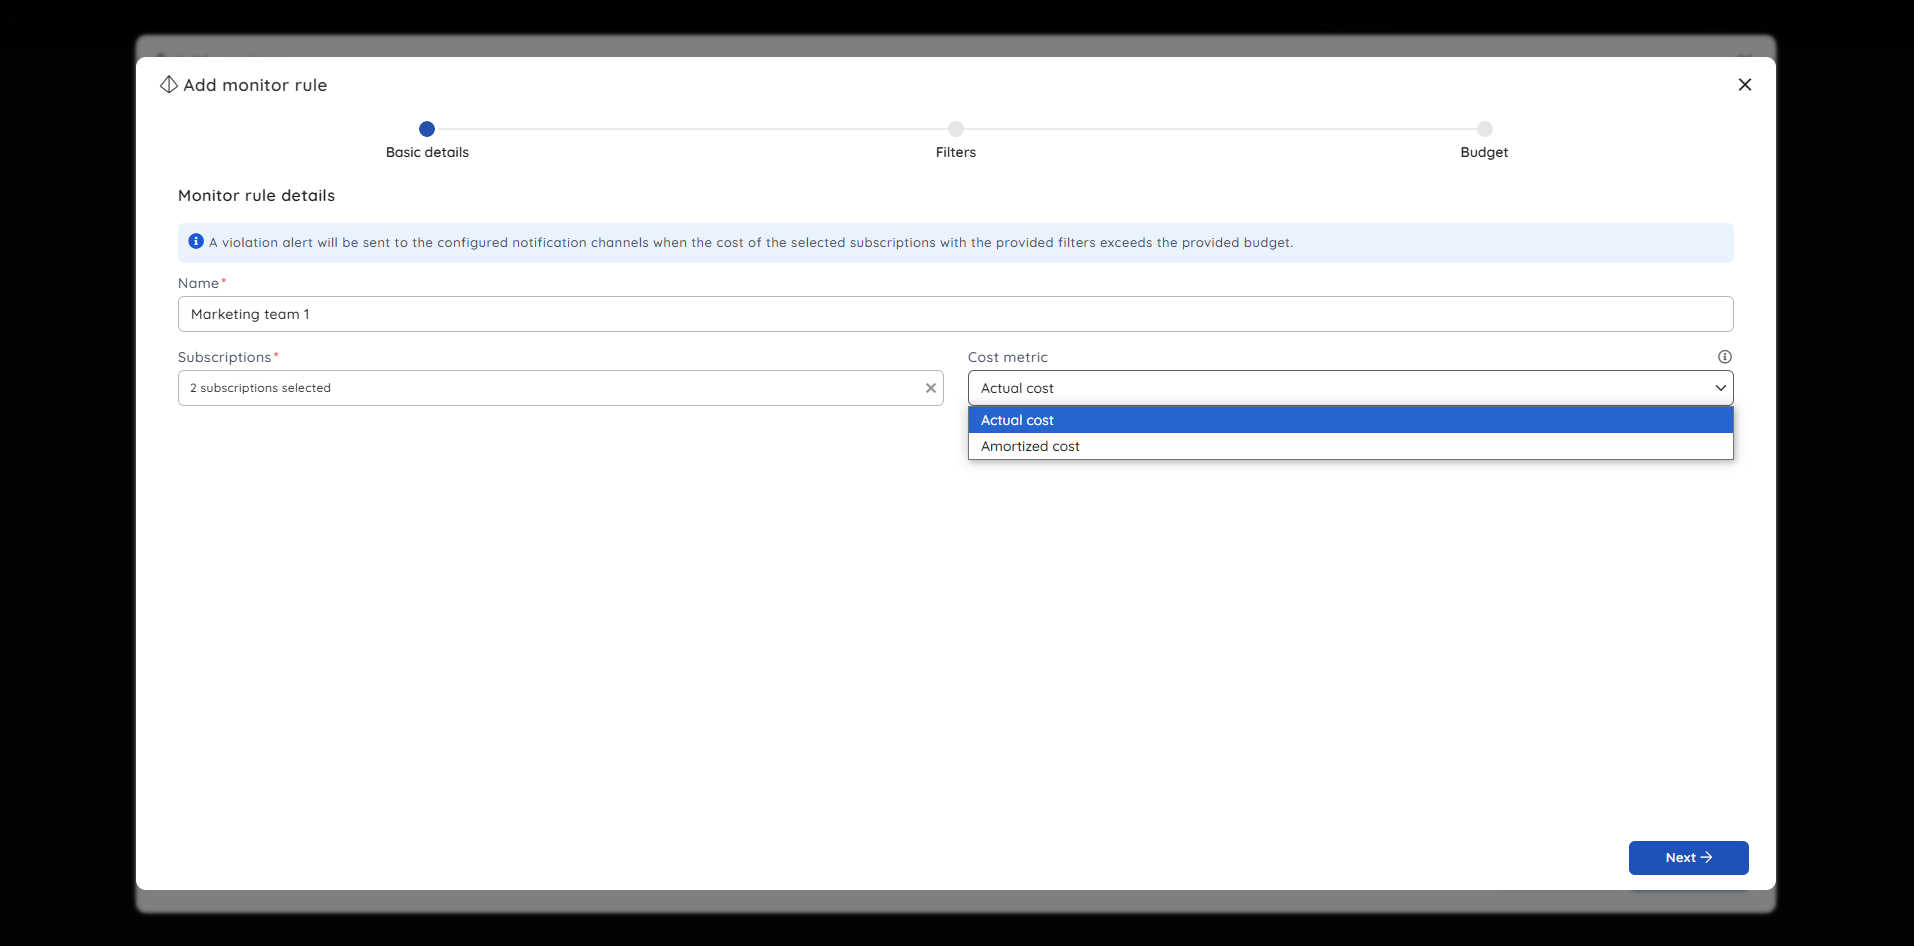
- Name the rule, select the subscriptions to monitor, and choose Actual cost or Amortized cost. Click Next.
- Add filters to scope the cost data, then click Next.
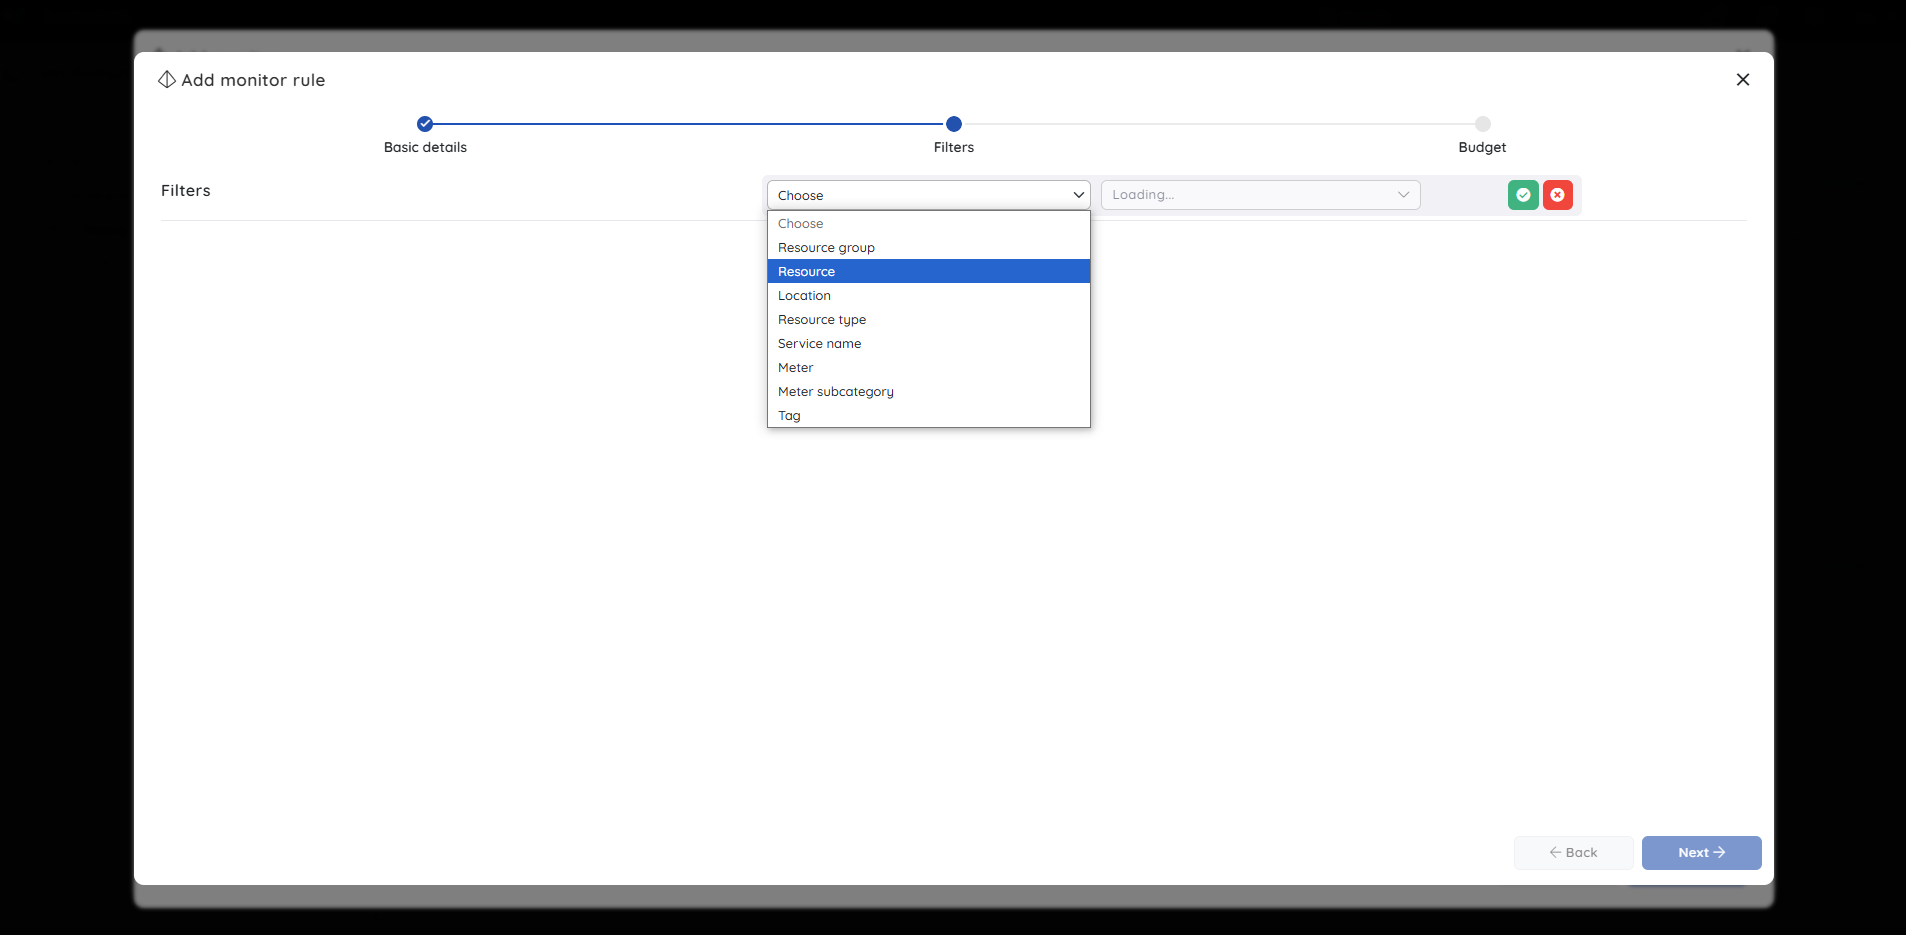
- Choose Static or Dynamic to define the budget limit.
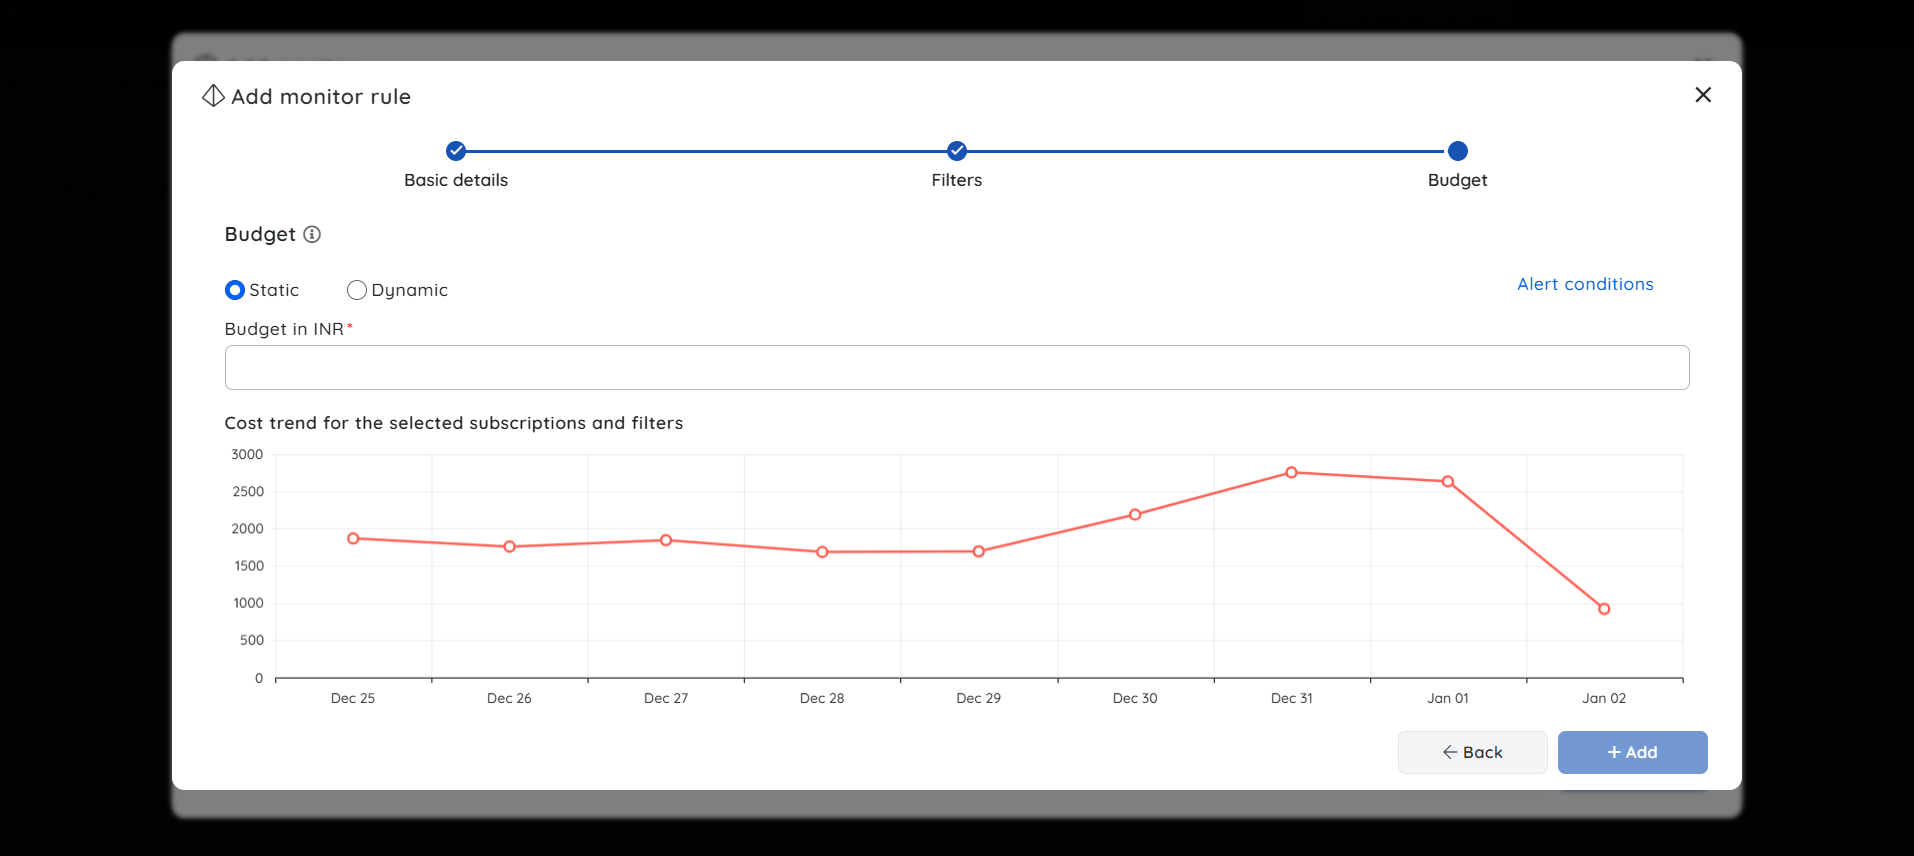
For Static budgets, click Alert conditions, set the desired percentage limits, and click Apply.
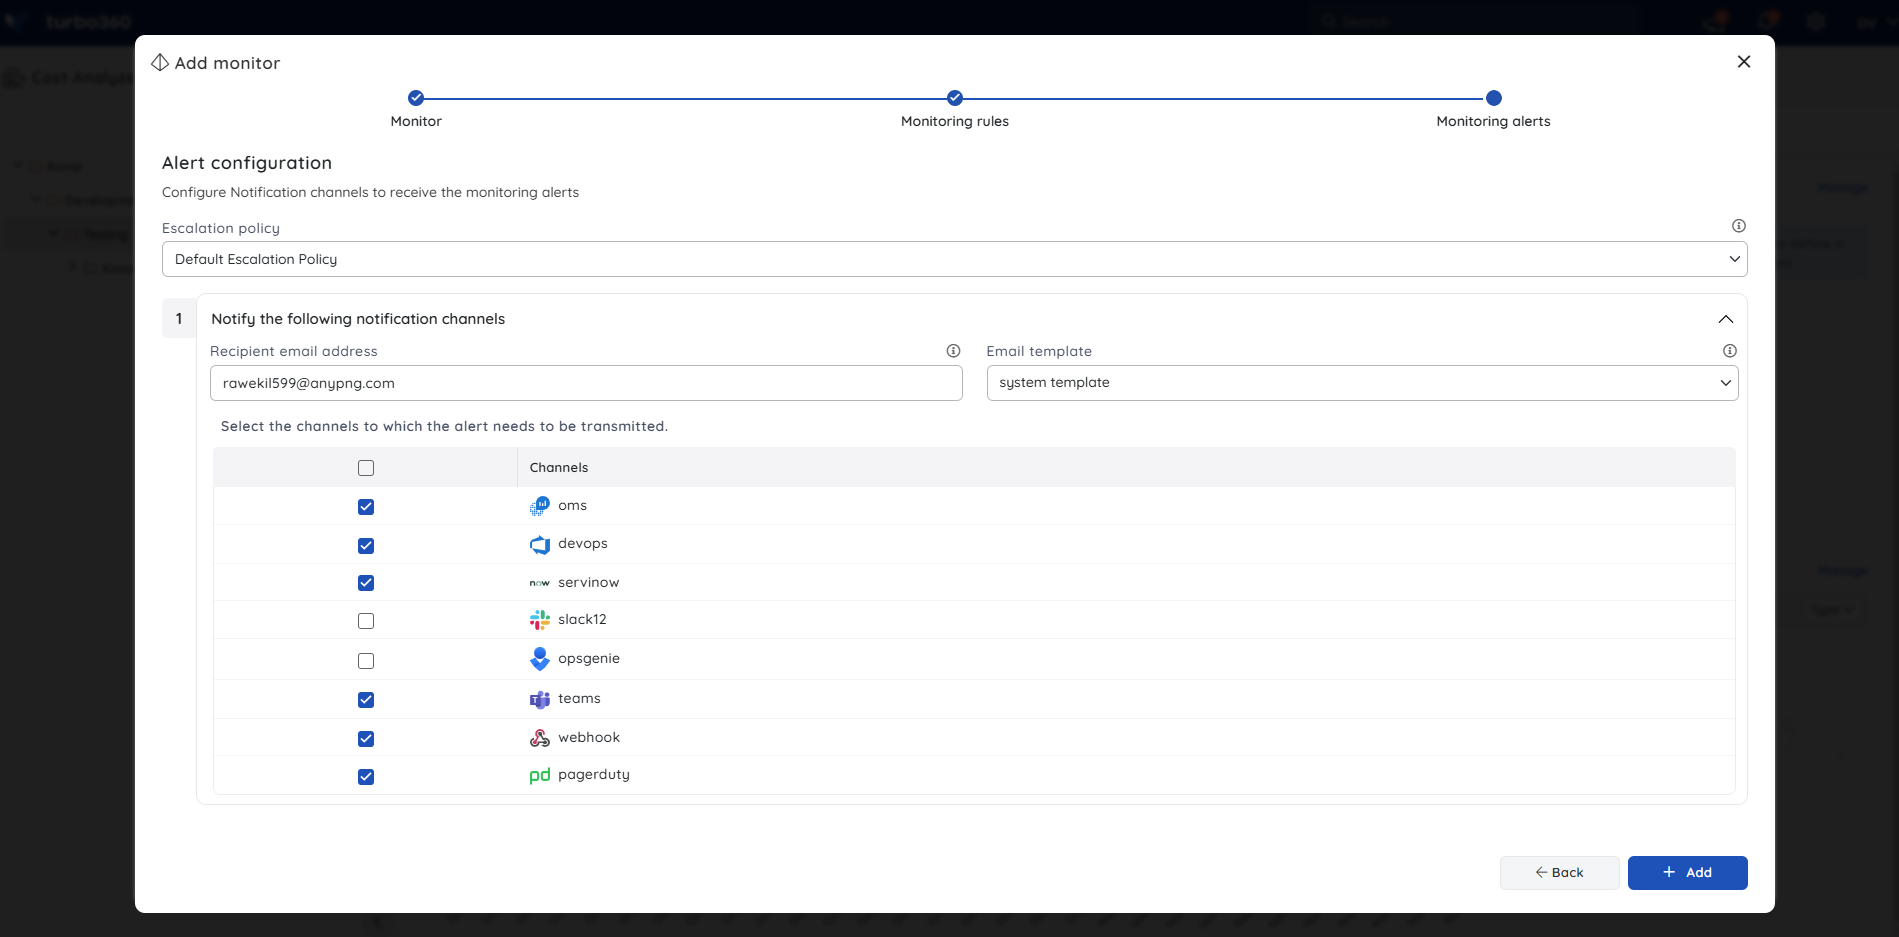
- Click Add to save the rule, then Next to configure alerts.
- Select an escalation policy with the preferred notification channel, then click Add to finish.
Update a cost monitor
Updating a monitor lets you change its name, run interval, rules, budget settings, or alert configuration without removing and recreating it.
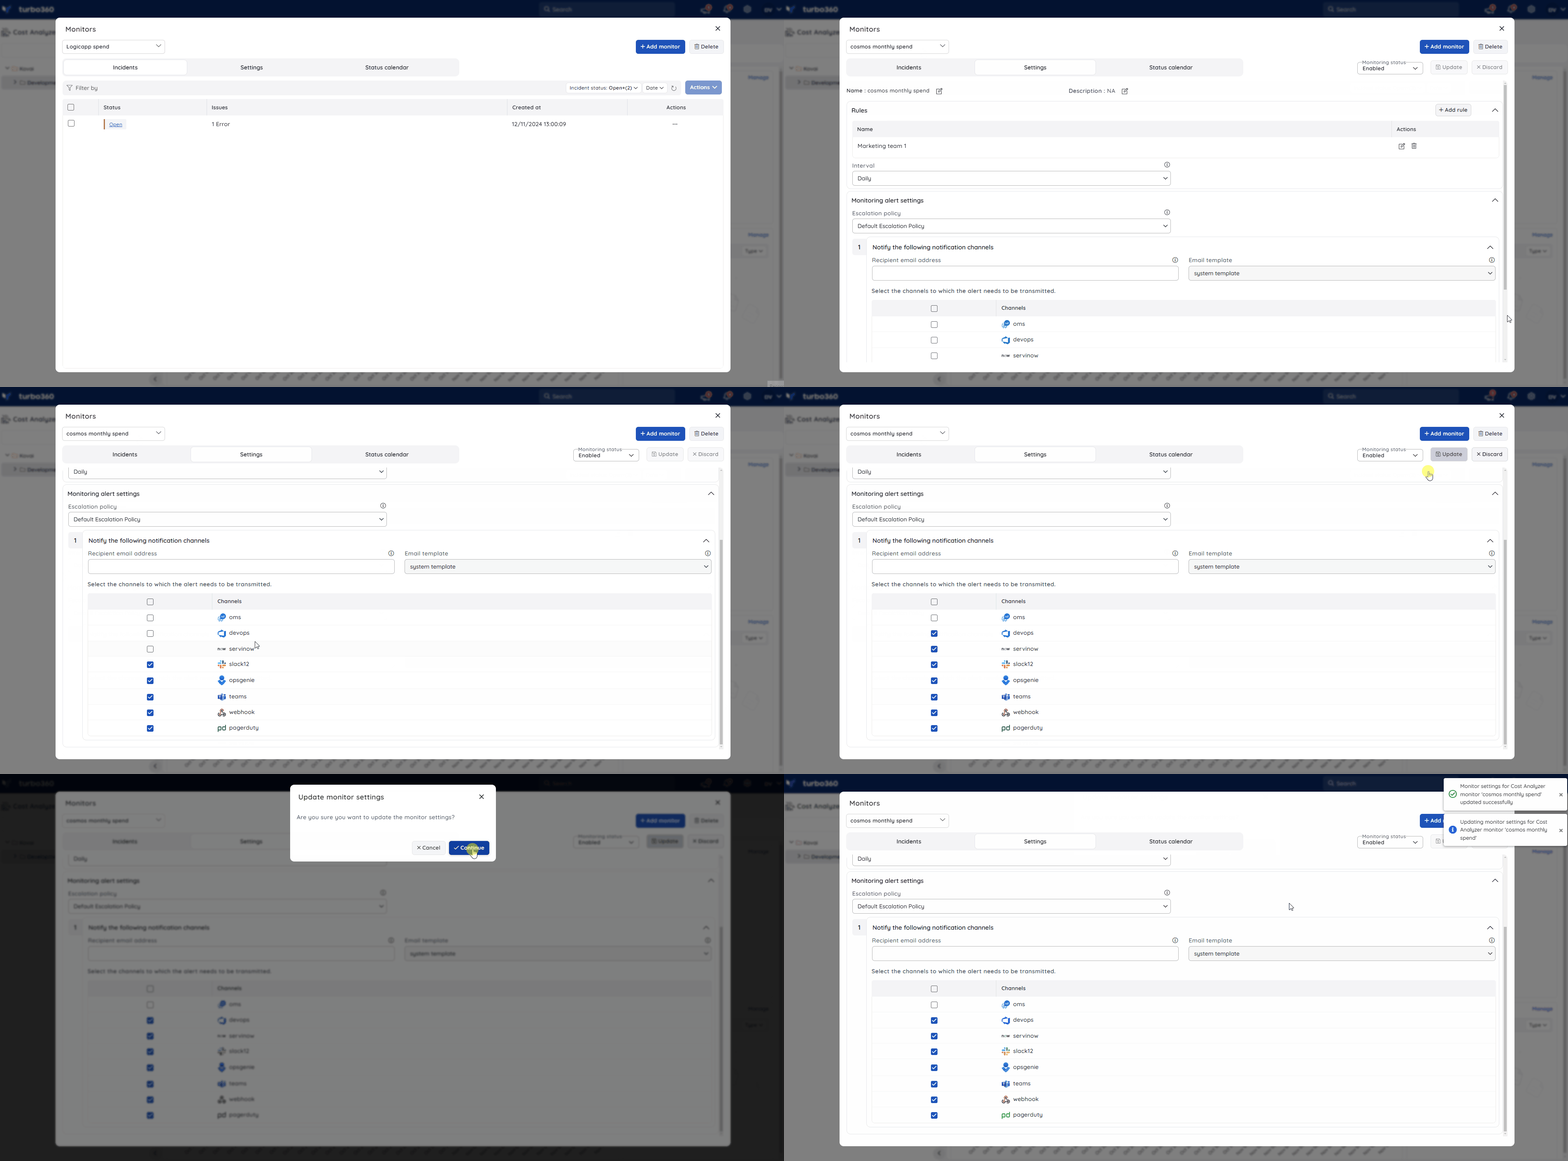
- Go to Cost management group > Monitoring and select Manage.
- Choose the desired monitor from the dropdown.
- Open Settings, make the necessary changes, and select Update.
Remove a cost monitor
Removing a monitor permanently deletes it and stops all future evaluations and alerts for that monitor.
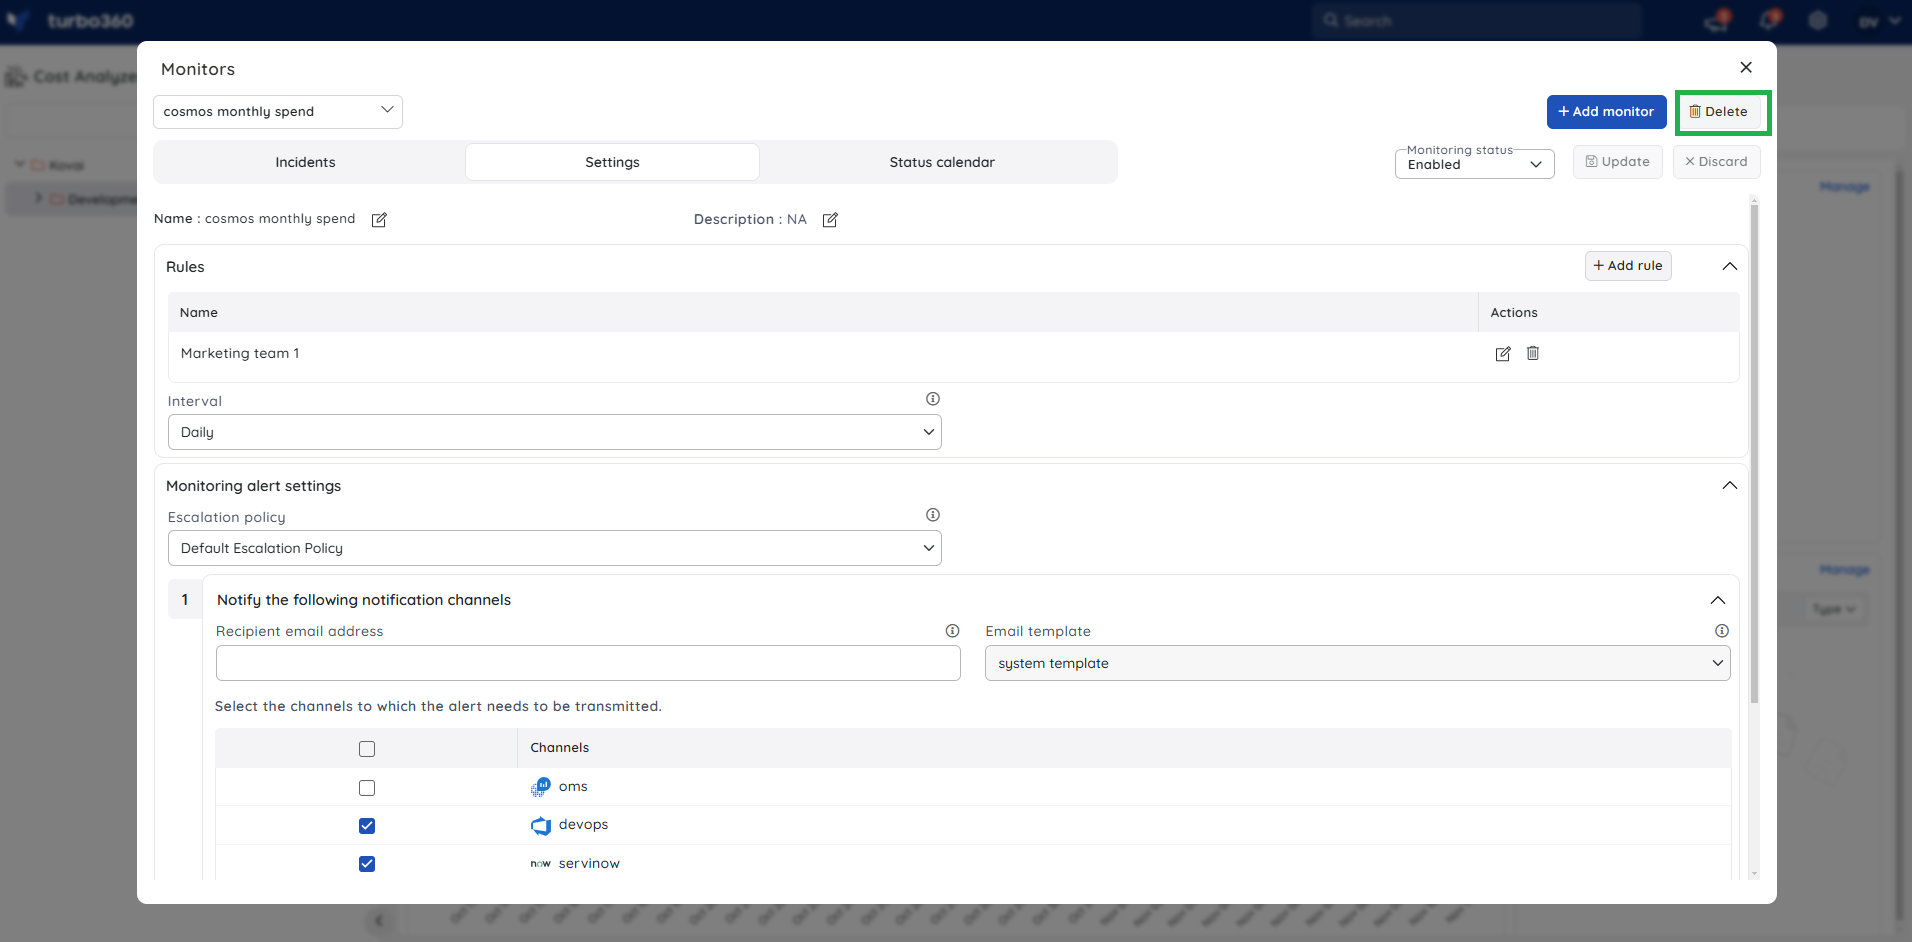
- Go to Cost management group > Monitoring and click Manage.
- Select the monitor from the dropdown.
- Click the Delete icon next to the monitor, then confirm with Delete.
Enable or disable a cost monitor
Enabling or disabling a monitor lets you pause evaluations temporarily without removing the monitor's configuration.
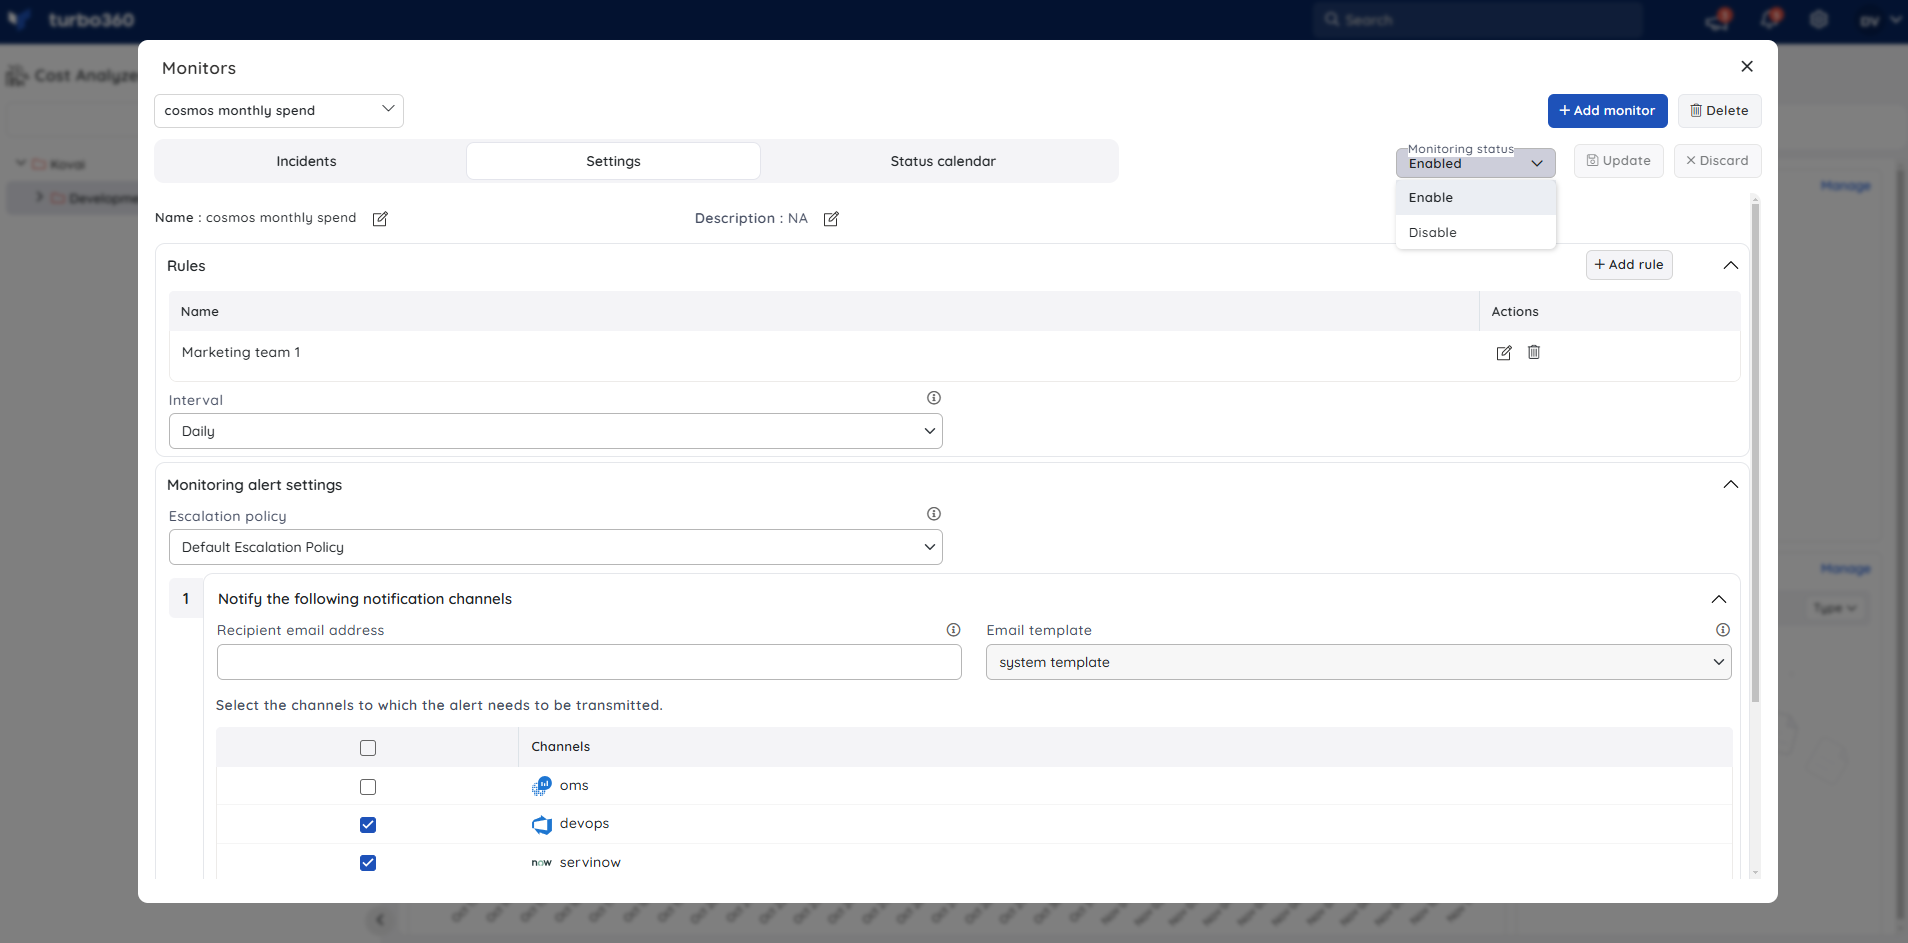
- Go to Cost management group > Monitoring.
- Use the toggle next to the monitor to Enable or Disable it.
Manage alert incidents
Managing incidents lets you track, acknowledge, close, and reopen triggered alerts so your team can maintain a clear record of cost violations and their resolution.
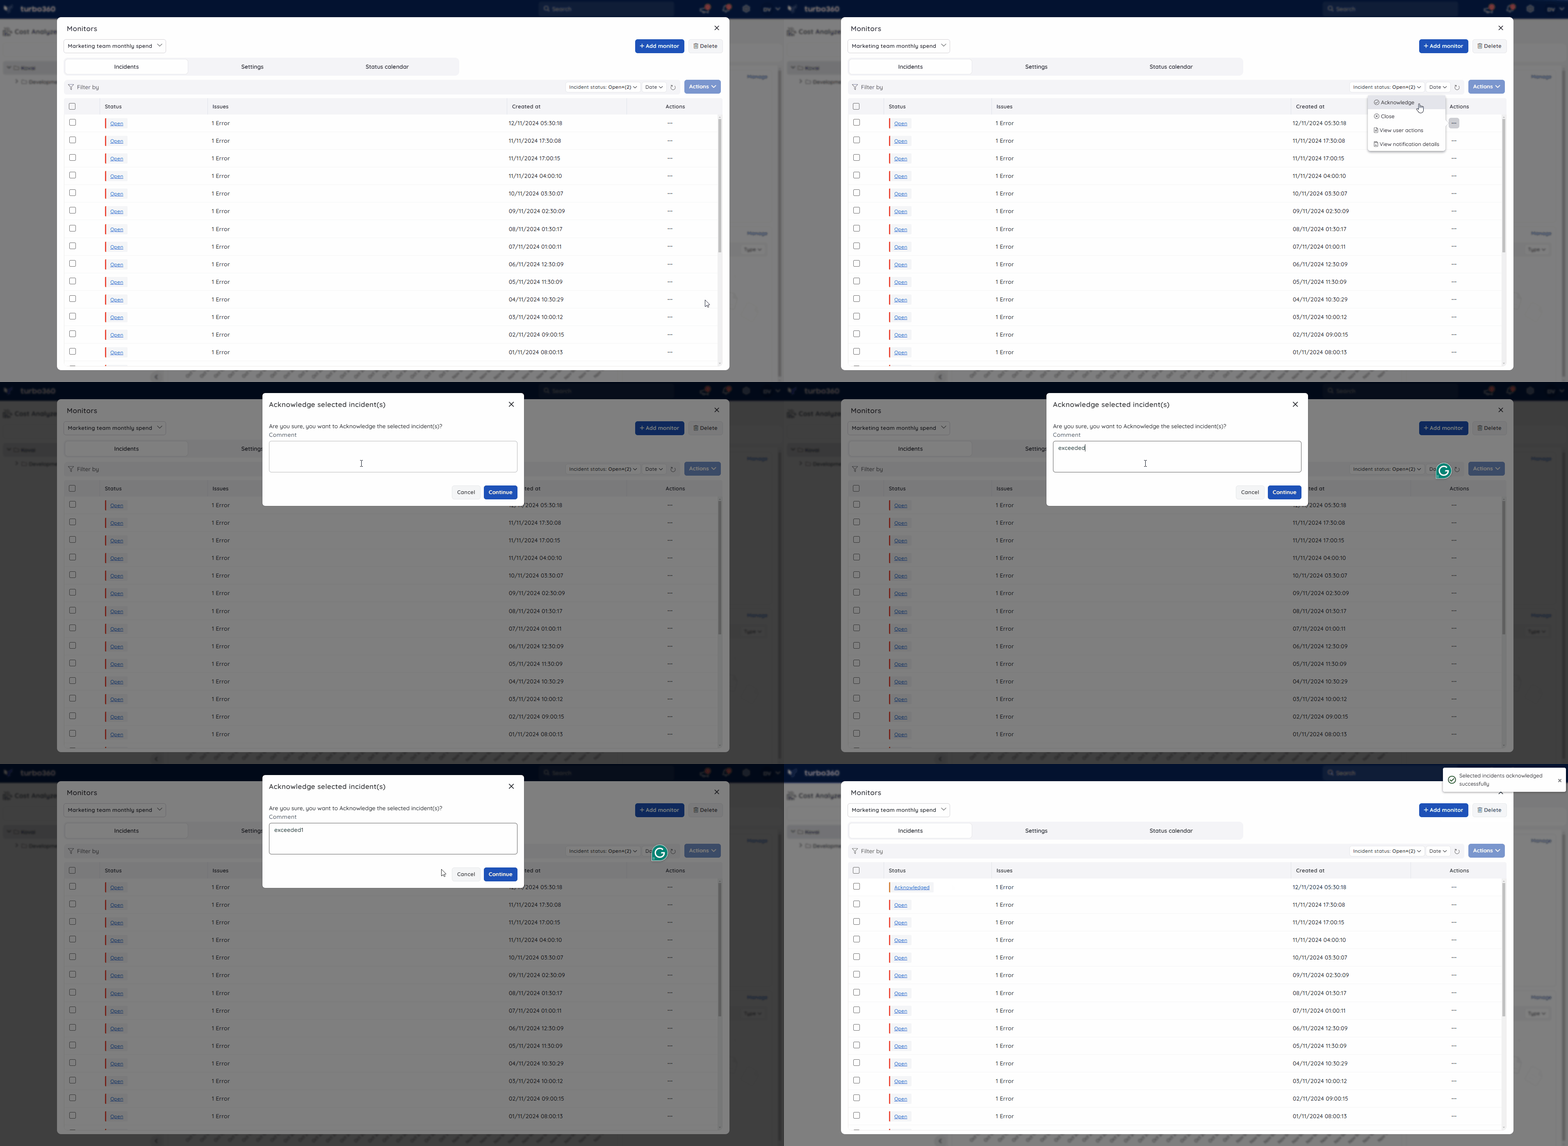
Triggered alerts appear under Incidents, accessible by clicking the state. Each incident can move between:
- Open — violations exist on the incident.
- Acknowledge — the violation is under investigation.
- Close — the violation is resolved and the incident is no longer relevant.
- Reopen — the incident is still problematic.
Change the state individually from the Context menu ( ⋮ ), or in bulk by selecting multiple incidents and choosing the option from the Actions dropdown.
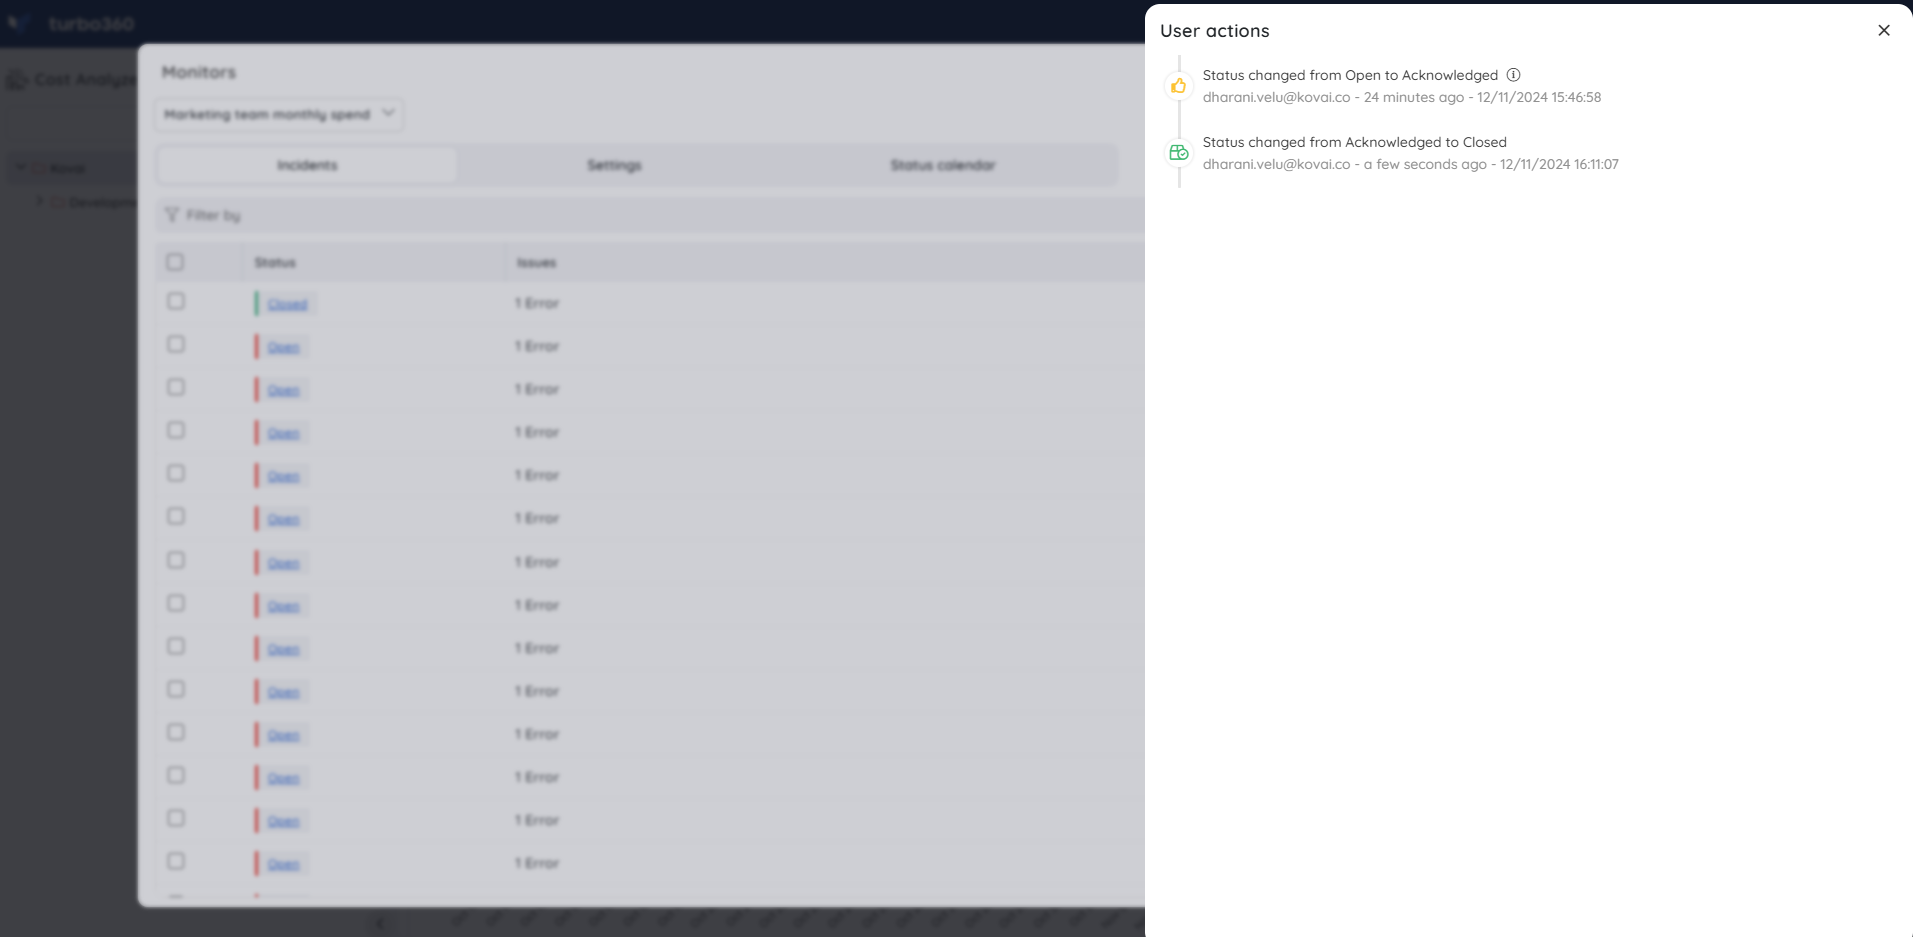
Track user actions: Select view user actions from the Context menu ( ⋮ ) of an incident to see every action taken, who took it, when, and the resulting state change.
View notification history: Select view notification details from the Context menu ( ⋮ ) of an incident to see channel-level delivery details, including the reason for any failed transmission.
Filter incidents by Incident status or Date.
Status calendar
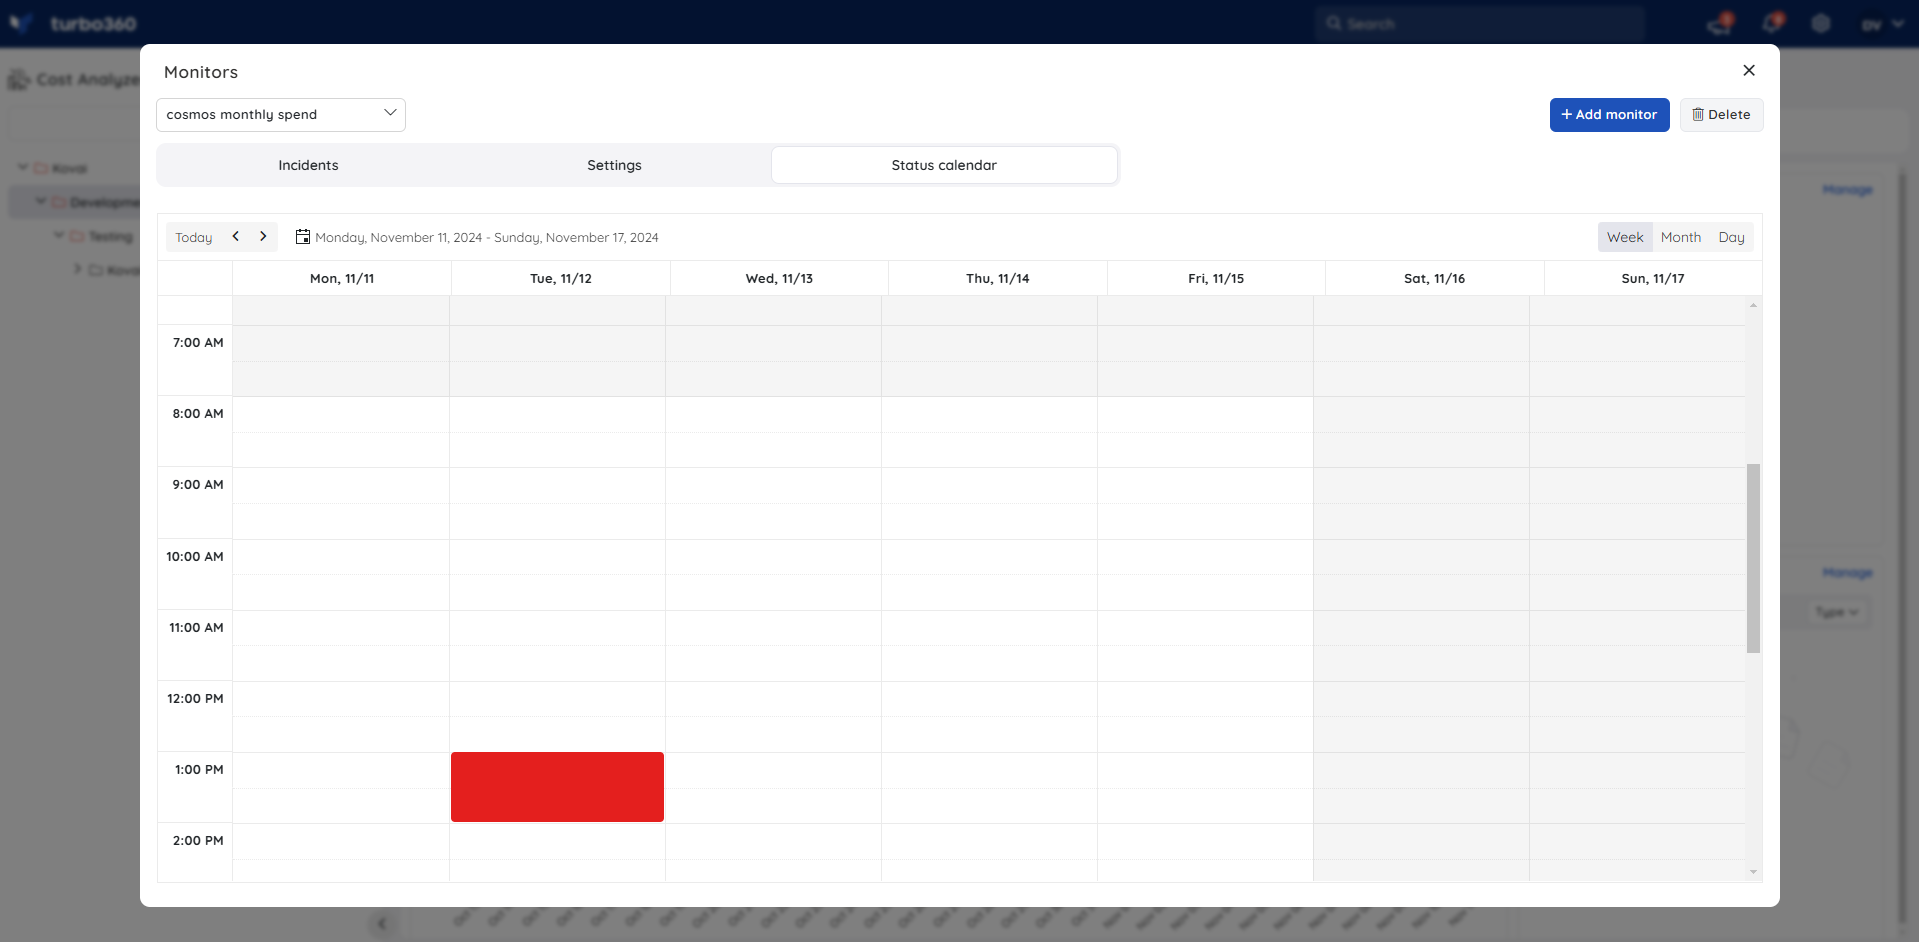
You can view the historical summary of the Cost Analyzer's cost alert status as a calendar. The last 30 days of data is always available for reference.
Configuration
| Option | Type | Default | Required | Description |
|---|---|---|---|---|
| Monitor name | Text | — | Yes | Identifies the monitor within the Cost group. |
| Run interval | Daily / Monthly / Last 7 days | — | Yes | Defines how often the monitor evaluates cost data. |
| Cost metric | Actual cost / Amortized cost | — | Yes | Determines which cost basis the rule evaluates. |
| Budget type | Static / Dynamic | — | Yes | Static uses a fixed value; Dynamic uses a defined cost difference. |
| Alert conditions | Percentage thresholds | — | No | Available only for Static budgets. |
| Escalation policy | Selection | — | Yes | Routes triggered alerts to the chosen notification channel. |
FAQs
What's the difference between Actual cost and Amortized cost?
Actual cost shows raw usage and purchase charges as they appear on the invoice. Amortized cost spreads reservation purchase charges evenly across the term and links them to the resources that used them.When should I use a Static budget instead of a Dynamic budget?
Use a Static budget when you want to monitor against a fixed value and trigger alerts at defined percentage thresholds. Use a Dynamic budget when you want to detect violations based on a defined cost difference rather than a fixed limit.Who can access cost monitors?
Users with the Monitoring feature permission enabled on their role. Read access allows viewing monitors; Manage access allows editing and enabling them.
Related articles
Was this article helpful?