

Optimization workflows
- 05 Aug 2026
- 6 Minutes to read
- Print
- DarkLight
- Download PDF
Optimization workflows
- Updated on 05 Aug 2026
- 6 Minutes to read
- Print
- DarkLight
- Download PDF
Article summary
Did you find this summary helpful?
Thank you for your feedback!
Overview
This tutorial walks you through building an end-to-end optimization workflow in Cost Analyzer. By the end, you will have reviewed idle and underutilized resource recommendations, created an optimization schedule to automate resource downscaling, and measured the cost impact of that schedule.
Business value
Acting on optimization recommendations without a structured workflow often leads to stalled decisions and unrealised savings. This tutorial shows you how to move from identifying idle resources to automating action and measuring real cost impact — turning cost intelligence into measurable outcomes.
Prerequisites
- Cost Analyzer is connected to at least one Azure subscription with imported cost data.
- At least one cost management group exists with resources that have generated recommendations. See Managing cost groups.
- The service principal used by Turbo360 has Contributor access on the target subscriptions or resource groups — required to apply schedule actions to resources.
Required permissions
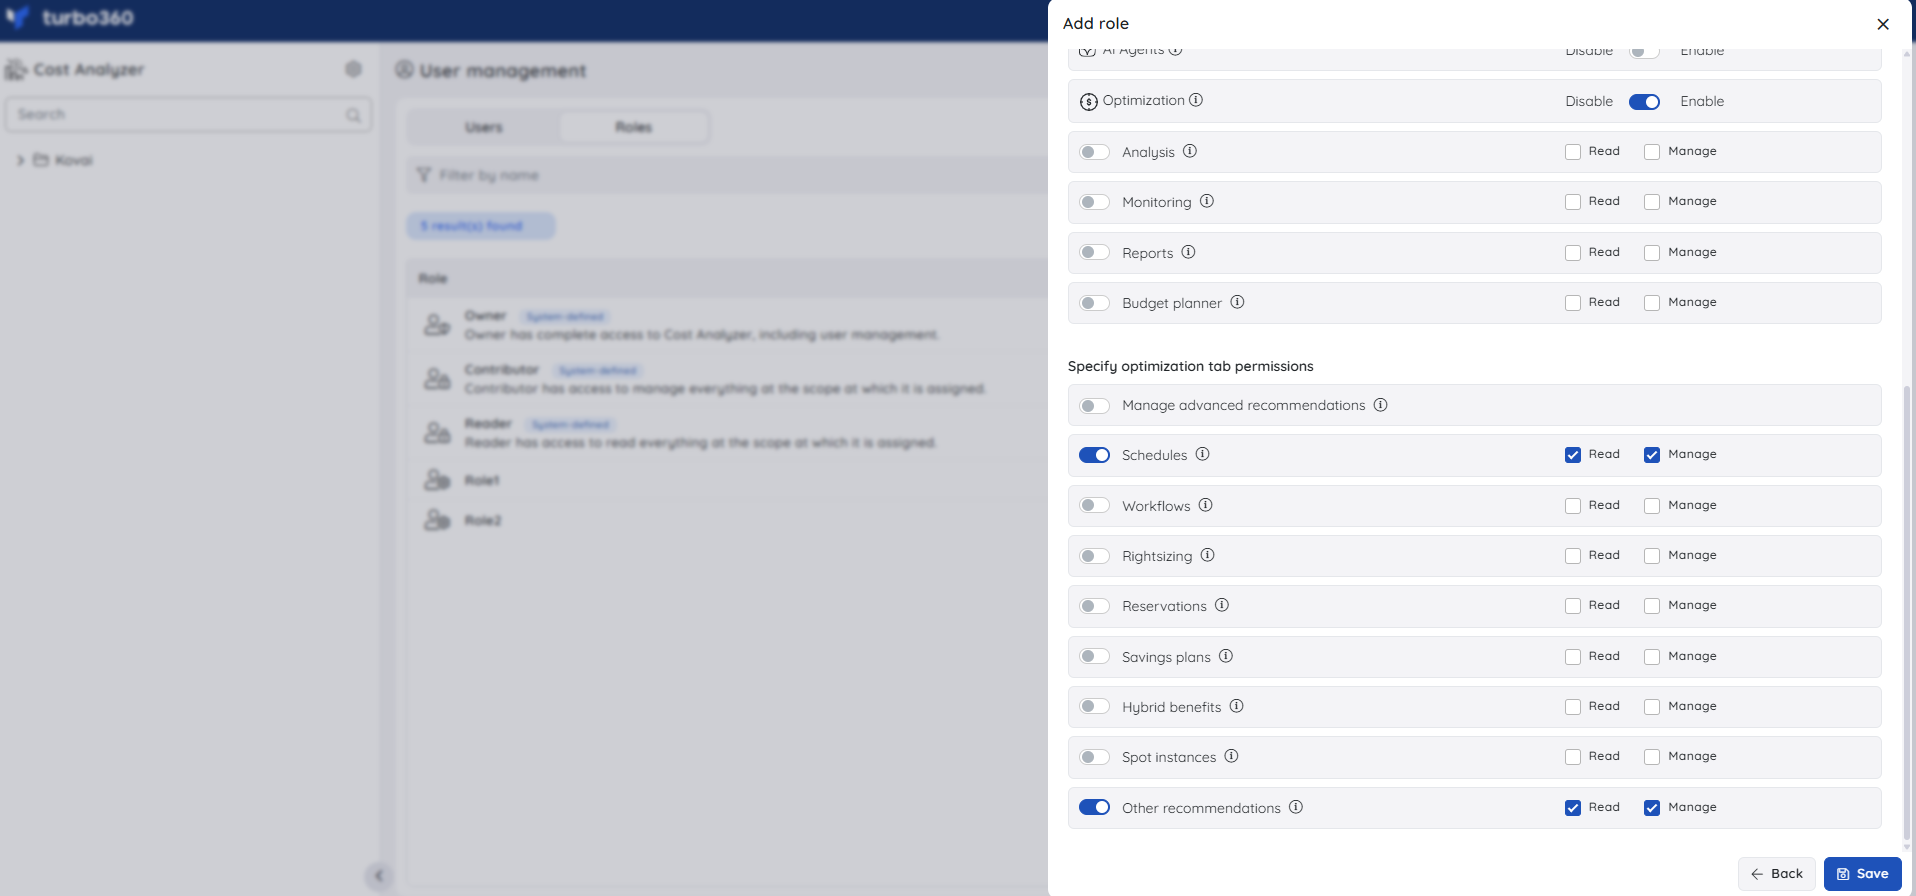
This tutorial spans three features. Each uses its own permission model under the Optimization tab.
The Optimization feature must be enabled on your role before any of the following permissions take effect.
| Feature | Permission | Access |
|---|---|---|
| Other recommendations | Read | View recommendation types and affected resources |
| Other recommendations | Manage | Trigger notifications, ignore resources, export data |
| Schedules | Read | View optimization schedules and Impact tracker |
| Schedules | Manage | Create, edit, and run optimization schedules; full Impact tracker access |
To configure: go to Cost Analyzer > User management > Roles, enable Optimization on the role, then set the appropriate permissions under Specify optimization tab permissions.
How it works
The Cost Analyzer optimization workflow connects three components:
- Other recommendations — surfaces idle and underutilized Azure resources across subscriptions, consolidated by recommendation type, so you can identify the highest-impact resources to act on.
- Optimization schedules — lets you configure automated up/down/skip hour schedules for eligible resources, defining exactly when each resource should be running, scaled down, or stopped.
- Impact tracker — automatically measures the cost difference between pre-schedule baseline spend and post-schedule actual spend, giving you verified ROI data after each billing cycle.
Working through these three components in sequence gives you a complete cycle: identify → automate → measure.
Steps
This tutorial covers reviewing recommendations, creating an optimization schedule, and measuring realised savings in the Impact tracker. Navigate to Cost Analyzer and open your cost management group to get started.
Review recommendations
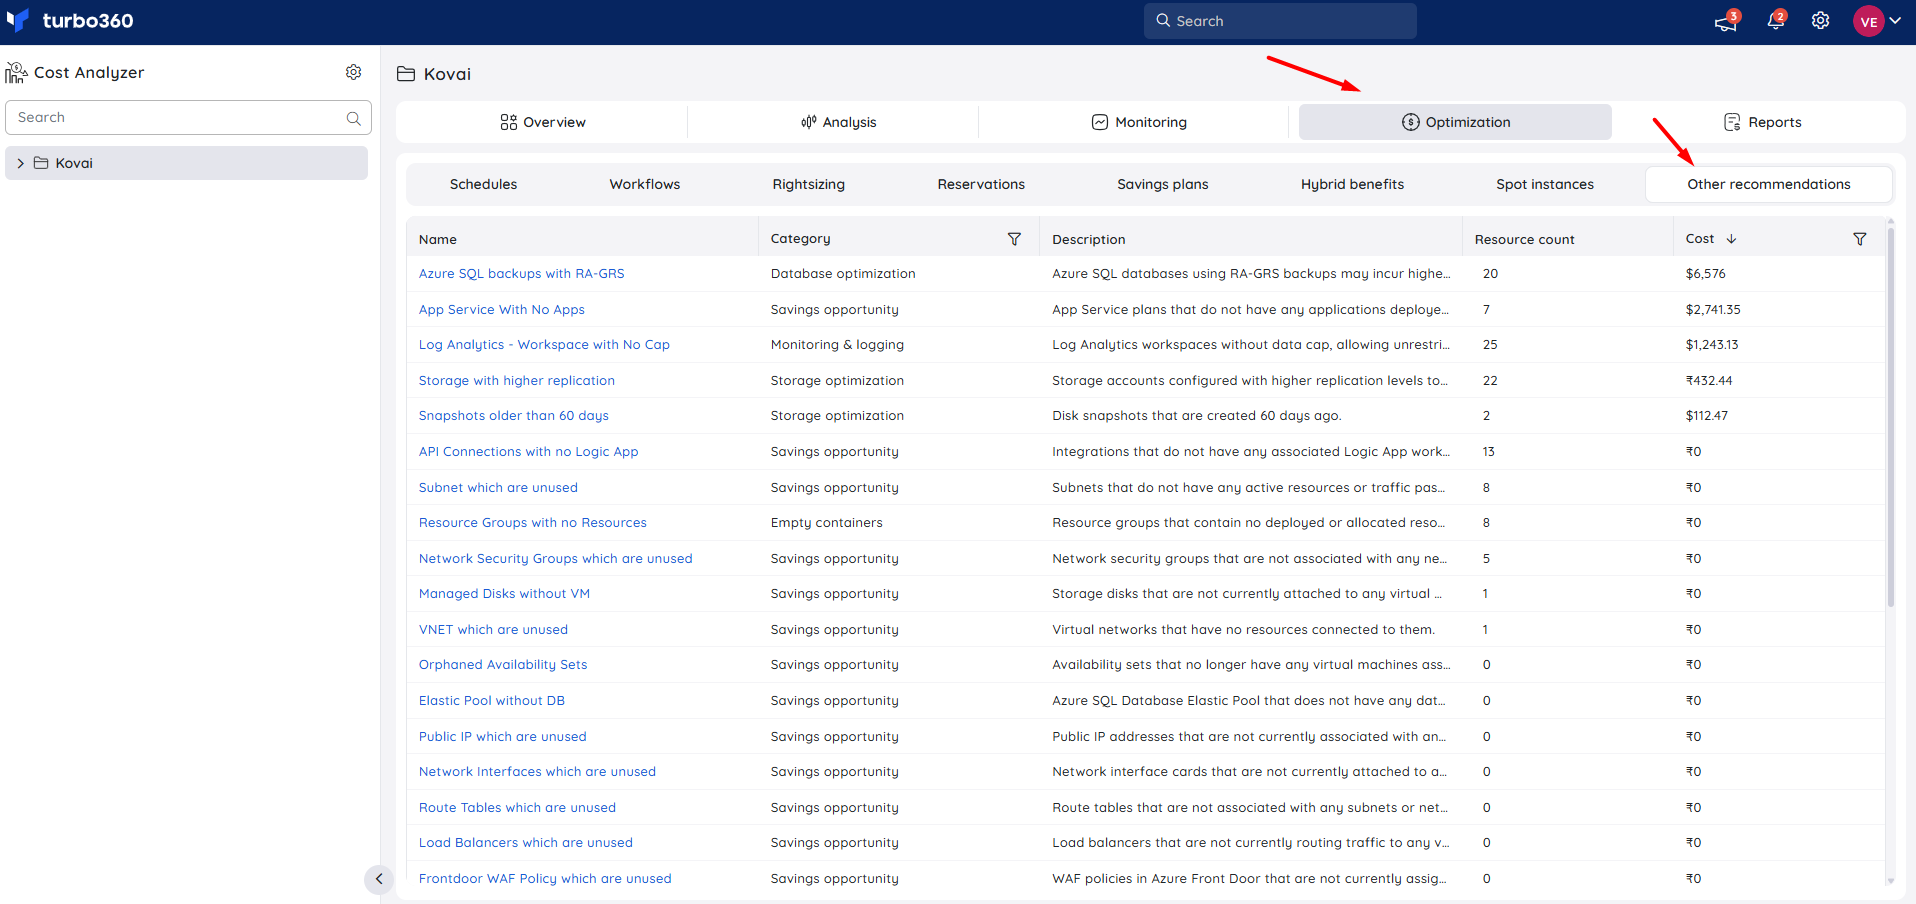
Other recommendations consolidates idle and underutilized resource findings across subscriptions into a single view, so you can identify the highest-value resources to target.
- In the cost management group, navigate to Optimization > Other recommendations.
- Review the list of recommendation types. Each type shows a description, the number of affected resources, and the consolidated cost to highlight potential savings.
- Select a recommendation type to see the individual resources identified.
- To share findings with your team, select the resources and click Actions > Trigger notification, choose your notification channels, and click Send.
- To exclude a resource you intend to keep, select it and click Actions > Ignore, then choose a permanent or date-range exclusion.
- Note the resources you want to act on — you will add them to a schedule in the next step.
Create an optimization schedule
An optimization schedule defines when Cost Analyzer should start, stop, or scale resources, running automatically once every hour based on the configured pattern.
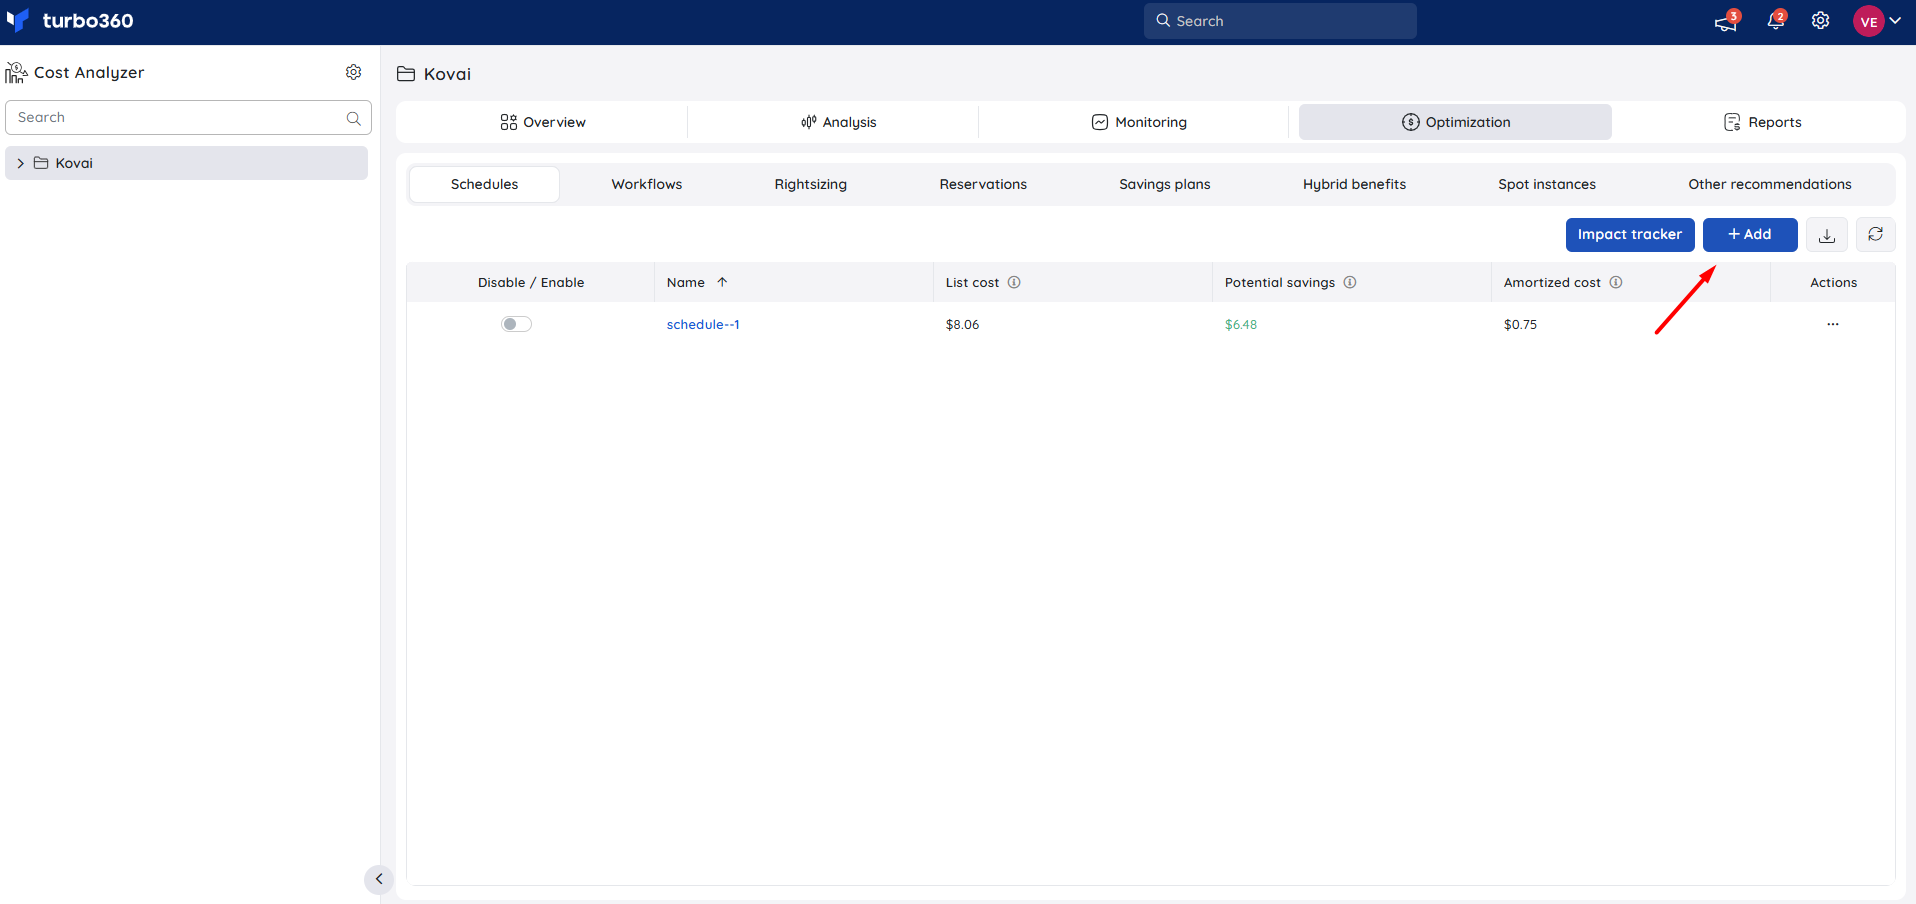
- In the cost management group, navigate to Optimization > Schedules.
- Click Add / Create optimization schedule.
- Enter a Schedule name and set a Timezone. Click Next.
- Choose a Schedule type: Weekly, Monthly, or Daily. Configure the up, down, and skip hours to match the resource's actual usage pattern — for example, set down hours on weekday nights and weekends for a development VM.
.png)
- Click Next.
- Select the resources identified from your recommendations. Assign a priority value to control execution order — lower values execute first.
- Provide the Up and Down configuration values for each resource (for example, SKU sizes for App Service Plans, or start/stop for VMs).
- Click Next.
- Configure notification channels to receive alerts when a schedule run completes. Click Next.
- Review the schedule summary and click Create optimization schedule.
The schedule begins evaluating and acting on resources on the next hourly cycle.
Note:
The service principal must have Contributor access on the resource for Cost Analyzer to apply configuration changes. Start/stop operations require Contributor at the subscription or resource group level.
Measure realized savings
Impact tracker automatically calculates the cost difference between each resource's pre-schedule baseline and its actual post-schedule spend. Data appears after at least one full day has elapsed since schedule creation.
- In the cost management group, navigate to Optimization > Schedules.
- Open the schedule you created.
- Click the Impact tracker option.
.png)
- Review the Schedules tab to see the aggregate impact cost per schedule.
- Switch to the Resources tab to see the per-resource breakdown — each row shows the resource name, associated schedule, and impact cost in both billing currency and USD.
- A positive impact means the resource has cost less since the schedule started than the baseline projected. A negative impact means it has cost more — check for increased usage, pricing changes, or new workloads added after schedule creation.
.png)
Example scenario
Contoso's FinOps team reviews Other recommendations for their Contoso Production cost management group. They find eight virtual machines flagged as underutilised on weekends. They trigger a notification to the Cloud Ops Teams channel, then create a Weekly schedule with down hours set to Friday 6 PM through Monday 7 AM and select all eight VMs. After the first billing cycle, the Impact tracker shows a combined positive impact of $2,180 — 91% of the projected savings. The remaining gap is traced to two VMs that were later found to be running scheduled batch jobs on Saturdays. The team updates the schedule to skip those two VMs on Saturdays.
Troubleshooting
Other recommendations is not visible in the Optimization tab
Cause: The Optimization feature permission is not enabled for your role, or Other recommendations has not been toggled on under optimization tab permissions.
Fix: Ask your administrator to enable Optimization and grant at least Read on Other recommendations under Specify optimization tab permissions in Roles.Schedule is created but resources are not being stopped or scaled
Cause: The service principal used by Turbo360 does not have Contributor access on the resource, subscription, or resource group.
Fix: Verify the service principal has Contributor access for the affected resources. See Service principal setup for guidance.Impact tracker shows no data after the schedule has been running
Cause: Impact tracker shows data only after at least one full day has elapsed since schedule creation. No data is shown on the day the schedule is created.
Fix: Wait until the following day and check again. If the issue persists, confirm the schedule has been executing by reviewing the History tab on the schedule.A resource shows "No impact (NA)" in the Impact tracker
Cause: No cost was recorded for the resource during the two-day baseline period before the schedule was created.
Fix: This is expected when the resource had no billed activity in the two days prior to schedule creation. A meaningful impact comparison cannot be made without a baseline.A resource type cannot be selected in the schedule
Cause: Not all Azure resource types support optimization scheduling. Supported types include App Service Plan, Virtual machine, Virtual machine scale set, SQL Database, SQL Elastic pool, SQL Managed Instances, Logic Apps, Data Factory Pipeline, Synapse Pipeline, Cosmos SQL container/database/table.
Fix: For unsupported resource types, implement downscaling manually in the Azure portal.
Related articles
Was this article helpful?